55 DIY Halloween Indoor Decoration Ideas So Good, Guests Won’t Want to Leave Your House
Updated on November 19, 2025
It can be tricky to find the right indoor Halloween decorations for your home. Families with children must take all age groups into account and find solutions to satisfy everyone’s needs. Meanwhile, couples are usually focused on hosting parties for grownups.
However, we did all the research, wanted to help you make the right decision for this year’s Halloween, and handpicked the best indoor Halloween decorations that work for both adults and children.
17 Best Indoor Halloween Decorations
The following ideas work for all age groups, not just kids. Some of them are stylish, while others are spooky.
1. DIY Embroidery Hoop Halloween Bat Decor
Decorating an embroidery hoop bat decor is a cool and inexpensive solution when looking for Halloween indoor decoration ideas. Since it’s built on an embroidery loop made out of wood, it works well with other wooden elements in your home.
To complete this project, get an embroidery hoop, thread, a pair of scissors, black glittery foam, and a needle. Get started by drawing the bats and cutting them out of the black glittery foam. If you are not creative enough, you can easily find a bat model on the Internet in order to download and use it as a template.
Next, you can shift your attention to the embroidery by starting with a knot and working your way back and forth to create the design using a needle and thread. It’s a pretty time-consuming process, so arm yourself with patience at this stage.
We are sure that you will love the results. It’s a pretty tame bat decor that works with any Halloween theme. Don’t miss out on this easy tutorial to learn every step of the way.
2. Halloween Wall Decor
Here’s a pretty neat idea that you can try for Halloween when it comes to wall decor: spider embroidery. It’s a fun project that will not only help you prepare for the spookiest night of the year but also unwind after a hard day’s work.
To tackle this project, you will need a pair of scissors, a hot glue gun, a paintbrush, black pipe cleaner, black acrylic paint, a wooden frame, a hanger, black pompoms, googly eyes, faux feather, artificial roses, black silk ribbon, and white lace. You should be able to easily obtain them from the local crafting store. Otherwise, the Internet is at your disposal.
Begin by starting the wooden frame with black paint. Afterward, you can create the spider legs by cutting the black pipe cleaner, make the spider head using a small pompom, googly eyes, and the hot glue gun, and design the spider’s body.
Once all these elements are ready, you can glue the white lace to the black wooden frame before decorating it with the feather, roses, spider, and lace. Check out our easy tutorial to discover how to easily create this cool spider embroidery wall art.
3. Halloween Bedroom Decor
A bedroom is a place for intimacy, so you might not necessarily want crazy Halloween decorations that could disturb your time of relaxation. So, when it comes to Halloween, we suggest opting for this super chilled Halloween decoration idea that creates a relaxing autumn atmosphere.
It’s one of the easiest projects on this list since you need minimum supplies: fake pumpkins and paint. If you want to stick to the colors shown in the image above, you can paint the pumpkins orange and white. Of course, you can choose any colors you find relaxing, such as muted green, blue, or peach.
Make sure to add a plastic cover to the floor to protect it from the paint. After it dries off, you can place the pumpkins in your bedroom and celebrate Halloween without having to lose a good night’s sleep.
4. Halloween Window Decor
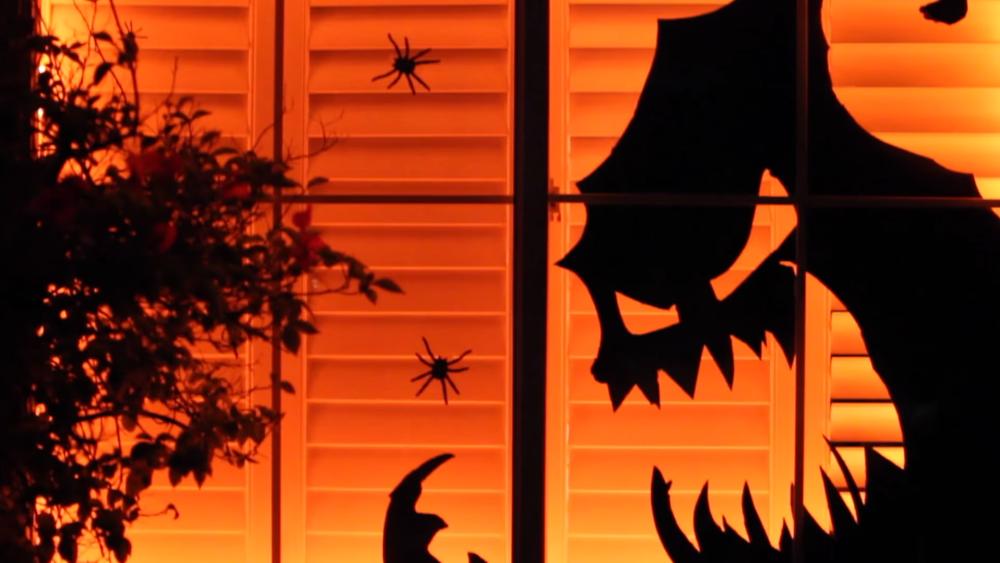
We think this is a super exciting Halloween window decor idea since it has a major impact on your guests and trick-or-treaters. Plus, it’s easy to accomplish since you don’t need any special tools.
Check out this cool YouTube tutorial created by Living to DIY with Rachel Metz to learn the exact steps you need to take. What you need are three large and black pieces of cardboard, a pencil, a cutter, a staple gun, black spray paint, and Halloween mini lights. Orange white bulbs work best, but you can also get white bulbs from your box of Christmas decorations.
Begin by placing the three cardboards side by side to fit your window frame. Then, you can draw the scary black creature in pencil before cutting it out. If you don’t trust your drawing skills, you can find a large design on the Internet and print it out to use as a template.
When using the cutter, the edges will be rough, but you can use the scissors to smoothen them out. In the next step, use the black spray paint on the edges of the silhouette figure to make sure that it’s entirely black.
The design should be ready now. What’s left to be done is to hang the light bulbs around the frame of your window, which you can fix using the staple gun. Once this part is over, you can assemble the creepy creature in the window by placing the cardboards in the correct order.
To top it off, you can stick spider decorations to the window, which you can buy from the local crafting store or make out of leftover black cardboard. Wait for nightfall and turn on the mini lights to admire your creation. We are sure that you are going to fall in love with it.
5. Halloween Home Decor
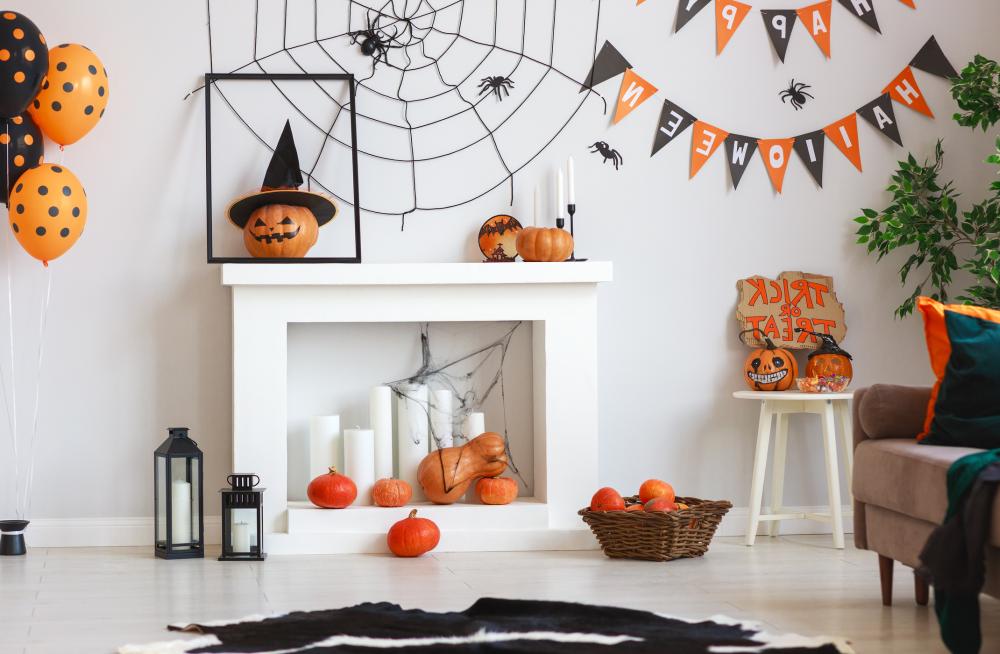
Here’s a nice idea for Halloween home decor, which should work with a simple theme when throwing a party at home or just preparing your house for the festivities. As you can notice in the picture above, there’s a lot going on here, such as a large spider web with spiders hanging on the wall, a pumpkin witch complete with a witch’s hat placed inside a simple black frame, as well as Happy Halloween garlands and spooky candles.
You can also add black and orange balloons, mini pumpkins of various colors painted with scary faces, a trick-or-treat sign made out of wood, together with black and orange decorative pillows to throw on the couch.
As you can see, it’s a pretty grown-up theme, but we are certain that some older kids would appreciate it, too. There are some do-it-yourself instructions involved, too, since you need to decorate the pumpkin witch and mini pumpkins. But we are sure that your results will be awesome.
6. Indoor Halloween Decorations
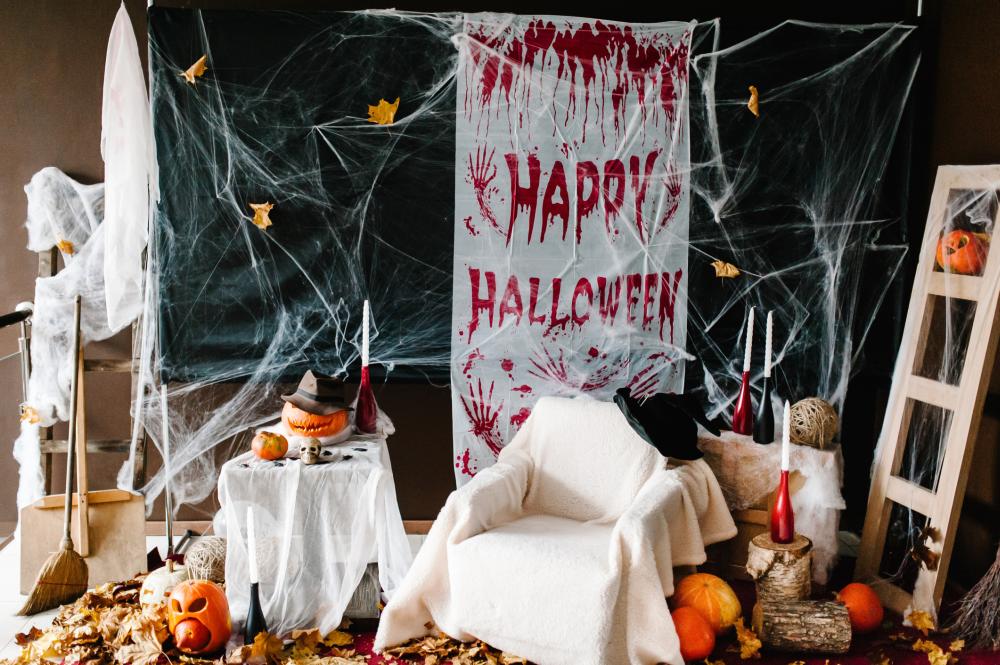
Check out this stunning indoor decoration idea for Halloween, which is definitely more adult than the previous idea we have seen. For starters, it has fake blood, at which kids would surely freak out.
There’s a lot of spider web in this picture, which you should be able to create using cotton balls. It’s also worth finding some old white sheets to throw on an armchair, end table, and standing mirror in order to create the haunted house feeling.
On the back wall, you can add an old black sheet that can be covered in a spider web. And you can put a smaller white sheet on top in order to write Happy Halloween or a scarier message in red paint. The trick is to make it look bloody, so bloody hands are definitely a must. It’s probably the most difficult part to do out of all elements in this picture.
Make sure to insert more Halloween elements into this ensemble, such as a mini pumpkin with a werewolf hunter hat, an old broom, creepy red and black bottles filled with tall white candles, and so on. Feel free to put your creativity to the test and let us know how the final draft looks like.
7. Indoor Halloween Decoration Ideas
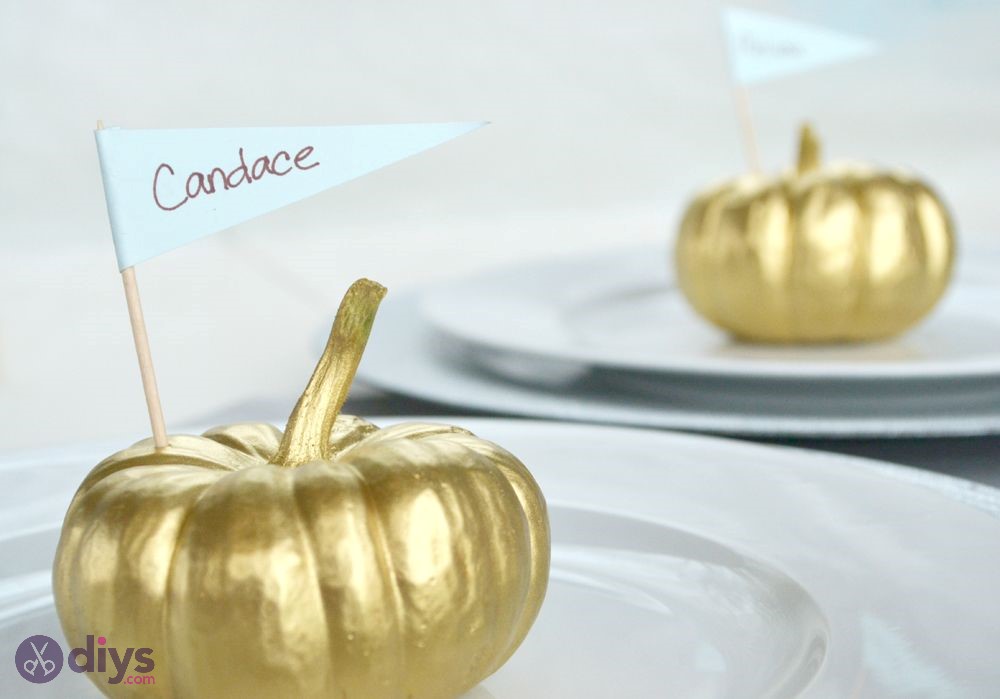
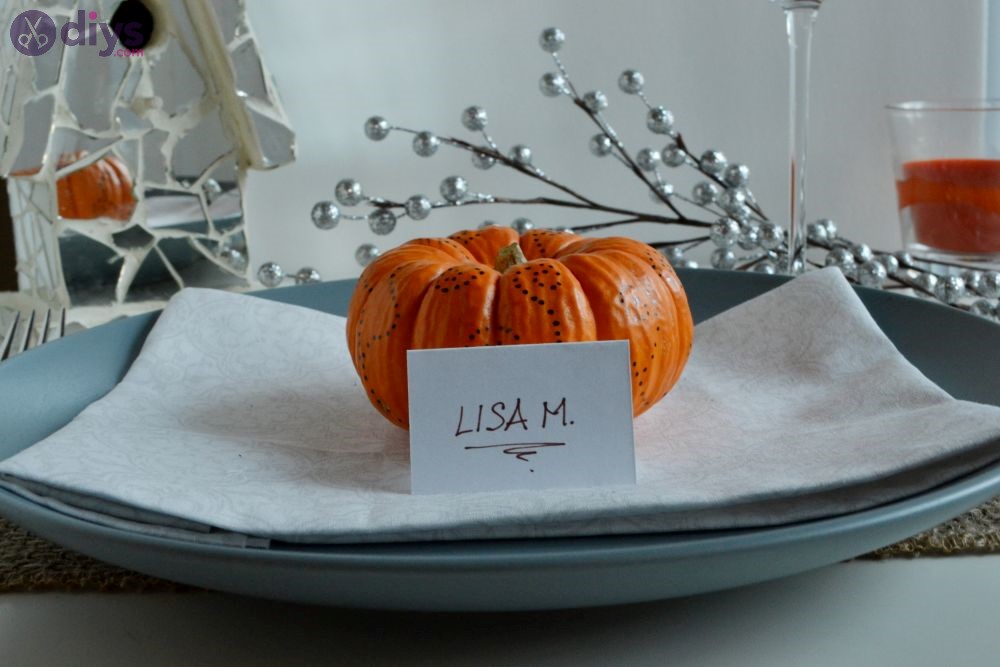
If you are looking for elegant and classy indoor Halloween decoration ideas, you can’t go wrong with the vibrant pumpkin place card setting. It can easily become a table centerpiece and a great way to seat your guests.
To complete this project, you need miniature real or fake pumpkins, gold spray paint, cardstock, a pencil, a ruler, craft glue, a pair of scissors, a Sharpie marker, and toothpicks. Read this easy tutorial to find out how to correctly combine all these elements and produce stunning results.
Start by spraying the mini pumpkins in the color of your choice. You can also go with multiple colors, although we feel that it would ruin the vibe of the placeholders. Let the paint dry, during which you can draw tiny flags on cardstock in order to cut them out and write the names of your guests.
The flags can be attached to the pumpkins using toothpicks. Then, you can place the vibrant pumpkin place cards on the plates of your guests and wait to receive a shower of compliments for your amazing idea.
8. DIY Halloween Decorations Indoor

The mini do-it-yourself pumpkin place cards are a terrific last-minute solution when searching for an indoor decoration idea for Halloween. What’s more, you can turn them into table centerpieces with minimum effort. And, at the end of the night, each guest can bring home their place card as a reminder for your Halloween party.
Get started by making a guest list to find out exactly who is coming to your party and how many mini pumpkins you will need. As far as supplies are concerned, you will need white mini pumpkins, gold metal floral wire, patterned scrapbook paper, coordinating solid colors of cardstock, white cardstock, a hole punch, round nose pliers, and glue.
Check out our intuitive tutorial to find out the exact steps you need to take to complete this project. It would go easier if you had a die-cutting machine, especially if you want to give the place cards a professional look. However, there’s no harm in going with a rectangle die and scissors either.
If you are not pleased with the color of the pumpkins, you can spray paint them in any other color you want. Don’t forget to include the stem and to use a protective sheet to protect the surface from paint.
Once the place cards are cut, painted, and written, you can attach them to the mini pumpkins using floral wire. Then, place the mini pumpkin place cards on places when setting up the Halloween dining table, and watch the look on your guests’ faces.
9. Black and White Patterned Pumpkin Halloween Decorations
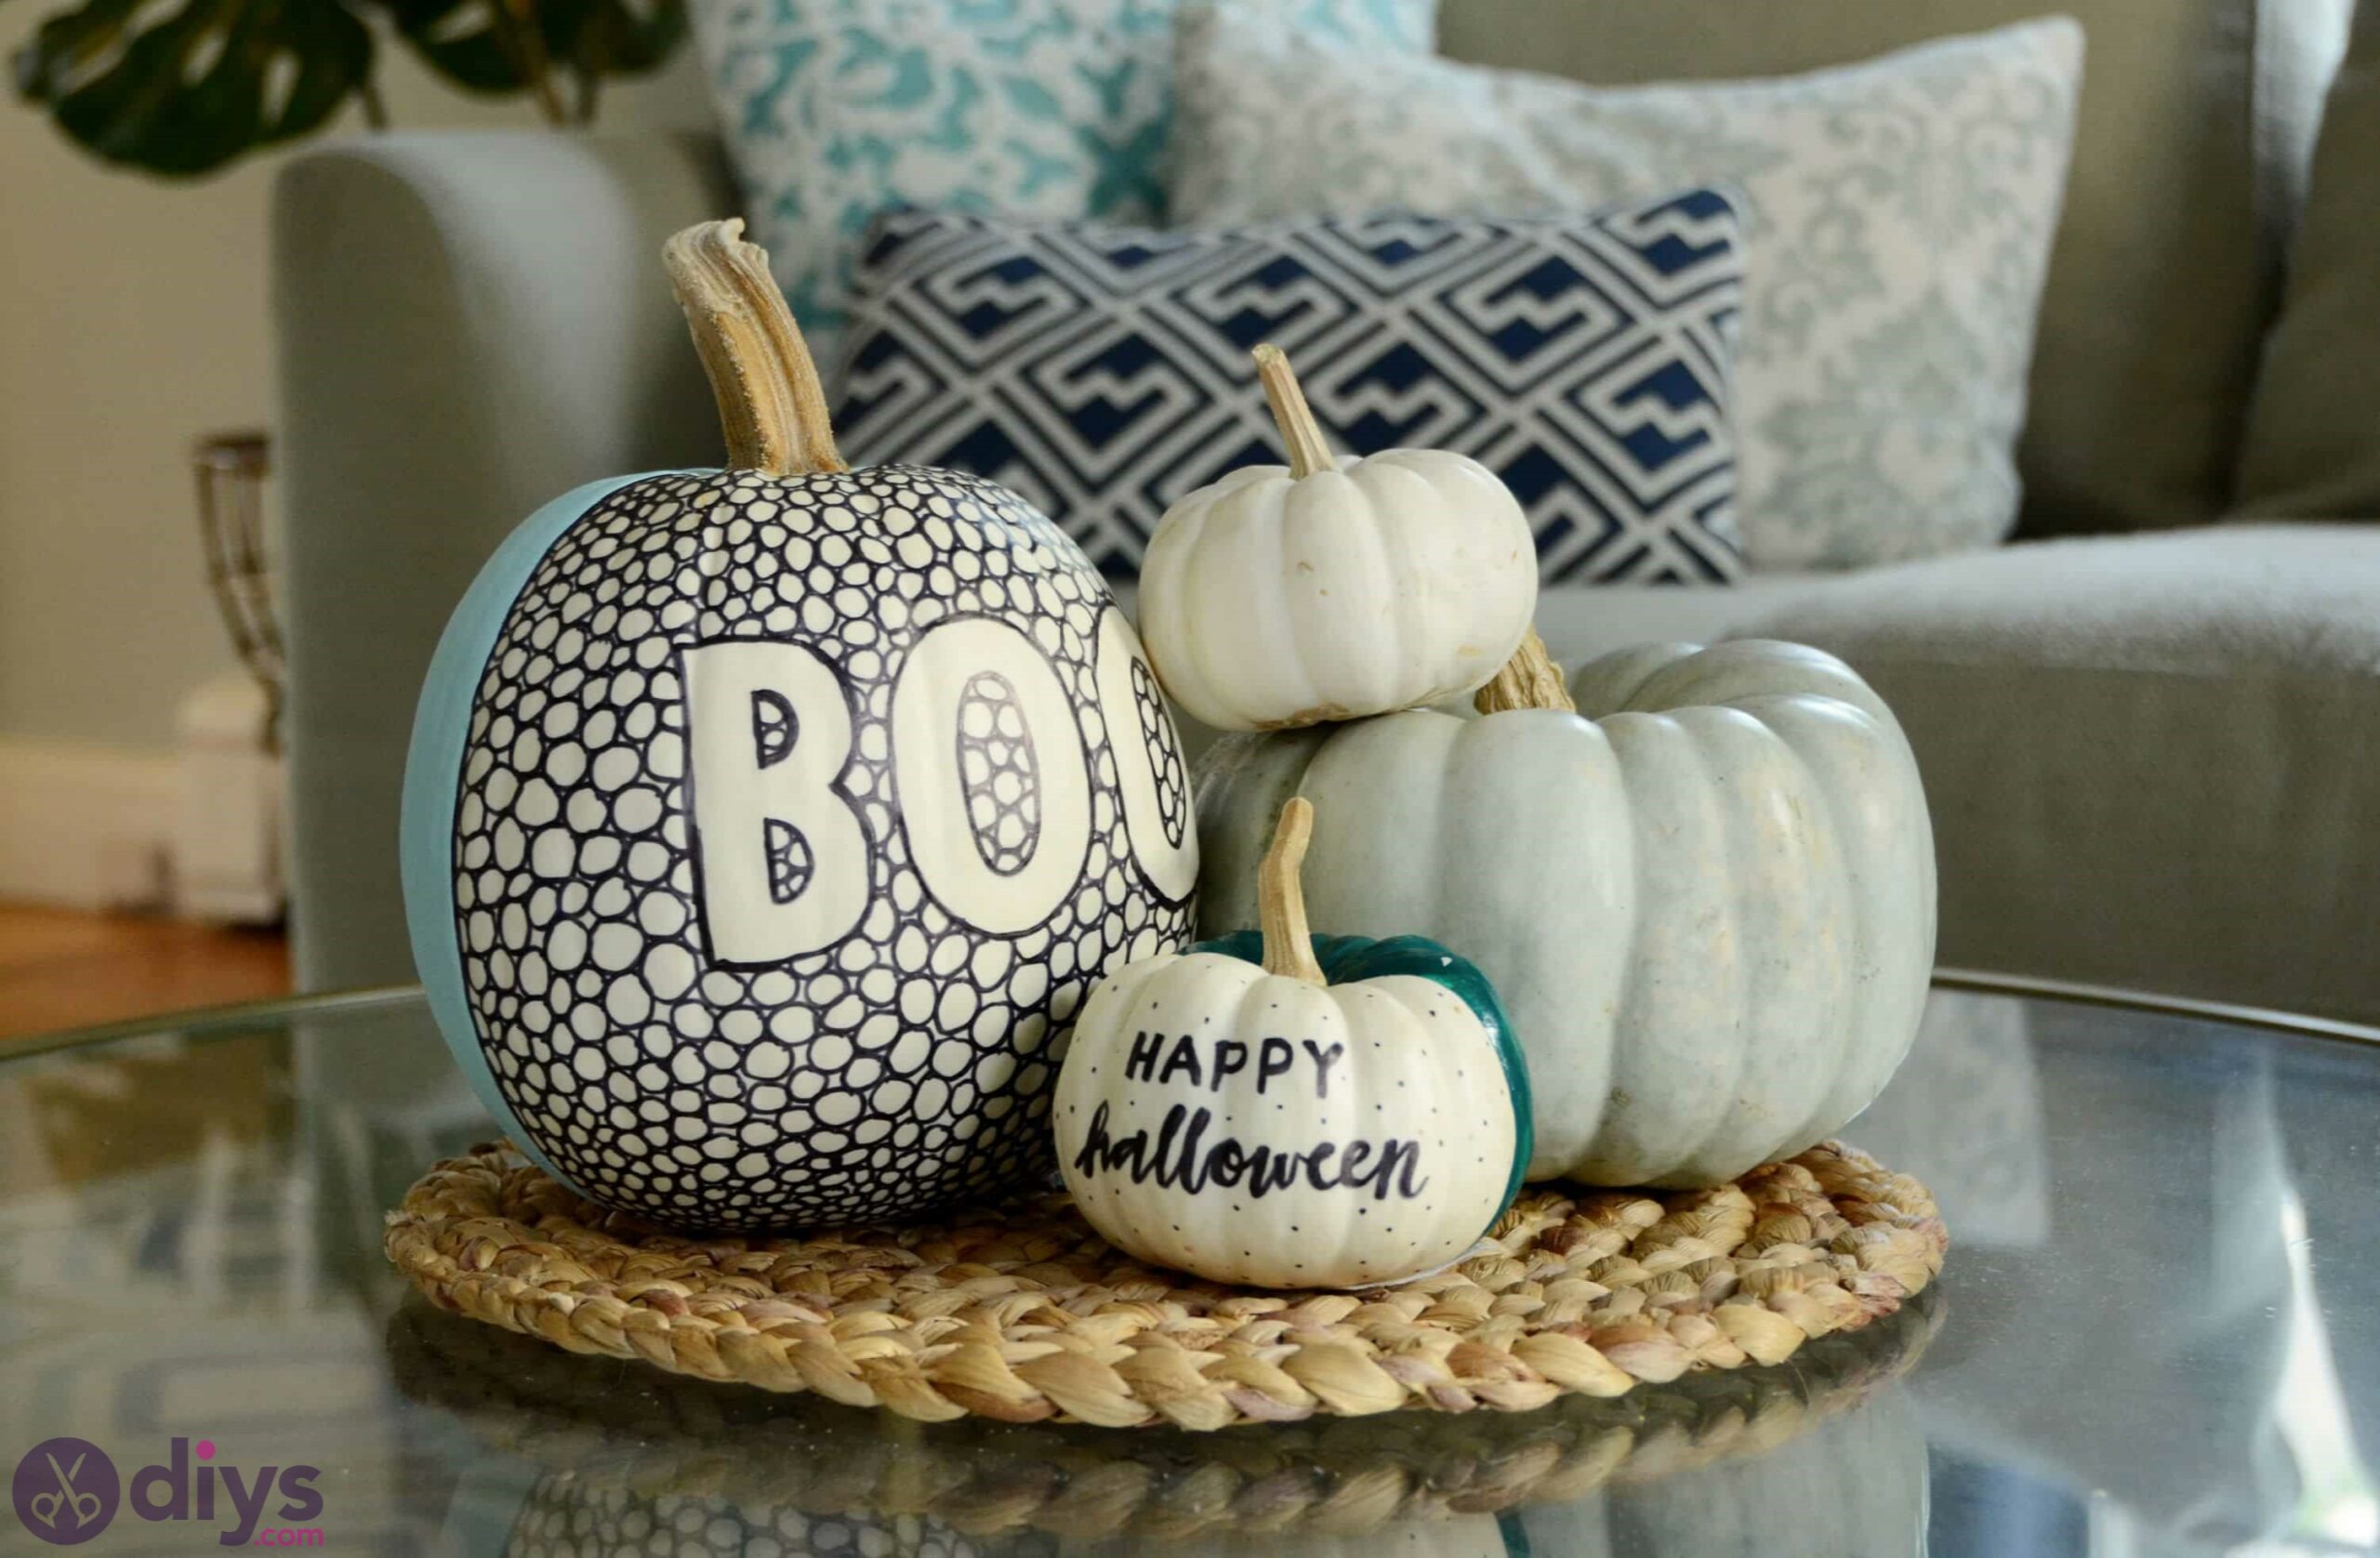
This cool black and white patterned pumpkin idea puts a nice twist on the classical orange pumpkin. Furthermore, it’s an elegant solution for grown-up Halloween parties, and it’s pretty easy to accomplish.
Check out our easy tutorial to discover how to complete this project in five simple steps. When it comes to supplies, you need a white pumpkin, acrylic paint, adhesive letters, a black Sharpie marker, a blue painter’s tape, and a foam craft brush. If you don’t like the colors shown in this example, replace them with anything you want.
The results can be best noticed when using a large pumpkin that stands out. You can also add multiple mini pumpkins around it that stick to the same theme in order to create an exquisite ensemble that your guests and trick-or-treats will surely appreciate.
To get started, you attach the blue painter’s tape to divide the pumpkin in half in order to paint just one half using the acrylic craft paint and a foam brush. After letting the paint dry, it’s wise to apply a second coating in order to create a solid color.
You can attach the letters on the other half to spell out a message, such as Happy Halloween or something shorter like BOO. On the same half as the letters, use the Sharpie marker to draw a pattern. And that’s it! There are numerous designs to choose from for this concept. Whatever you pick, the results will definitely look stunning.
10. Easy DIY Halloween Decorations
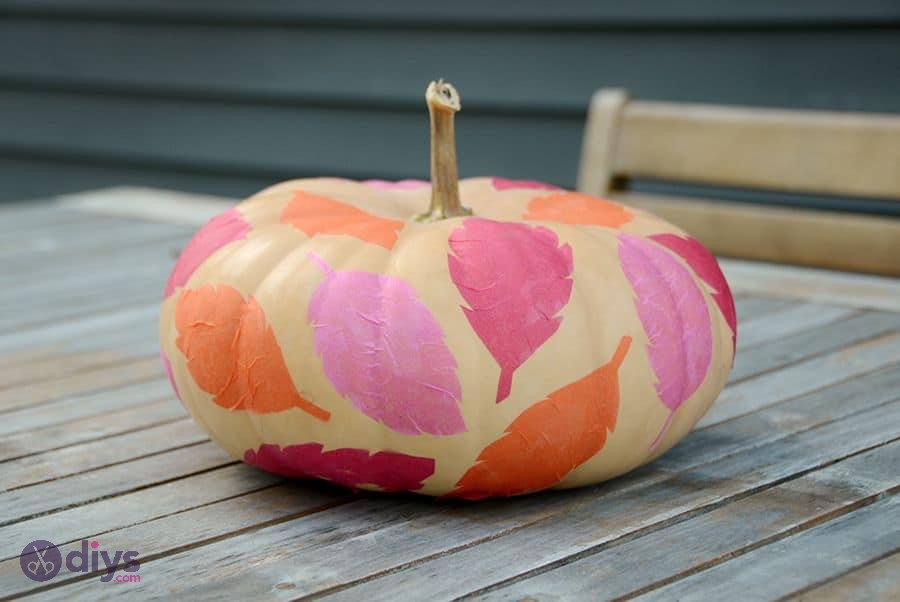
Pumpkins can take any color, thanks to do-it-yourself techniques that allow you to turn them white, black, red, pink, or anything else. However, for this easy DIY Halloween decoration idea, we suggest going with the paper maché technique.
Read our intuitive tutorial to discover how to effortlessly embellish pumpkins with tissue paper in the shape of leaves to express an autumn feeling and add a nice touch to your indoor Halloween decorations.
To make this project happen, you will need a pumpkin, Elmer’s glue, a plastic cup, a foam brush, a pair of scissors, as well as colored tissue paper.
Cut tissue paper into multiple rectangles of the same size, place them on top of each other, and draw a leaf on the first layer. Then, using your scissors, cut the leaf out of multiple layers of tissue paper since this significantly speeds up the process.
Next, prepare the glue in a plastic cup by mixing it with a bit of water, add each leaf to the pumpkin, and apply the glue on both sides of the leaves using a foam brush. When placing the leaves on the pumpkin, make sure they have alternating colors and are oriented differently. The result shouldn’t look neat but natural. And that’s it! Find a nice spot for your pumpkin in your house and get started on the next project.
11. Whimsical Wreath Halloween Decoration Ideas
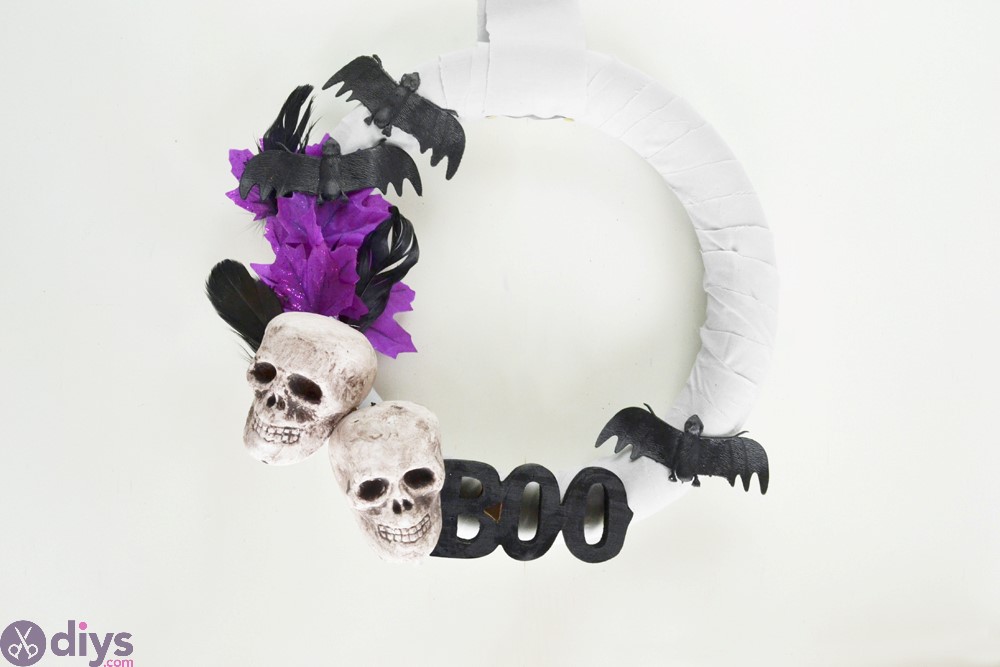
If you are researching Halloween decoration ideas for indoors, you can make a whimsical wreath and hang it on the inside of your front door or on any other door in your home.
Check out this simple tutorial we wrote to find out how you can easily create this wreath design for guests and trick-or-treaters. When it comes to supplies, you need styrofoam, a round wreath, some strips of fabric, push pins, scissors, skulls, and bats.
But you can personalize this item by decorating it with any Halloween elements you like, such as spiders, ghosts, zombies, and even scary messages. The project is simple enough for your children to chip in and keep them busy.
You start by cutting the fabric and wrapping it around the wreath to create a mummy look. After securing the fabric’s end with pins, you can arrange the skull, paint the letters, and glue them to the wreath. Don’t forget to also glue the feathers, purple leaves, and bat.
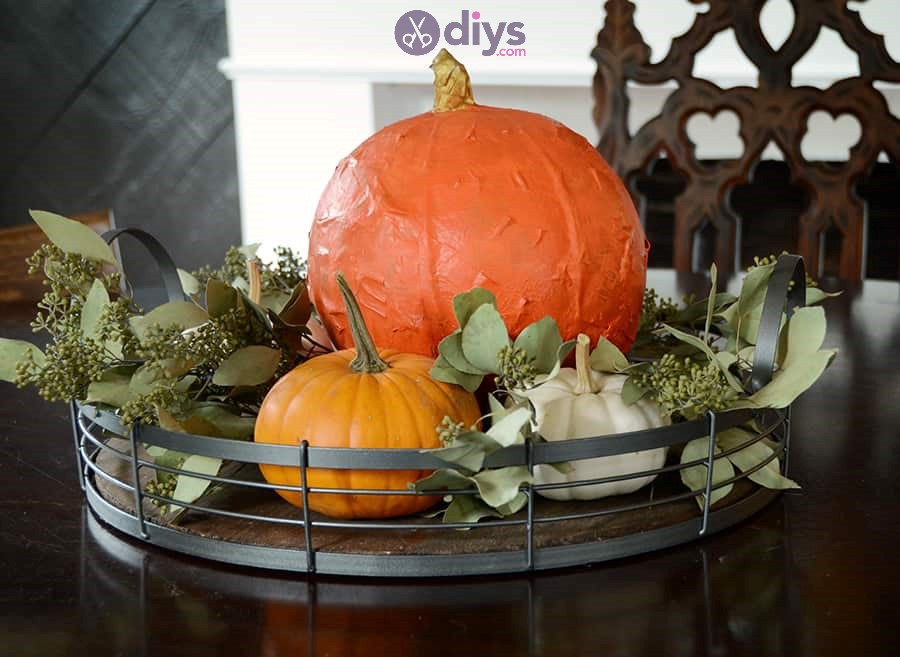
12. DIY Thanksgiving Table Decor Idea
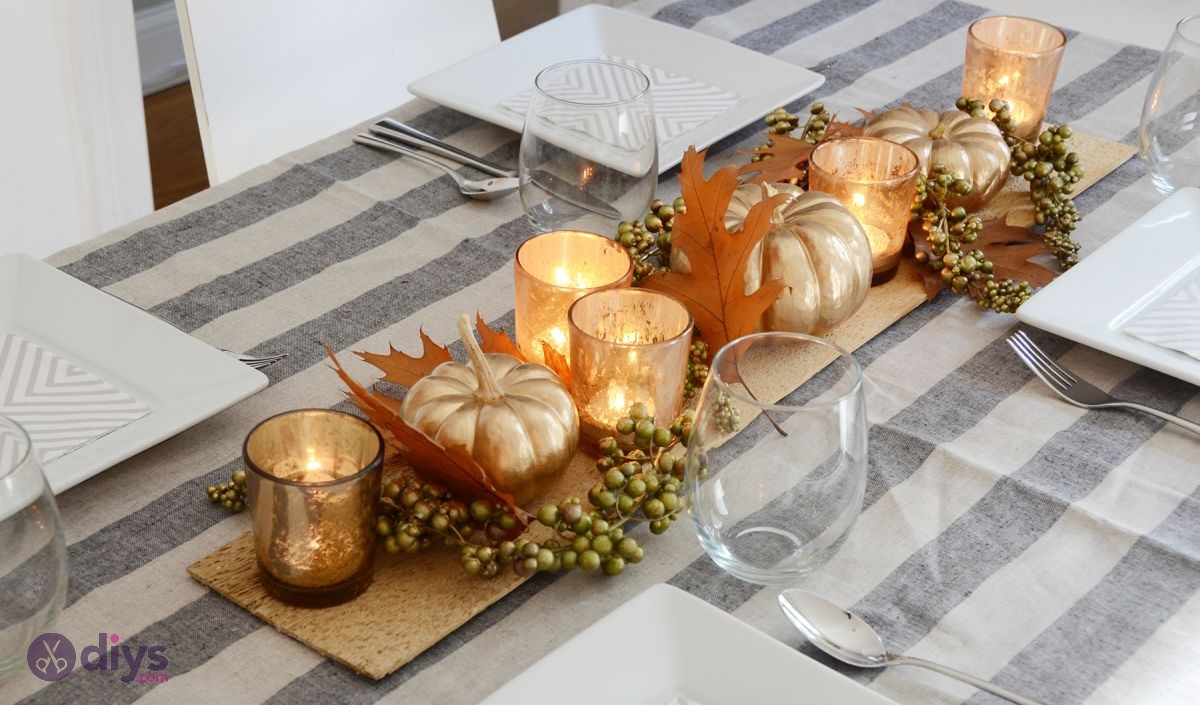
This do-it-yourself Thanksgiving table decor idea also works great for Halloween if you are hosting a party and inviting some friends over. It’s clearly a concept for grown-ups, which kids are unlikely to appreciate.
When it comes to supplies, you will need some scrap wood, mercury glass votives with tea lights, a gold liquid leaf, a paintbrush, small pumpkins, oak leaves, and assorted artificial floral accent stems.
Get started by painting the pumpkins with the liquid leaf. Then, neatly arrange the pumpkins on the scrap wood, place the mercury glass votives in between the pumpkins, add the floral accents in between the pumpkins and votives, and insert the oak leaves in any unoccupied space.
We are sure that your guests will love this eye-catching table decor, whether it’s Halloween or Thanksgiving. Plus, you can reuse it for next year’s event, too.
13. DIY Paper Maché Pumpkin
It’s possible to create a fun pumpkin for Halloween without using a real or artificial vegetable. For instance, this concept approaches a paper maché pumpkin made out of a balloon with strips of paper glued together. Interesting, isn’t it? And you can also ask your kids to help you.
Several items are required before beginning this project: a balloon, flour, jute twine, scotch tape, scissors, a foam brush, acrylic paints, an old newspaper, a bowl, and a fork. Check out our intuitive tutorial to finish this project in just six stages.
You start by blowing the balloon to the desired pumpkin size and wrapping it with twine. Make sure to tie the twine’s knot to the top of the balloon since it will act as a pumpkin’s stem.
After the balloon is secured with twine, cut some strips of newspaper and wrap the twine’s ends in order to create the stem. Cut more strips of paper to cover the entire balloon.
In the following step, mix the flour and water in a glass bowl in order to create a mixture that’s thick enough to apply to the balloon in order to stick the newspaper. A trick is to go for smaller strips of paper to create a polished look, although it will take longer if your balloon is very big.
Let the mixture sit for a while so that it dries off. Any bubbles that appear should be smoothed out using your bare fingers. Now you can paint the pumpkin and stem in any colors you want. The results should be amazing.
If you have enough time on your hands, you should create multiple pumpkins in this manner by choosing different colors and balloon sizes. Just make sure that it goes well with your Halloween theme.
14. DIY Glamorous Beaded Pumpkin
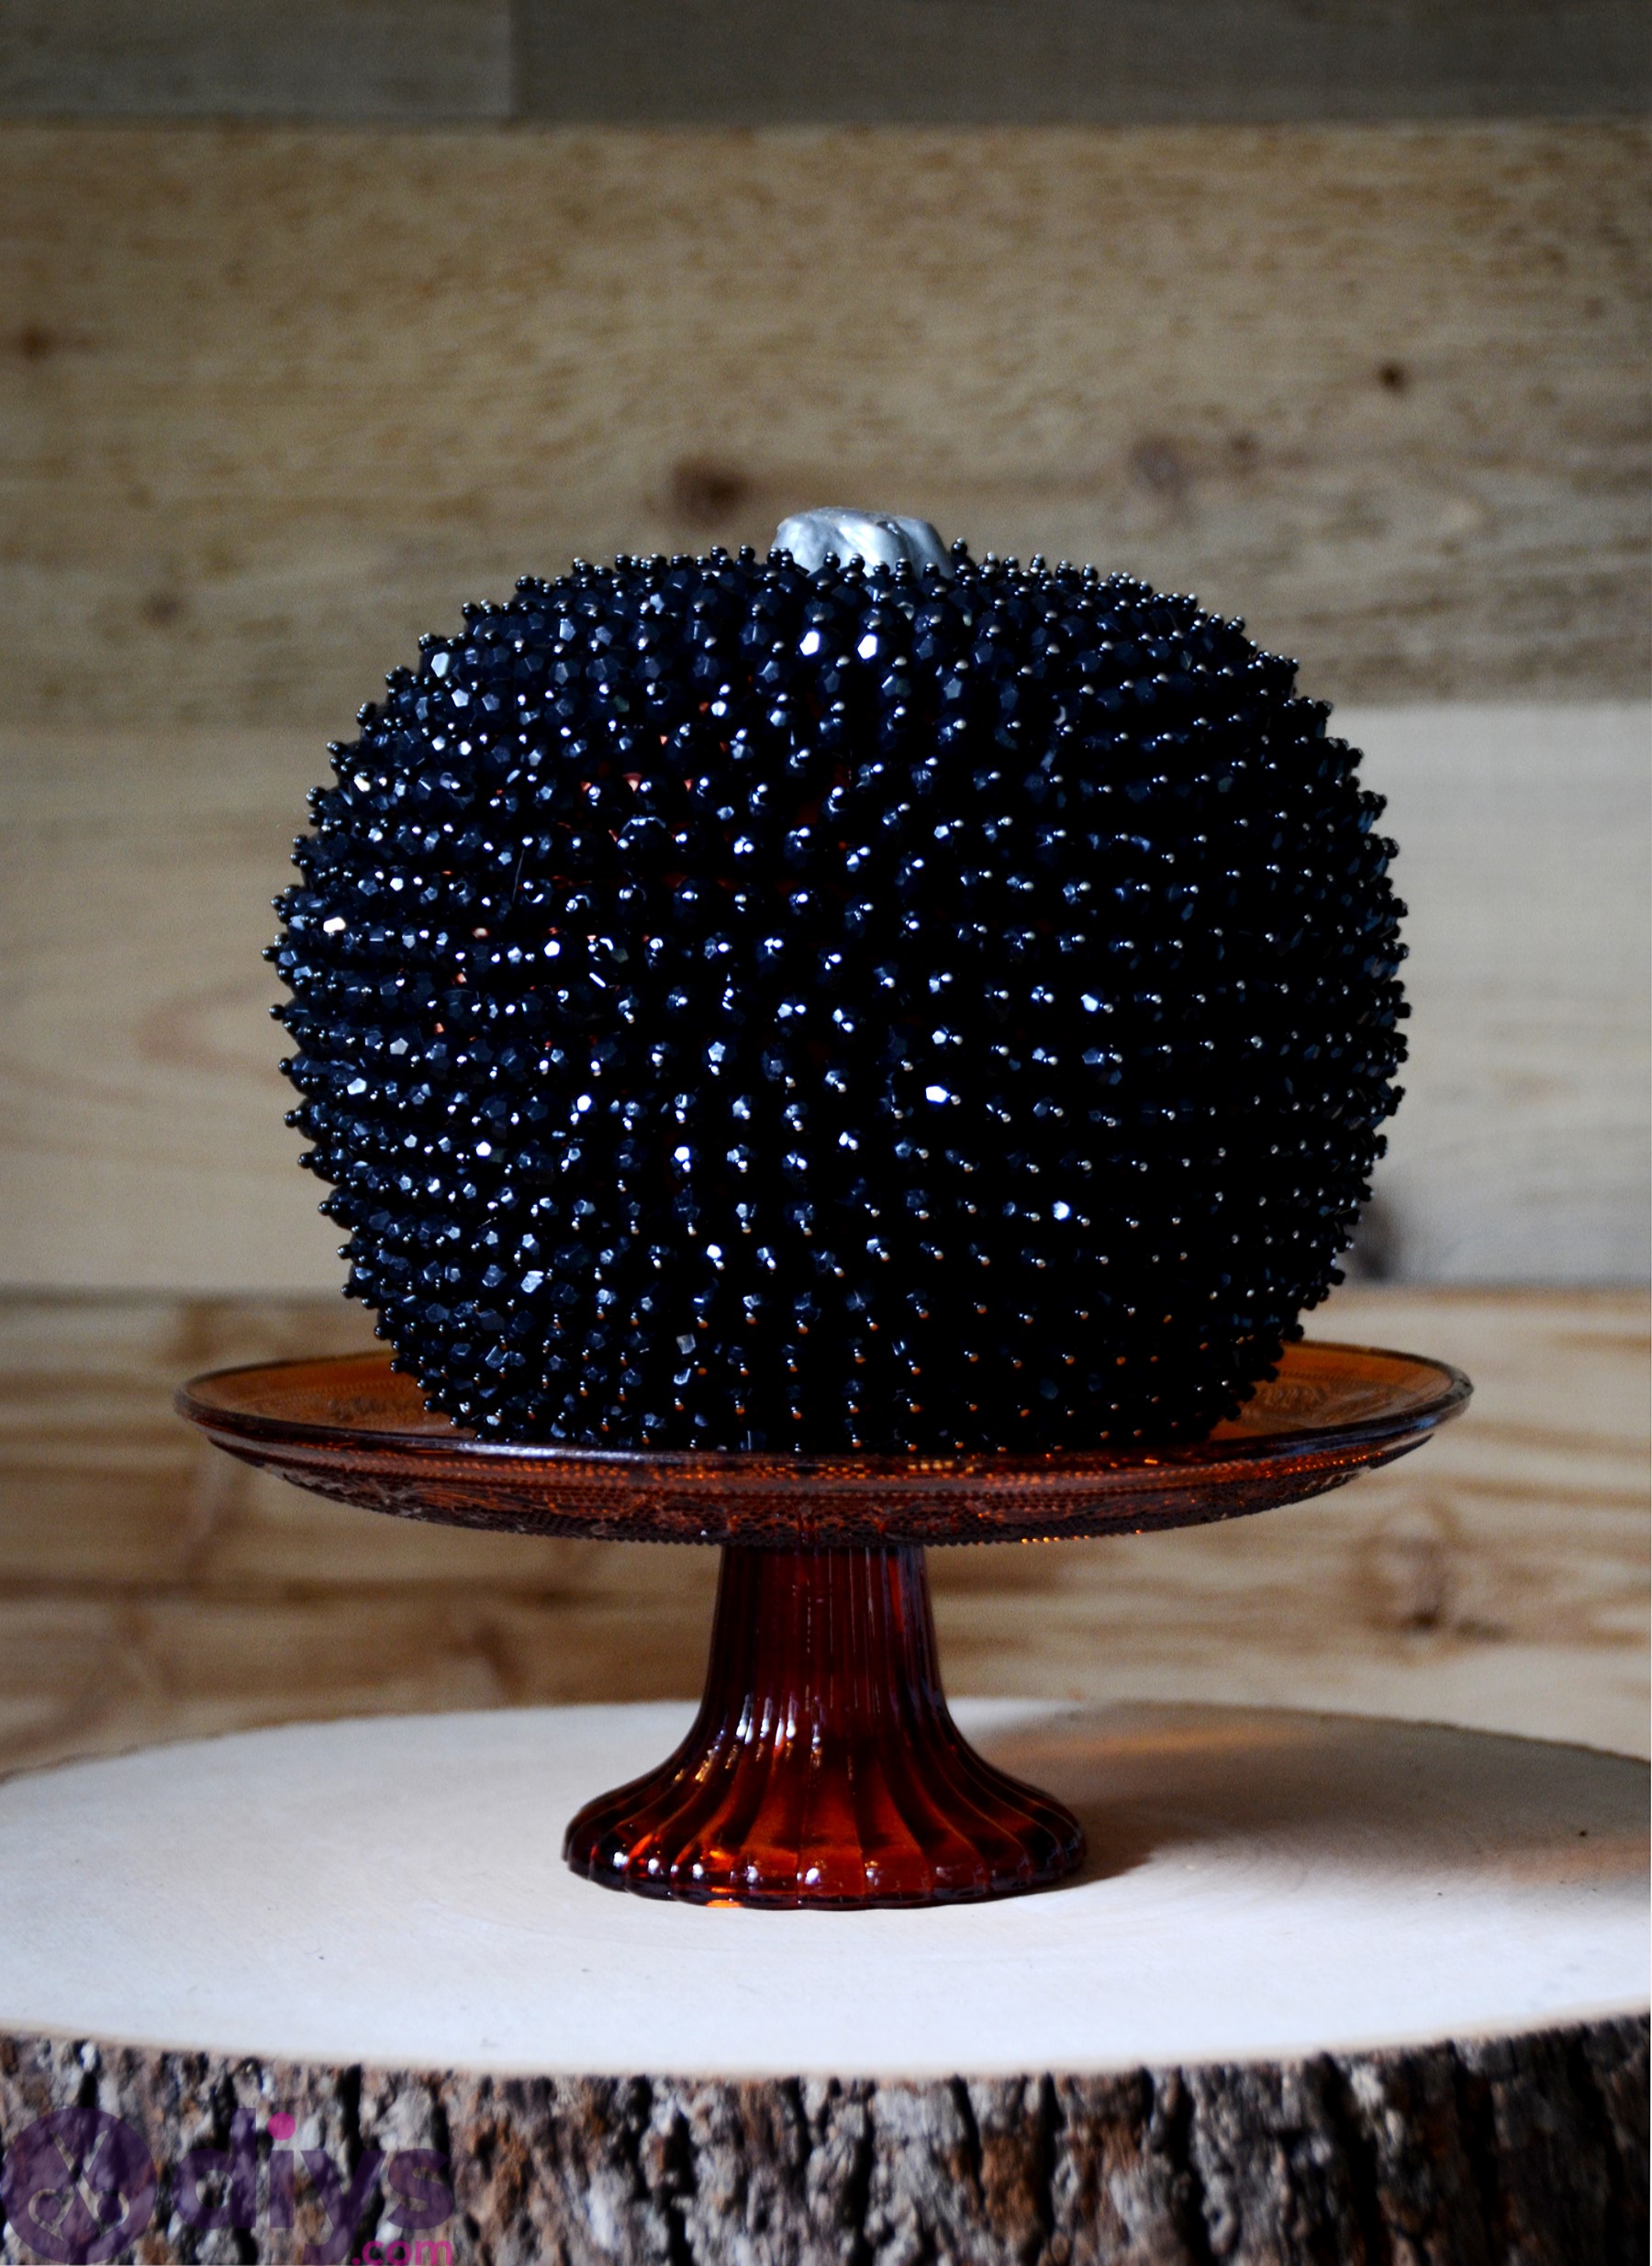
If you want to organize a classy Halloween party for grown-ups without children, you must definitely check out this stunning do-it-yourself glamorous beaded pumpkin. It’s one of a kind, cheap but looks expensive, easy to create, and will surely leave your guests in awe.
Since it’s entirely covered in beads, you can barely tell there’s an actual pumpkin hiding inside. Plus, you only need to make one of these since more would only devalue the Halloween decoration.
To begin this project, you will need an artificial pumpkin, two packages of black faceted beads, one package of small black seed beads, silver craft paint, a paintbrush, two packages of dressmaker pins, and a thimble.
You start by painting the pumpkin in one color. As far as colors are concerned, choose one that contrasts the color of the beads in order to make the pumpkin stand out. For instance, if you have black beads, you can go with white or gold for the pumpkin.
It’s best to apply several coats of paint to make the color truly pop. Leave it to dry, after which you can start attaching one bead at a time. As you can probably tell, it’s a tedious process, so arm yourself with patience. Besides, you can take a break any time and later pick up where you left off.
Once the pumpkin is ready, find a suitable spot for it in your home. We think that it should be the first thing your guests see when they step inside the house. It’s dazzling.
15. DIY Splatter Pumpkin Decor
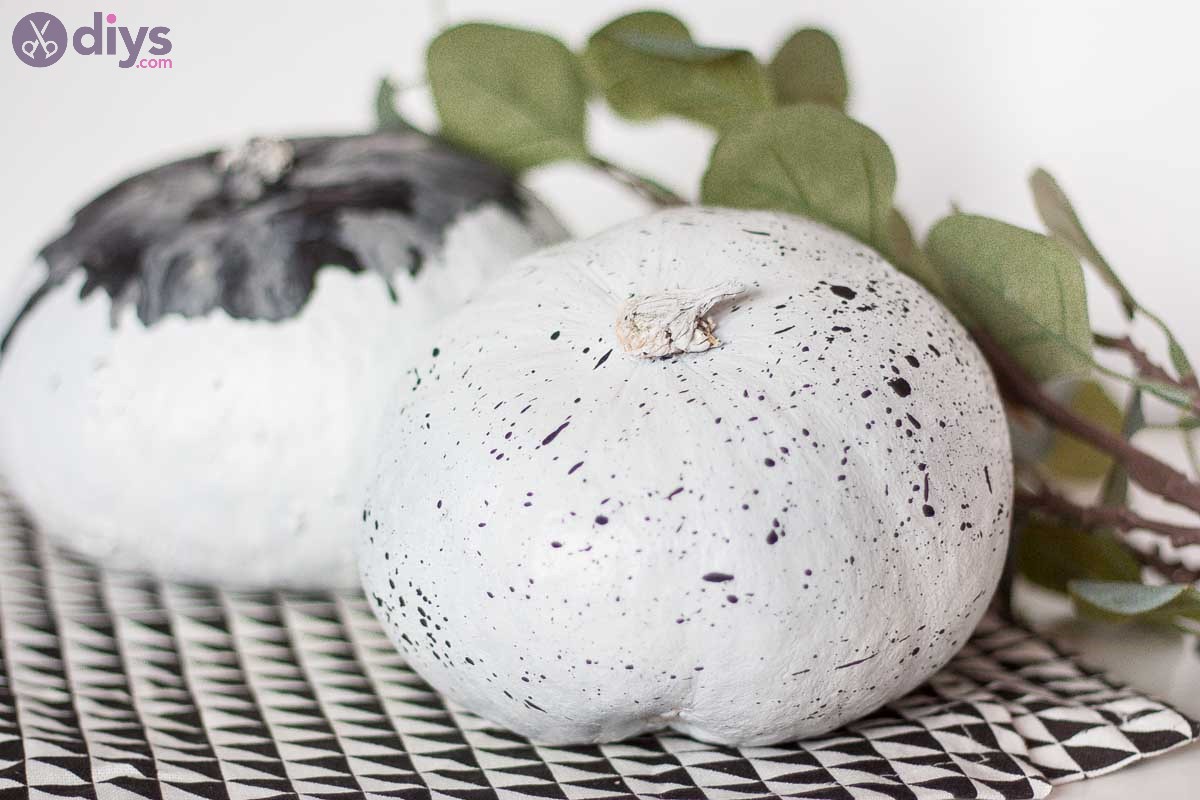
If you are a fan of the splatter trend, you can’t miss out on this cool idea for Halloween: do-it-yourself splatter pumpkin decor. It works great as an indoor decoration element, even a table centerpiece.
Moreover, it’s pretty easy to complete this project since you need a minimum amount of supplies: a small or medium pumpkin, white spray paint, black acrylic paint, and a brush. Check out our tutorial to learn the exact steps you need to take.
You start by painting the pumpkin in one color, such as white. Don’t forget to paint the stem, too! Let it dry before applying the second layer of paint. Afterward, you can drop a brush in black paint and flick it using your fingers to create the splatter effect.
16. Simple DIY Fabric Pumpkins
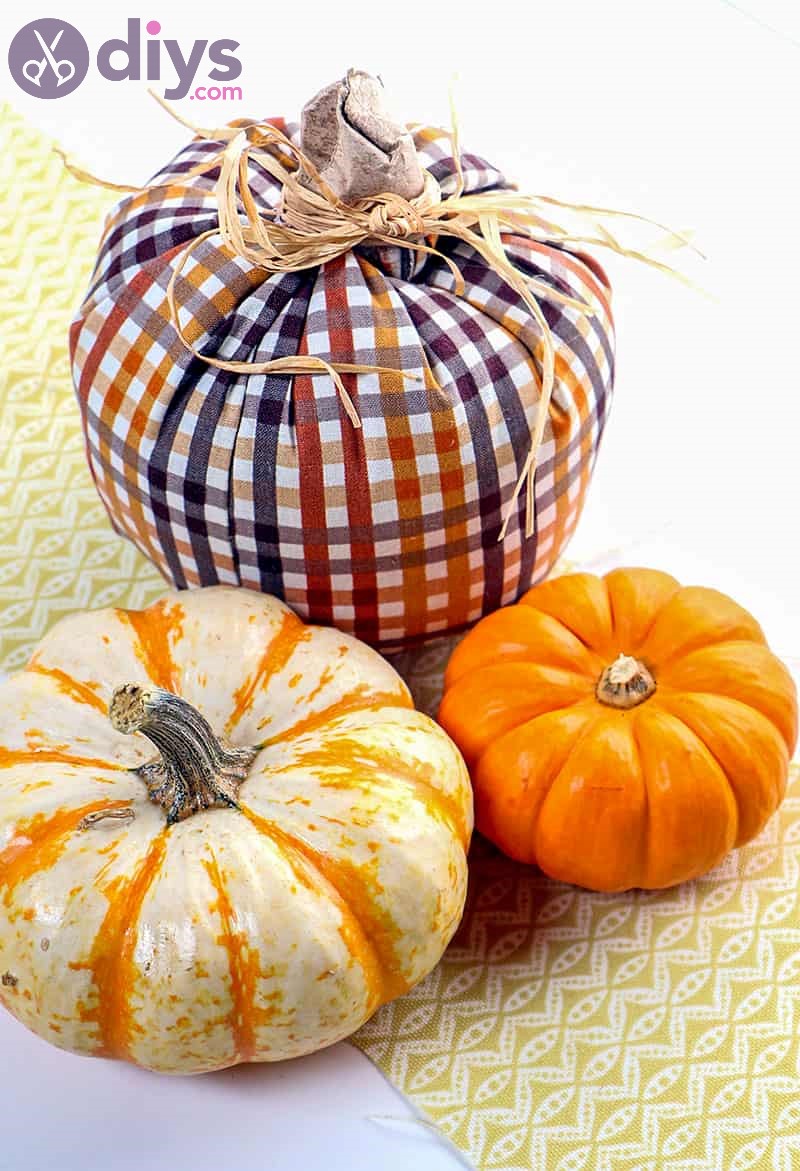
Earlier, we discussed preparing pumpkin decorations for Halloween without using real or artificial pumpkins. For this idea, we propose making a fabric pumpkin. It’s an awesome idea for craft makers who love playing with fabric.
For this project, you will need a few yards of fabric, an empty paper towel roll, a needle and thread, a hot glue gun with glue, raffia, and batting. Don’t miss our tutorial to learn the exact steps you need to take.
The best part about fabric pumpkins is that they are completely customizable when it comes to colors and patterns. It depends on the fabric you use. Plus, you could make several pumpkins this way with distinct features, which you can mix with other pumpkin decorations to create a cool ensemble.
17. Simple Mini Pumpkin Decorating for Fall
This is a super-cute idea that will surely impress your guests around the table, whether you are setting it up for Halloween or Thanksgiving. You can easily paint mini pumpkins to create placeholders for guests or another form of decorations.
All you need is to get mini pumpkins and a Sharpie marker to draw on them. If you are going with the placeholder idea, find out how many guests will be attending your party to know how many miniature pumpkins you must buy.
The color of the pumpkins doesn’t really matter unless you have a specific theme in mind. You can go with orange or white, or completely paint them in any other color. Then, using the Sharpie marker, you can draw dots, messages, and various shapes on the pumpkins. The sky is the limit.
Don’t forget to write the names of your guests on some pieces of cardstock in order to put them on the plate of each guest, along with the mini pumpkin.
13 Best Halloween Decorations for Kids
Children need simpler but creative designs when it comes to Halloween decorations. But that doesn’t mean that they won’t come to you for help. Here are the top Halloween decorations for kids that you should check out.
18. Toilet Paper Roll Pumpkin Halloween Decorations for Kids
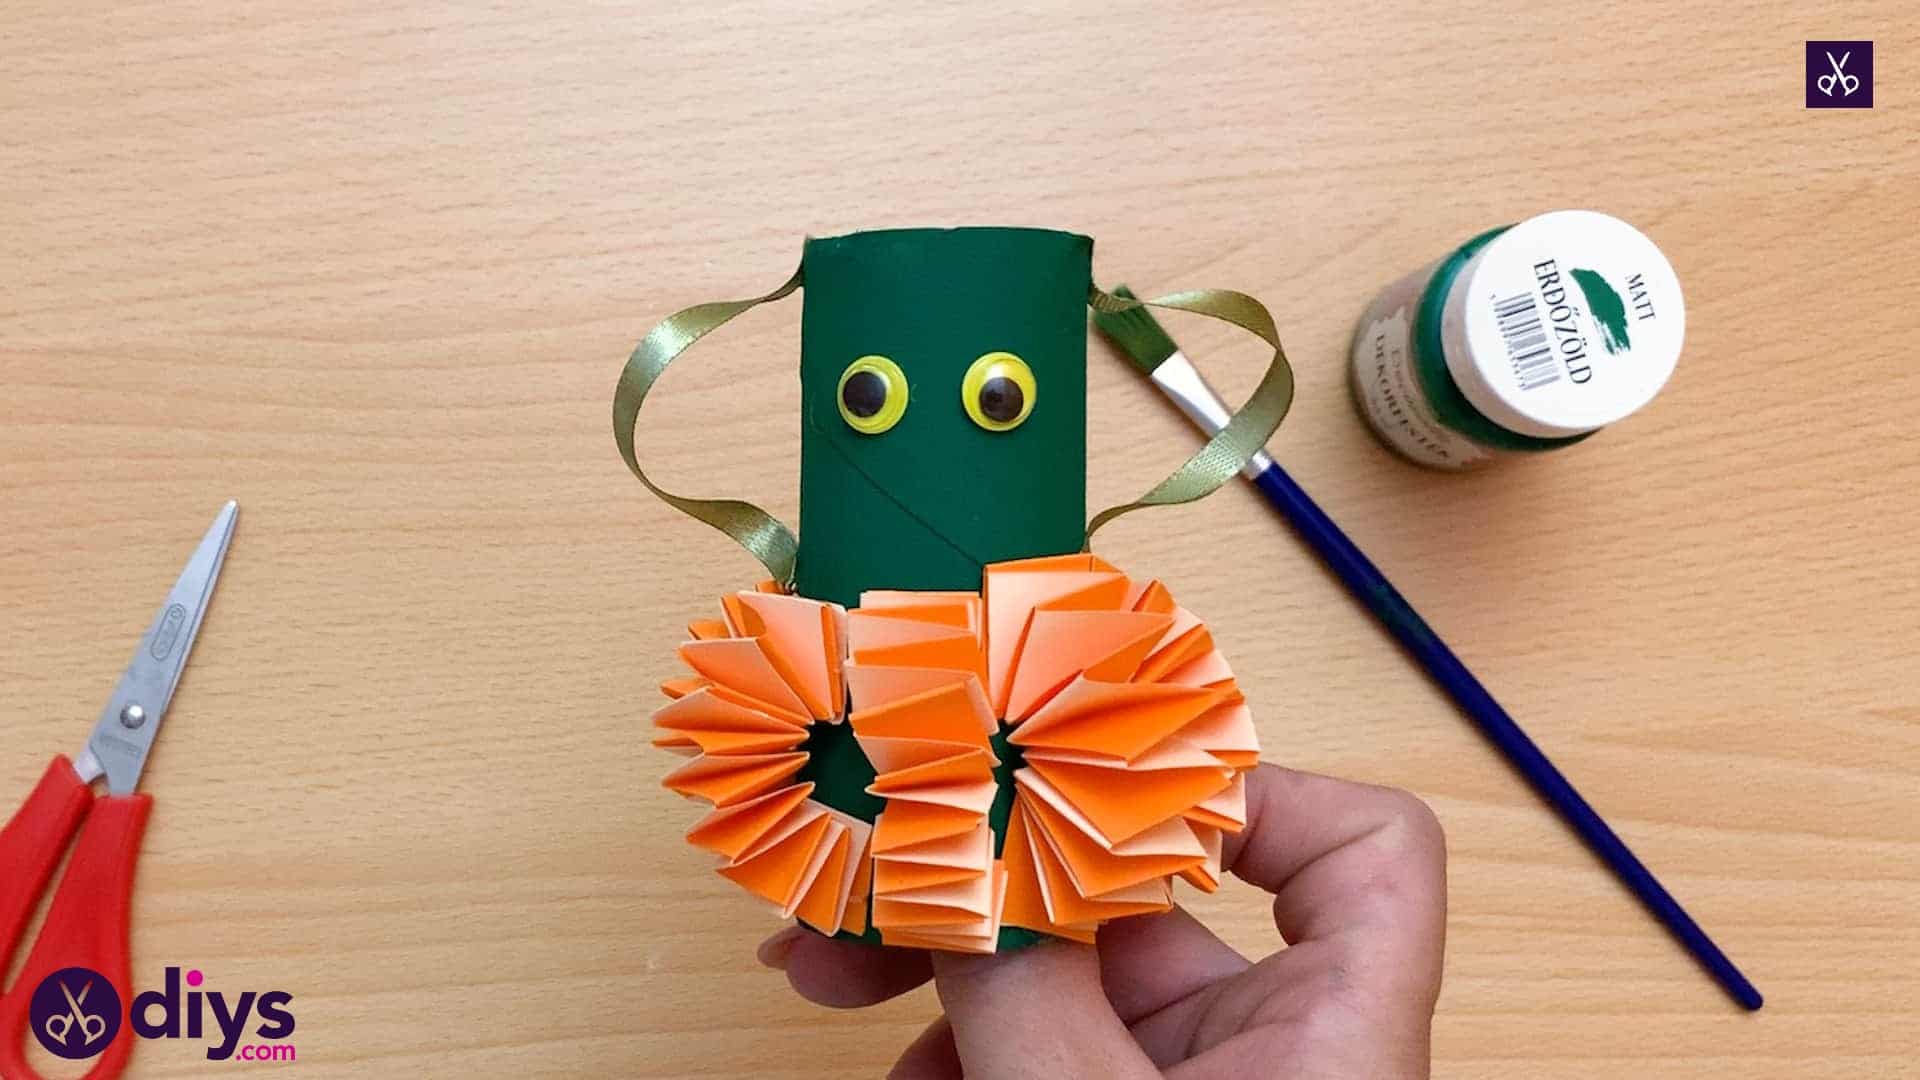
This is a fun and simple concept: creating Halloween decorations out of toilet paper rolls and paper. It’s easy to do, and you will not have to buy too many supplies from your local crafting store.
To complete this project, you will need colored paper (orange and cream were used in this example), a small green ribbon, two google eyes, a paintbrush, green paint, a toilet paper roll, a pair of scissors and a hot glue gun.
You get started by painting the toilet paper roll green. Make sure to also paint the inside of it, or it will look ugly. Next, cut eight thin strips out of your colored paper in order to fold them into an accordion shape. You apply hot glue to each end of the accordion so that it easily sticks to the toilet paper roll. Do this for every strip of paper, making sure that you cover the entire circumference of the roll.
In the following steps, you can attach the google eyes and ribbon using the hot glue gun. Check out the whole YouTube video tutorial to learn how to correctly follow each step. It applies to a single toilet paper roll, so you will have to repeat everything for each new roll.
19. Lollipop Ghost Haunted House Ideas
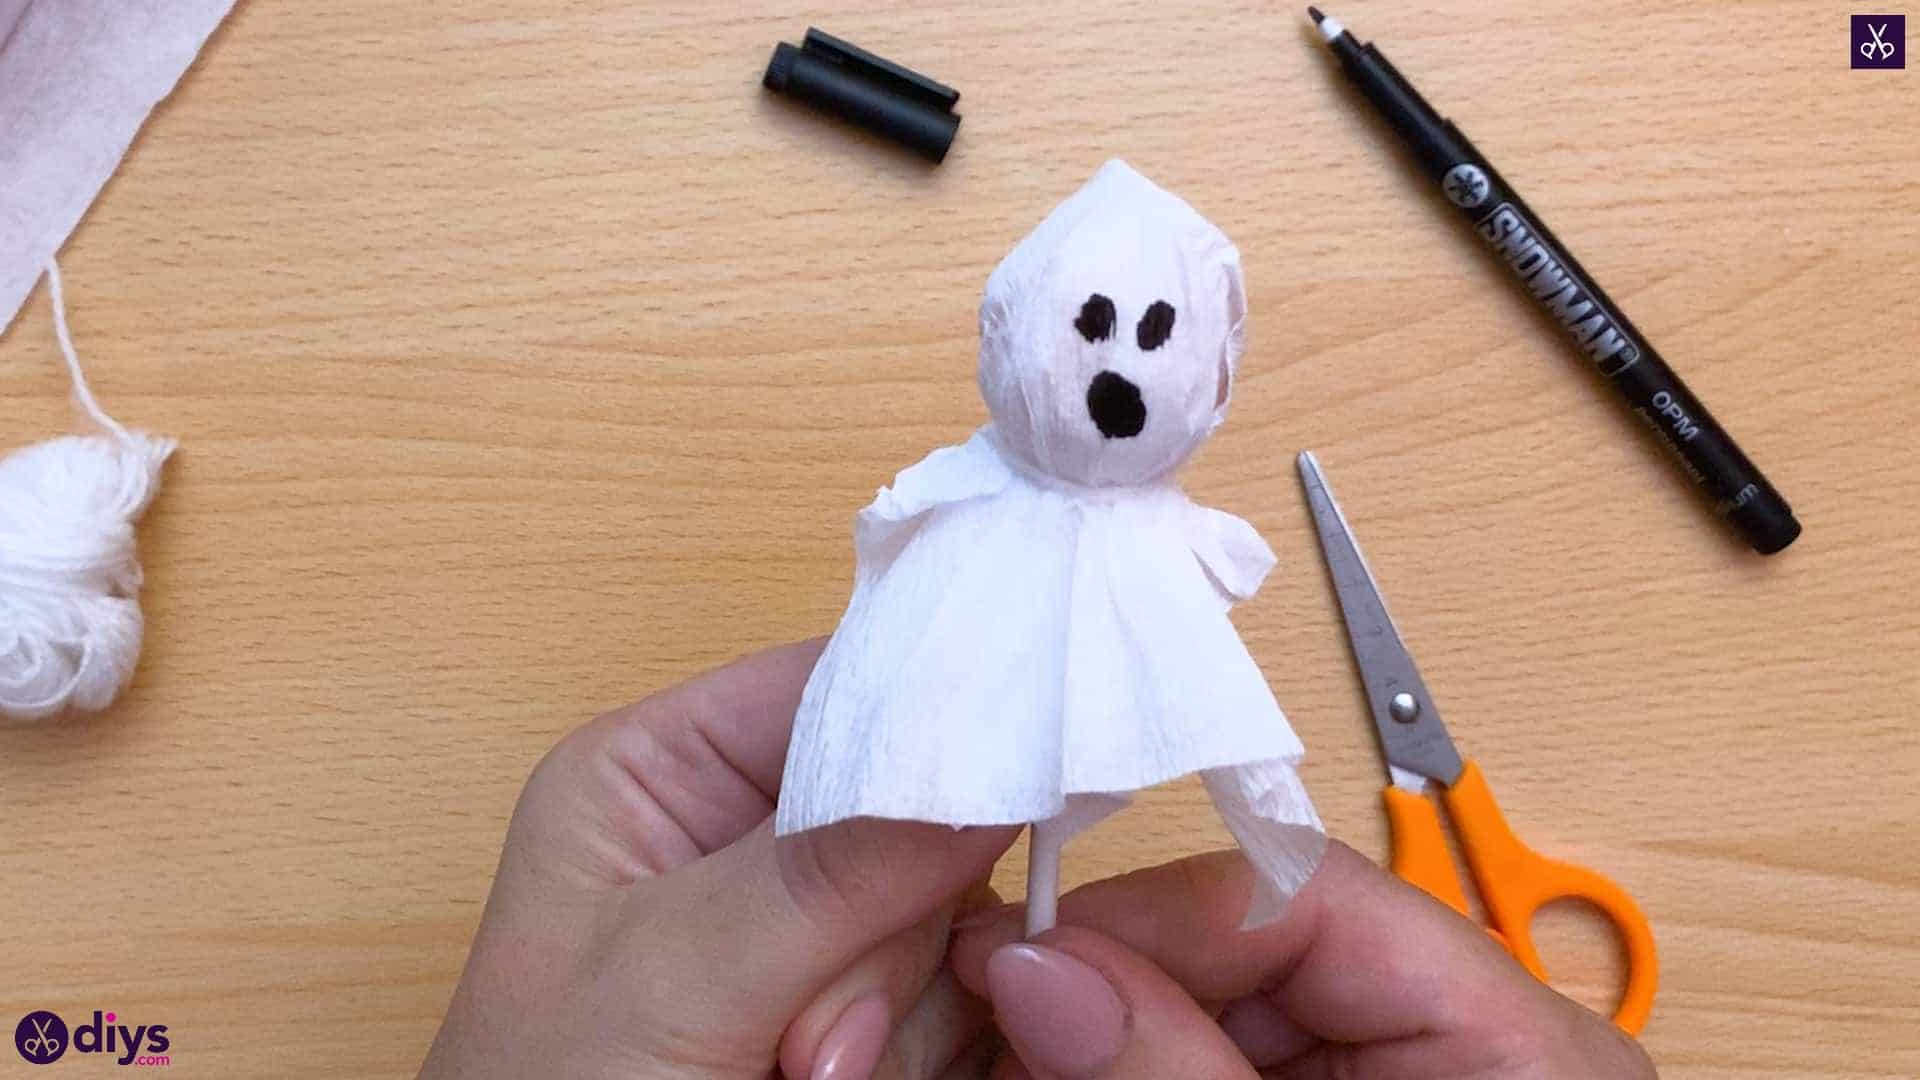
Another cute Halloween decoration idea for kids is making tiny ghosts out of lollipops and paper. The adorable ghosts can then be placed anywhere in your kid’s room. You could also bake a cake for Halloween and place the lollipops on top, just as if they were candles.
To make just one ghost, you will need a lollipop (uneaten), white yarn or string, a black felt-tipped pen, a pair of scissors, and white crepe paper.
Start by cutting a long strip from your roll of white crepe paper so that you can fold it in half and cut it again to create two smaller strips of identical size.
In the following steps, cut some yarn or white string and use it to wrap the crepe paper around the lollipop. Once you start seeing what it should look like a ghost, you can draw the eyes and mouth on the ghost’s head.
Remember to follow these steps for every lollipop ghost you wish to make. As you can see, it’s extremely simple. But you can follow our YouTube tutorial to visualize the exact steps you need to take.
20. Lollipop Spider DIY Halloween Decorations for Kids
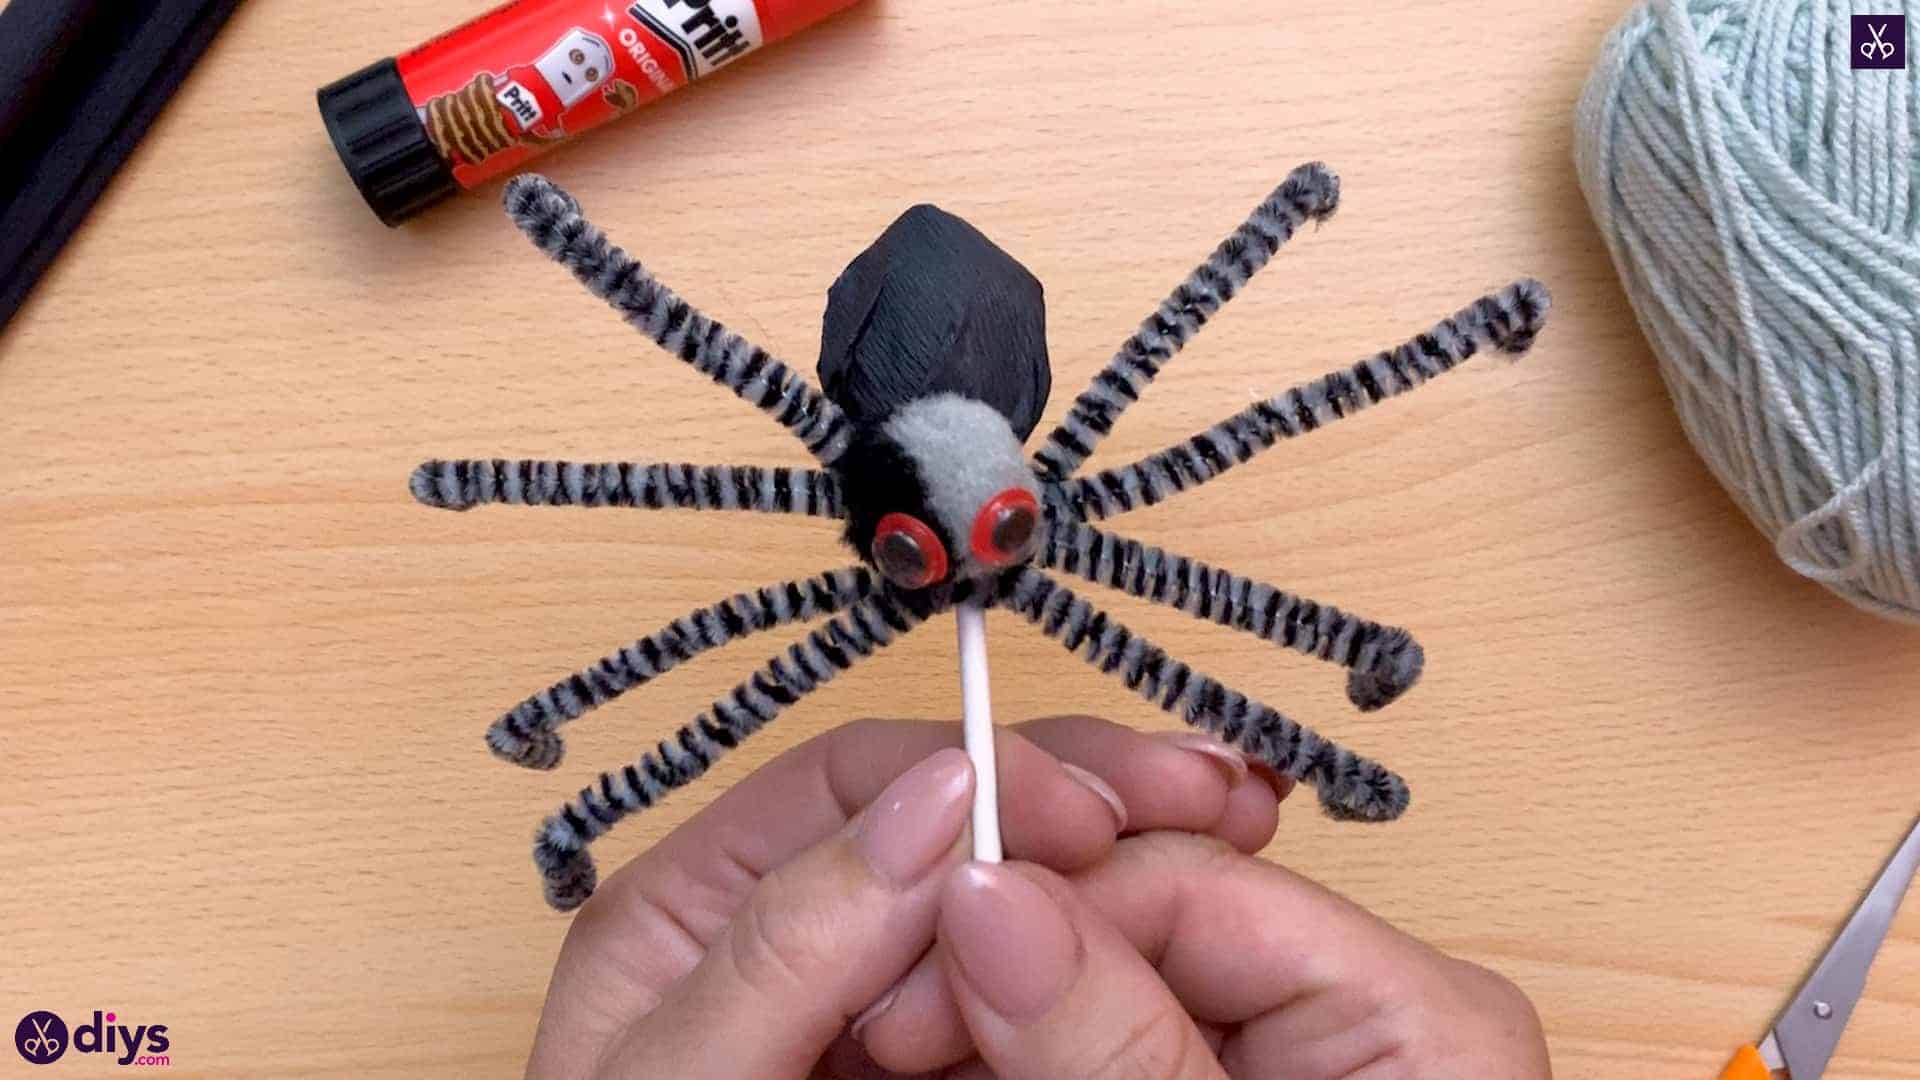
Another way to use lollipops for do-it-yourself Halloween decorations is by turning them into spiders. This crafty project is easy to accomplish by your children using a minimum amount of supplies from the local craft store.
To begin, you will need some grey yarn, black crepe paper, red google eyes, a pair of scissors, a glue stick, four black-and-grey pipe cleaners, along with a small black and grey crafting pom-pom.
Start by taking out a small piece from your roll of black crepe paper, which you can then fold and cut in half to form two identical pieces. Then, wrap the crepe paper around a lollipop and secure it with the help of the yarn.
In the next steps, you can make the spider’s legs by trimming the pipe cleaners with scissors. They can be attached to the lollipop stick using glue, just like in the images shown in our tutorial.
For the last step, you can make the head and eyes of the spider by attaching a pom pom to the head of the lollipop, together with the google eyes. Repeat these steps to create as many lollipop spiders as you wish. If you need more help, be sure to review our intuitive YouTube tutorial.
21. DIY Halloween Paper Lantern Art
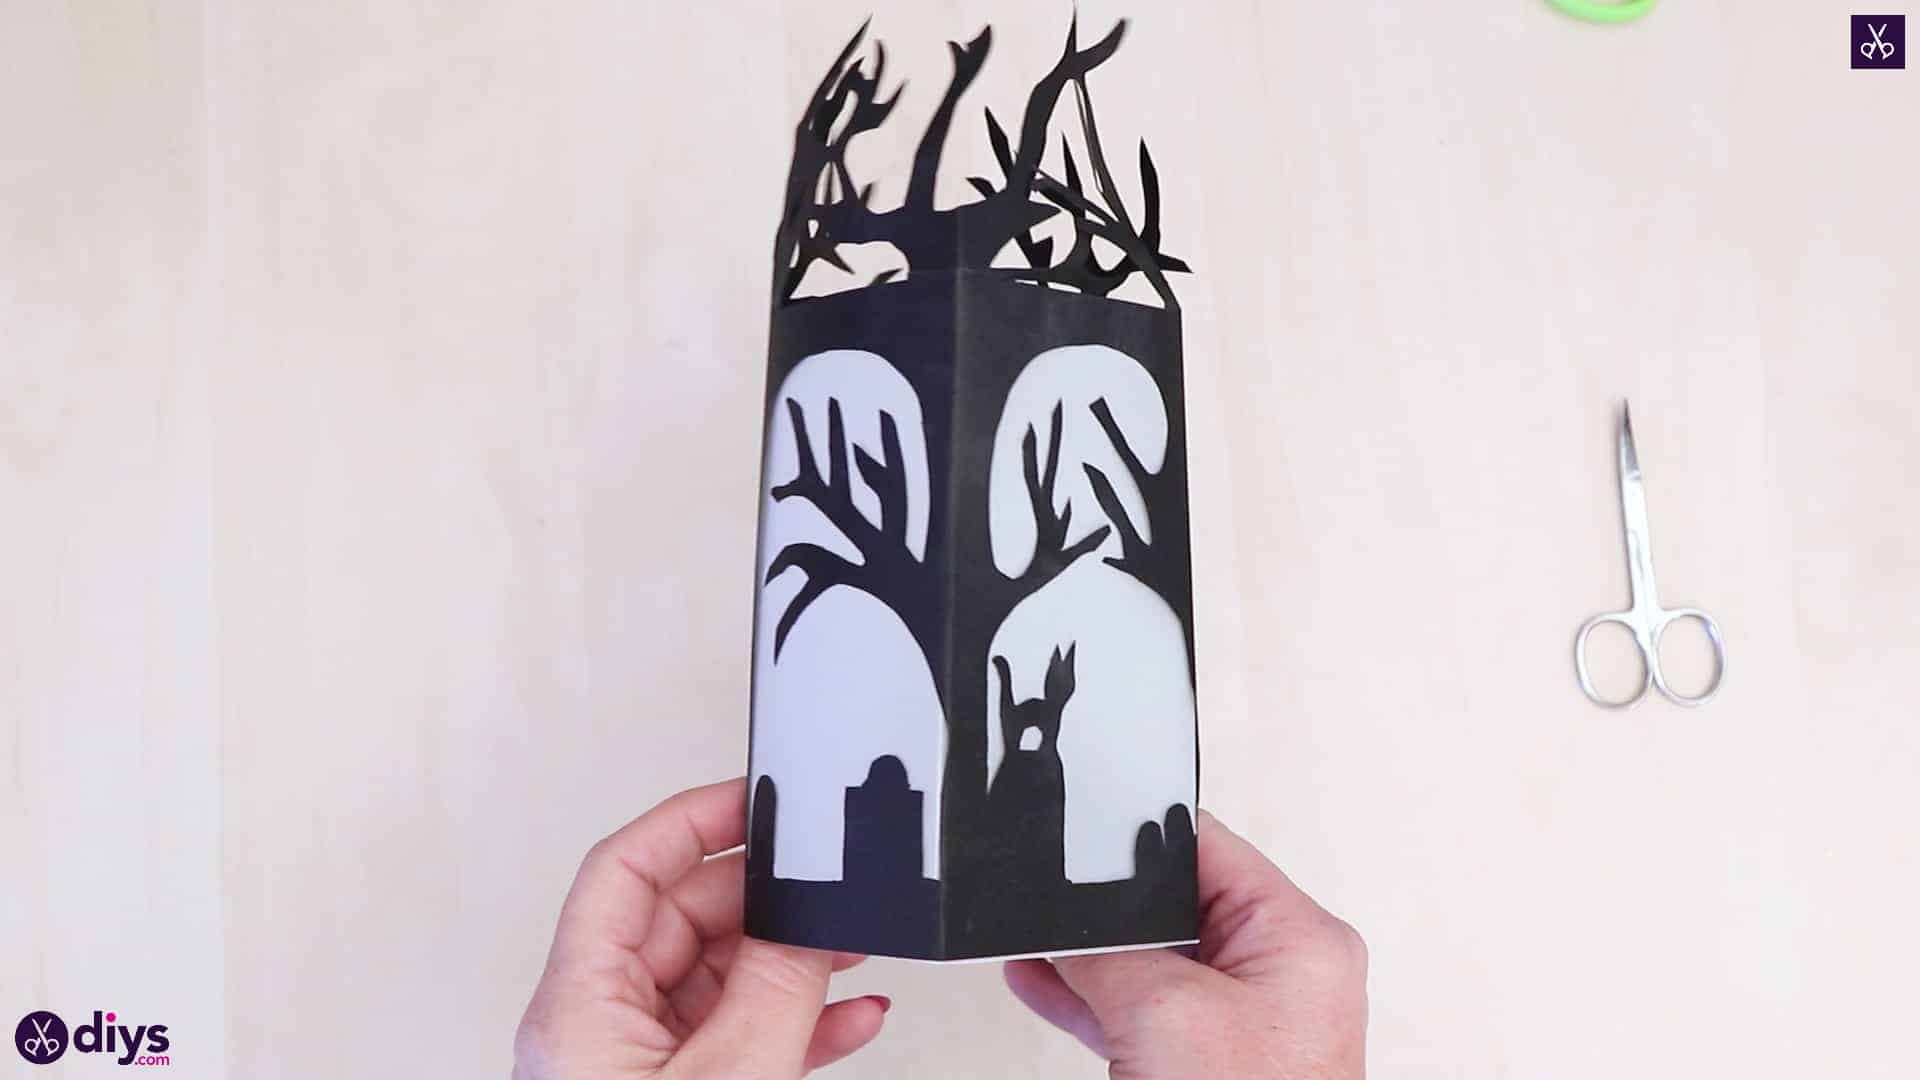
If you are looking for a simple way to brighten up your child’s room for Halloween, you should check out this easy guide on how to create simple paper lantern art using basic supplies and by following do-it-yourself instructions.
You will need a white pencil, curved nail scissors, black paper, a glue stick, white vellum, and a pair of small scissors. Once you gather all these materials, begin by mapping out the shape of your lantern.
To do this, you must fold your black paper using simple Origami tricks, as detailed in our intuitive guide. After making creases in all the right positions, use the white pencil to draw the silhouette design that will be revealed when the paper lantern is lit.
You can then cut the blank spaces with the scissors and place the vellum paper on top of the black paper. Only the top part of the black paper should remain visible, the one with the tree branches. The remaining parts of the black paper and white vellum paper should be glued together at the margins.
Finally, you can fold in the paper while keeping the black design on the exterior, and then put a lit tea light candle or a cluster of battery-powered string lights to make your new paper lantern flow. We are certain that your kids will be thrilled with the results.
22. Witch Boot Candy Holder Halloween Designs

Kids need a special place to hide candy from their parents and siblings, especially during Halloween. In this case, you should let them take a creative approach by helping them design a candy holder in the shape of a witch’s boot. It’s easier than it sounds, really.
To complete this project, you will need a glue stick, a toiler paper roll, a pair of scissors, a pencil, black crepe paper, and colored paper. For this example, we used light yellow, black, orange, and purple.
After you gather all these supplies, you can start by using the toilet paper roll to measure how much purple paper it will be necessary to cover it. Next, you can cut out that section of purple paper, which will become the base color of the witch’s stocking.
For the next step, you need to create a shoe buckle by cutting a small square of yellow paper. For the witch’s ankle, you should cut a thin strip of black paper, which is as long as the paper’s width.
Now, cut a thicker strip from the same black paper as in the tutorial in order to make it the witch’s boot. For the last pieces, you will need to cut three strips of orange paper, which have identical sizes and are as long as the paper’s width. They will become the strips of your witch’s stocking.
After cutting out all the necessary parts, it’s necessary to assemble them. Begin by gluing the purple paper to the toilet roll. Next, add the three orange stripes, make the ankle, add the belt, curl the toe, stiffen the boot, make the cuff, and finish the top.
The top will remain empty, so the candy can be placed through there. It sounds more complicated than it actually is, so we recommend visualizing the steps by checking out our YouTube tutorial.
23. Spider Web DIY Scary Halloween Decorations
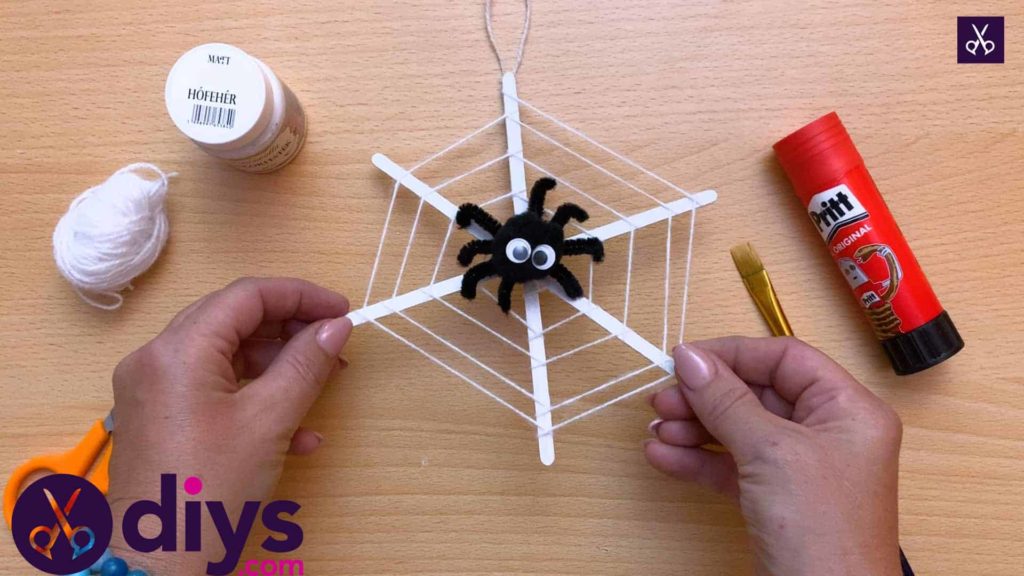
Spiders are always popular when it comes to Halloween, so your kids would probably be excited to create a spider web with a spider using simple do-it-yourself instructions.
Before getting started, make sure you have a glue stick, white paint, a paintbrush, two google eyes, a black pipe cleaner, three popsicle sticks, a black crafting pom-pom, white string, and a pair of scissors.
Begin by painting the popsicle sticks white on both sides, and make sure to let them dry. You can then glue the sticks together by creating a snowflake: the three sticks should be spread apart equally and meet at the center.
You can then transform the snowflake into a spider web by wrapping the string and applying glue everywhere it touches the sticks. Once the spider web is complete, you can cut the piper cleaner into four equally sized pieces to form the spider legs.
Next, you can glue the googly eyes to the pom-pom in order to create the spider head. What follows is assembling the four spider legs into the snowflake design before turning and twisting them to make them look like the real deal. Afterward, you can glue the head to the legs to complete the entire spider, as well as attach it to the spider web – right in the center.
If you feel that these text-based instructions are unclear, be sure to watch our YouTube video tutorial to get a better view of all steps involved.
24. Paper Hat Halloween Stuff
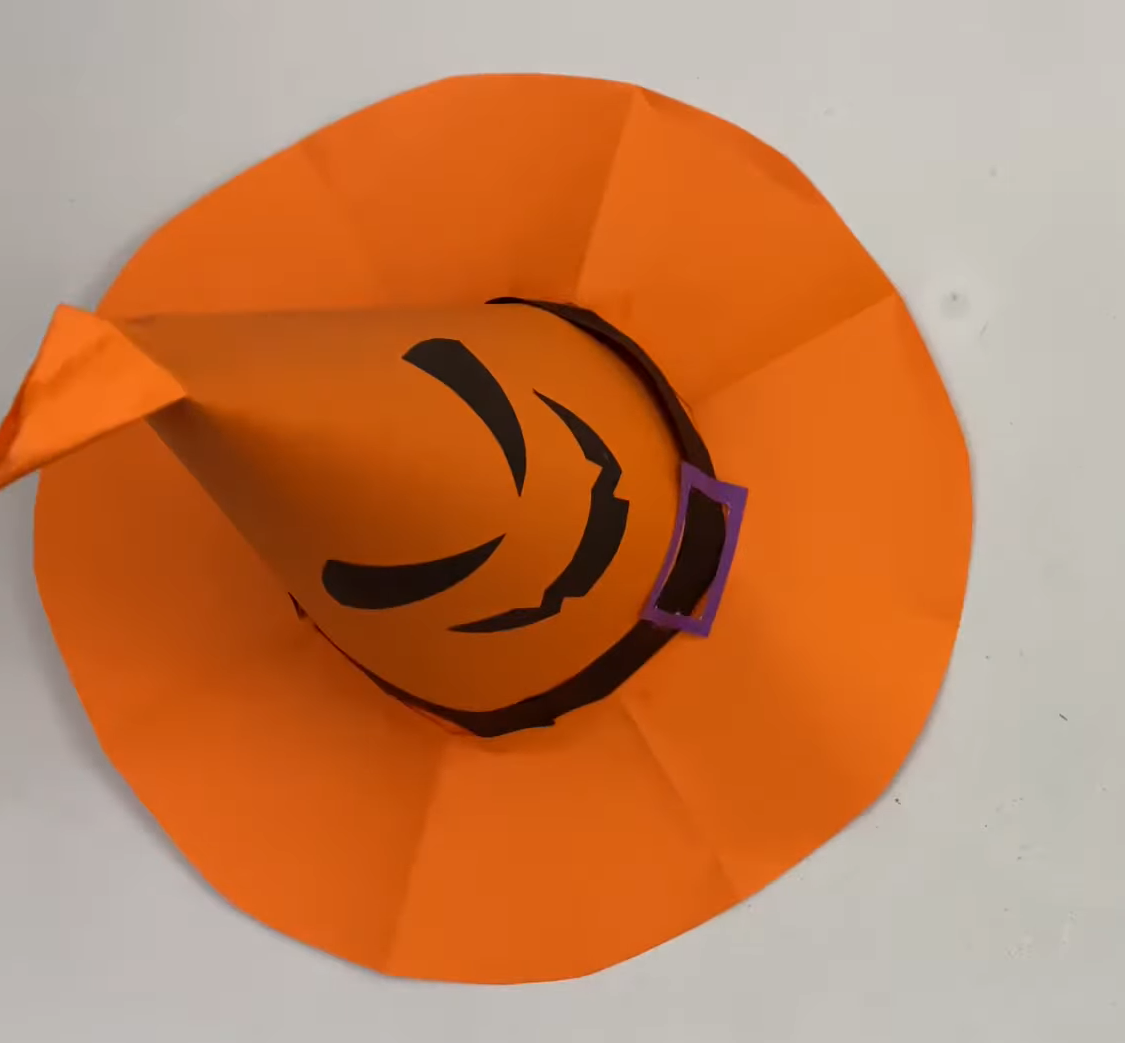
Check out this awesome YouTube video tutorial brought to you by KIDS crafts in order to find out how your children can easily make Halloween hats made out of paper. They can be worn as part of a costume or used as a cool indoor decoration. It’s a really simple craft that needs minimal supplies.
To get started, you need one sheet of orange A4 paper, which you can fold in a cone and glue the margins together. You then trim the excess paper to create the cone shape – it should be able to sit on a flat surface without falling.
Next, you take another sheet of A4 orange paper and fold it into four equally sized rectangles. Now, take a corner and fold it to the other side of the paper to form a triangle before cutting the bottom using a pair of scissors. The cut shouldn’t be straight but slightly curving toward the tip of the triangle. Lastly, cut the top part of the triangle, which should be on the opposite side of the slightly curved cut.
You can now unfold the orange paper to reveal a circle with a hole in the middle – this represents the base of the hat. Take the cone-shaped paper, make even-spaced cuts on the bottom, and fold the margins on the exterior. You can now apply glue to these margins in order to easily attach the base of the hat.
To give a bit more detail to the hat, you can cut a stripe of black paper, wrap it around the hat – just above the base – and attach it with glue. Next, cut a small rectangle out of purple paper, cut out the inner part and leave out only a rectangle frame, and then glue it to the black ribbon. This indicates the front of the witch hat.
For the final part of the hat, cut the eyes and mouth of a witch out of black paper and glue these pieces to the cone-shaped part of the hat. Fold the tip of the hat to make a crease, thus adding the final touch to the witch’s hat.
Another variant is to make the hat black, the eyes and mouth white, the ribbon purple, and the small rectangle frame yellow. It’s an incredibly easy project for kids, so make sure to check out the entire YouTube tutorial.
25. Popsicle Stick Monster Homemade Halloween Decorations

Here is a cute guide that shows you how to create homemade Halloween decorations out of popsicle stick monsters. They kind of look like spiders because they have eight legs, but the small furball mostly resembles a tiny monster.
For this tutorial, you will need four popsicle sticks, yarn, paint in the same color as the yarn, a glue stick, a paintbrush, a pair of scissors, light pink paper, and two googly eyes.
Once you make sure that you have everything on the list, you start by painting the four popsicle sticks in the same color. After the paint dries, use the scissors to cut all sticks in half, thus creating eight pieces of identical size.
You can now make the legs of the monster by cutting a tapered shape of the paper. In this example, the scissors were used to cut an oval shape with pointy ends. In the following step, you can use the yarn to create a pom-pom by wrapping it around your hand, tying it in the middle, cutting the sides with scissors, and trimming the uneven ends.
Next, you can glue the pom pomp to the eight sticks (four on each side), carefully assembling them into a spider monster. To top it off, make sure to glue the googly eyes to the pom-pom.
To get the best effects, you should create multiple popsicle stick monsters in this fashion. Try experimenting with different colors to see what you like the most. And, if you feel that these instructions are not clear enough, make sure to watch our YouTube video tutorial.
26. Scary Halloween Decorations
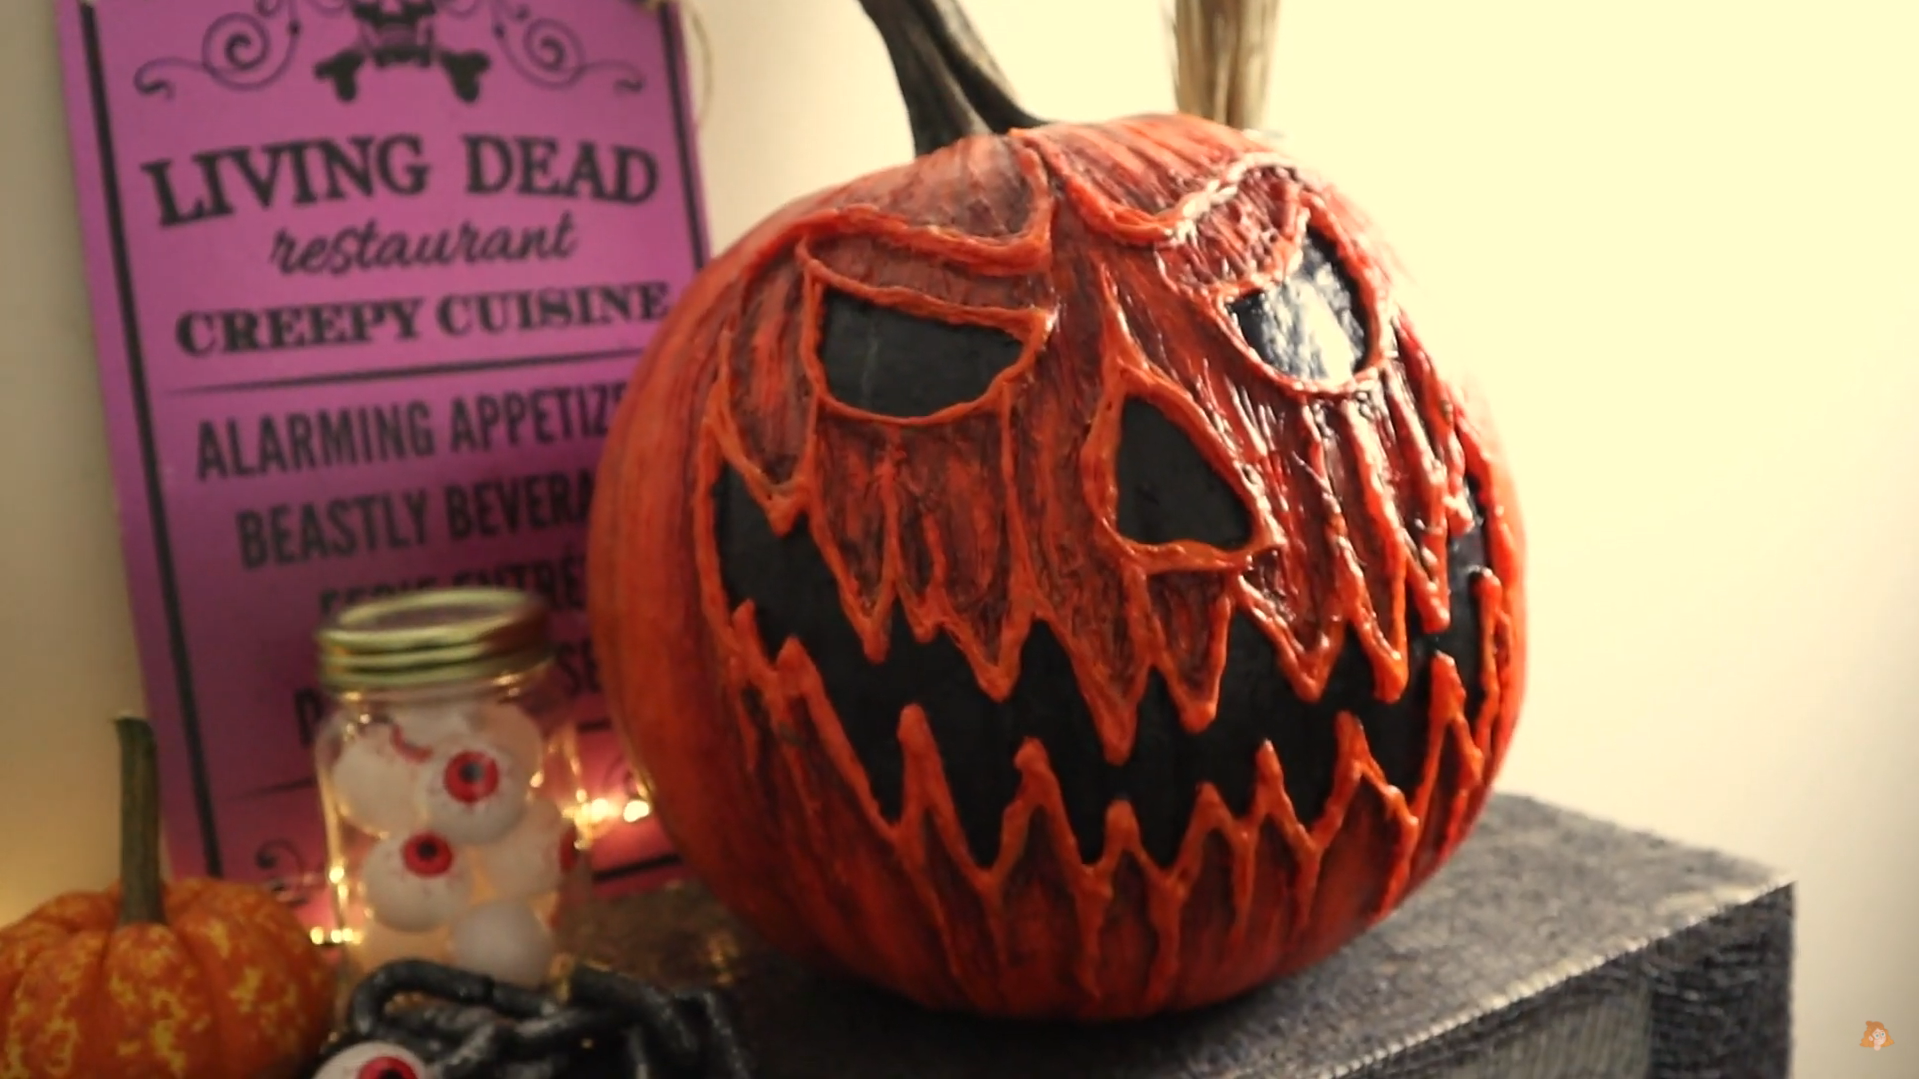
This is a more complicated do-it-yourself project for children, but we can assure you that it is incredibly rewarding. You can create a scary-looking Jack-O-Lantern by drawing, gluing, and painting a regular pumpkin.
It requires a bit of imagination, though, since there are no exact instructions on how to obtain the awesome look showcased in this YouTube video tutorial made by Helen Mabel. But we don’t think there are any wrong answers here. You can draw anything you want and let your imagination fly.
Using a Sharpie marker, you get started by drawing the facial features of a Jack-O-Lantern – eyes, eyebrows, nose, and mouth with teeth. You want to make it as scary as possible, so you can use the video tutorial as a template.
Next, get a hot glue gun and apply glue by tracing the facial features you have just drawn. Don’t worry about going overboard since you should insist on the face, nose, mouth, and eyebrows. Also, add glue between these features but without insisting and without touching the inner part of the eyes, nose, and mouth.
Once you are done, get some paint and find the right shade of peach and light orange in order to apply it on top of the glue. You can also mix multiple paints until you obtain the color you are looking for. After the paint dries off, add more glue to these parts and then apply a heavy second coat of paint. This time, the paint should match the color of the pumpkin.
Next, apply some red paint to the outer edges of the facial features in order to highlight them. As a final step, get some black paint and apply it to the inside of the mouth, nose, and eyes, which have been left untouched up until this point.
And that’s it! If you stick to the recipe displayed in this video tutorial, it means that you have created a super-scary Halloween pumpkin that would scare not only kids but also adults.
27. Minnie Mouse Candy Holder DIY Halloween Decorations
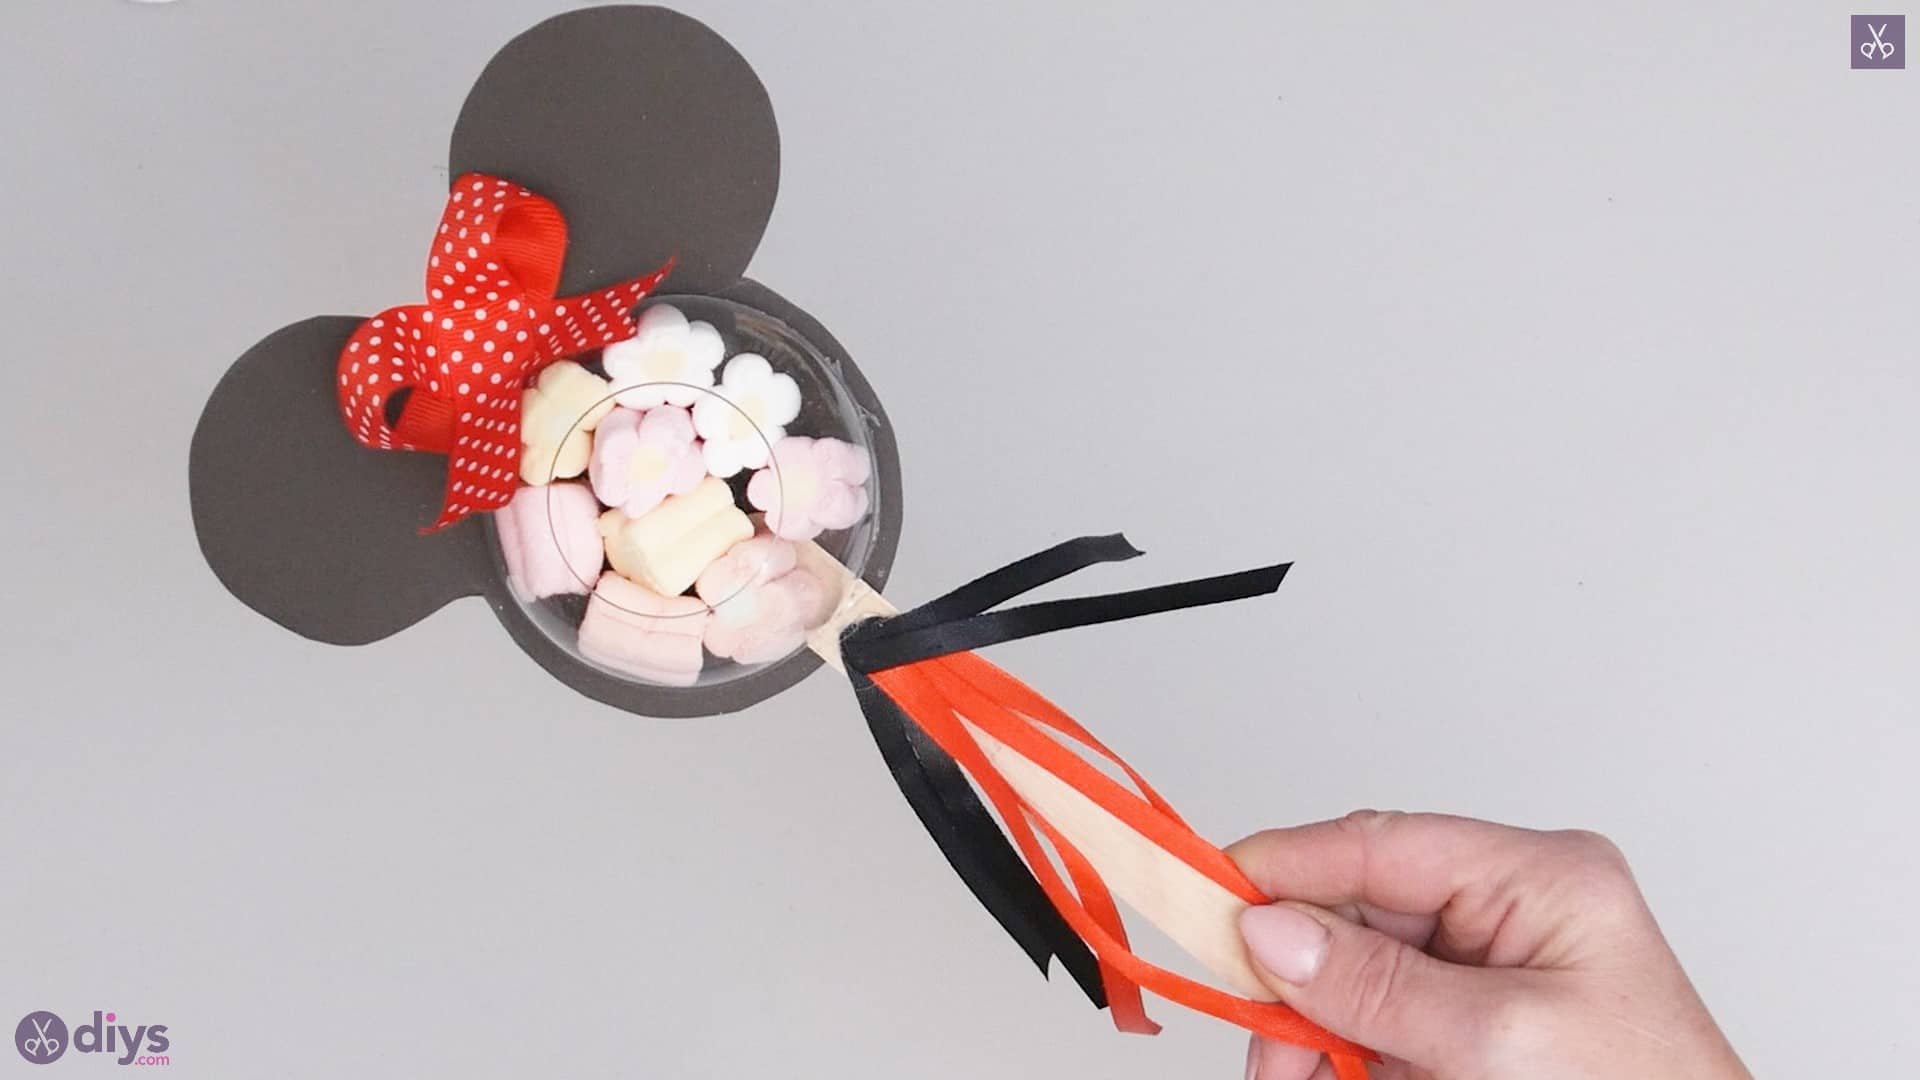
All kids love Disney pictures, so you can’t miss out on this super-cute candy holder shaped like Minnie Mouse. It’s a really fun activity to do with your kids, especially since it comes with a straightforward and intuitive guide.
Before getting started, make sure that you have black cardstock, an open-topped plastic dome, candies, a pair of scissors, hot glue, a black ribbon, a red ribbon, a red-and-white polka-dotted ribbon, a pencil, and large popsicle sticks.
Start by tracing a circle on the cardstock with the help of the plastic dome. Then draw two smaller circles on the top and on the sides to create the Minnie Mouse ears. Cut this shape out of the cardstock.
Now, cut two pieces of red ribbon of equal size and then two pieces of black ribbon. Next, make a bow out of the red and white polka-dotted ribbon, glue the popsicle stick to the bottom of the Minnie Mouse head, add the ribbons, attach the plastic candy bowl, and add candy.
The steps are quite easy, so make sure to watch our entire YouTube video tutorial to find out exactly what you need to do.
28. Pumpkin and Cat Halloween Decor
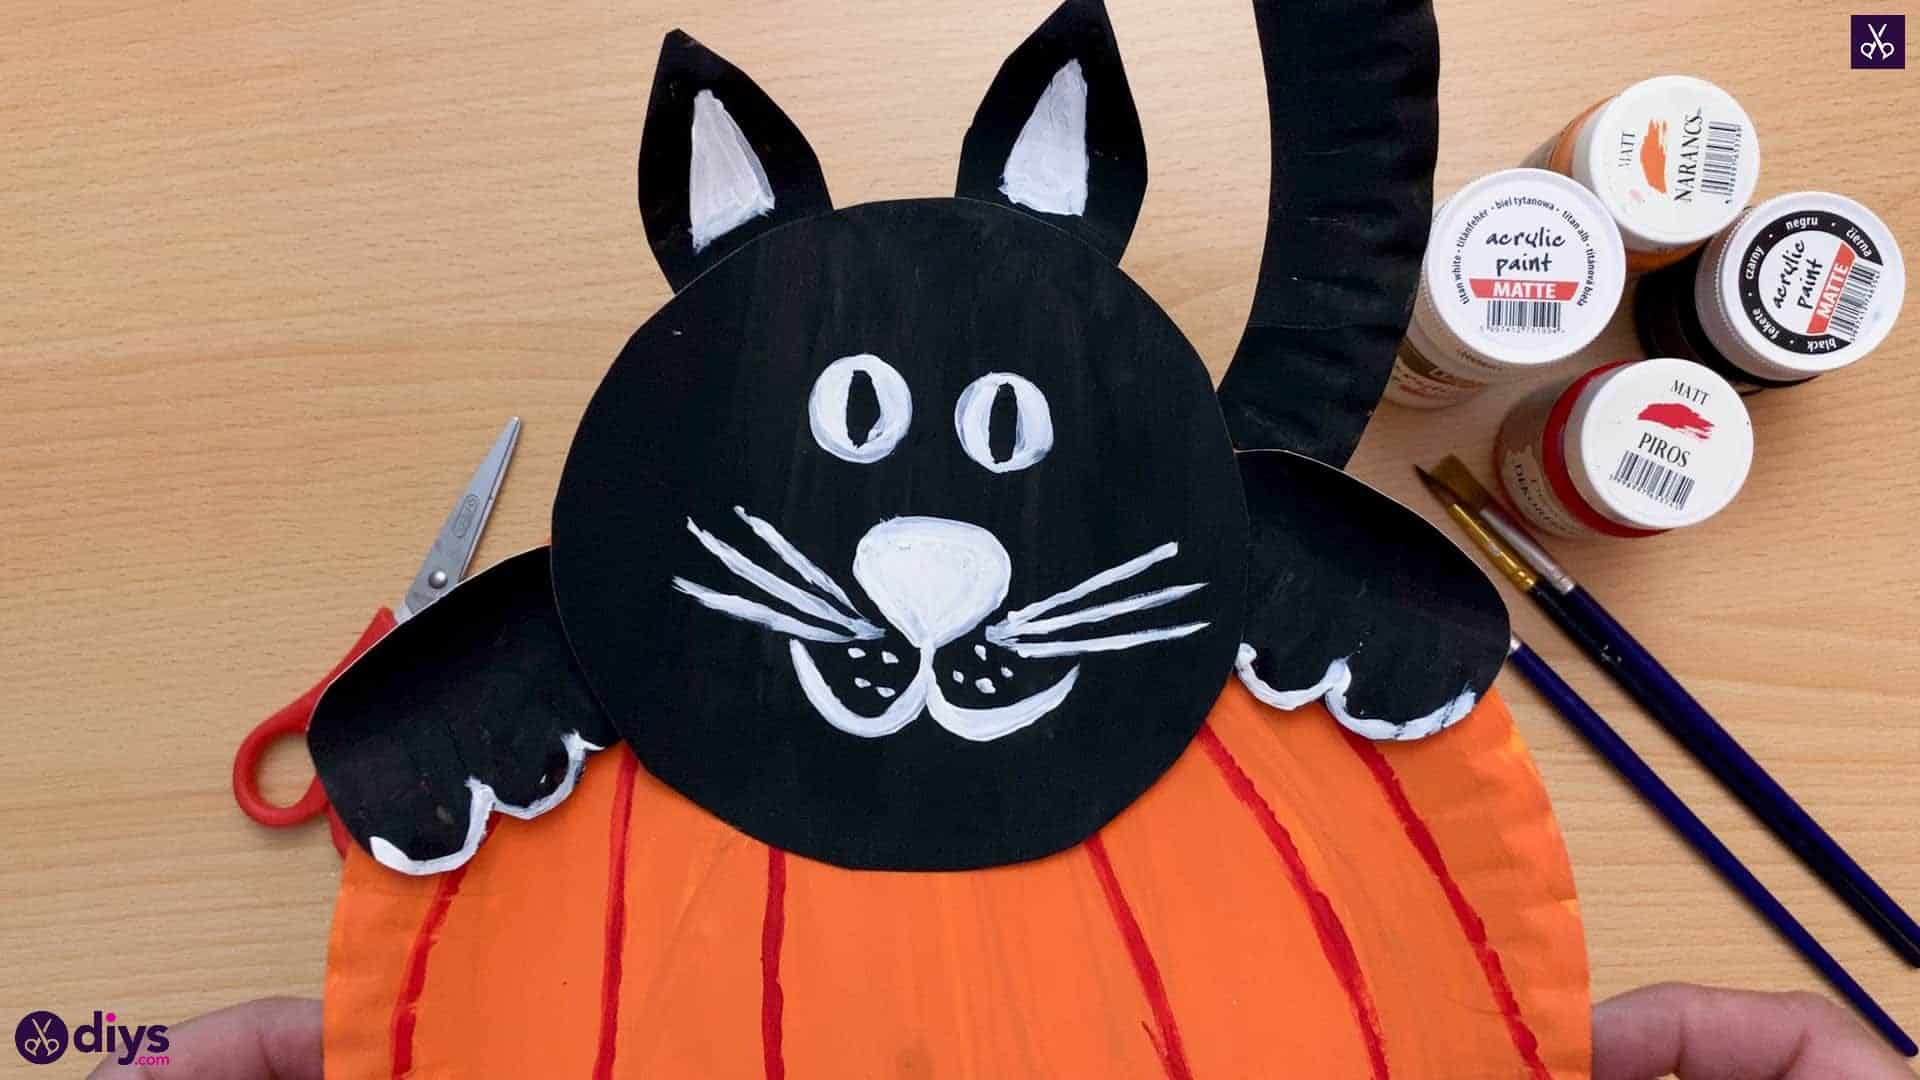
If your kids love cats, you can opt for this adorable pumpkin and cat Halloween decor that will definitely keep them happy. Plus, you don’t need a real pumpkin for this project since you can use paper plates.
As far as supplies are concerned, make sure to get two paper plates, a hot glue gun, a few paintbrushes, a pair of scissors, and paint in black, orange, white, and red. Once everything is in place, you can begin.
Start by painting the inside of a paper plate in orange. After the paint dries off, check the results and, if the white is still visible, apply a second coat of paint to obtain that solid orange look. Using the same recipe, paint the inside of the other plate – this time in black.
Now, take the black plate and carefully cut the base while keeping the remaining part of the paper plate intact since you will need it to create the cat’s tail. For the tail, cut about a third of the remaining part and curve the edges. You can use what’s left to cut two paws and two ears.
In the following steps, use red paint to draw the pumpkin details on the orange plate, just like in the images displayed in our tutorial. Once the paint dries off, you can glue the head of the cat on top of the pumpkin, followed by the paws, ears, and tail.
Use white paint to create the cat’s facial features, namely the white of the ears, eyes, nose, mouth, whiskers, white paws, and white tip of the tail. After everything dries off, you can admire the results and get started on a second cat.
29. Paper Cone Witch
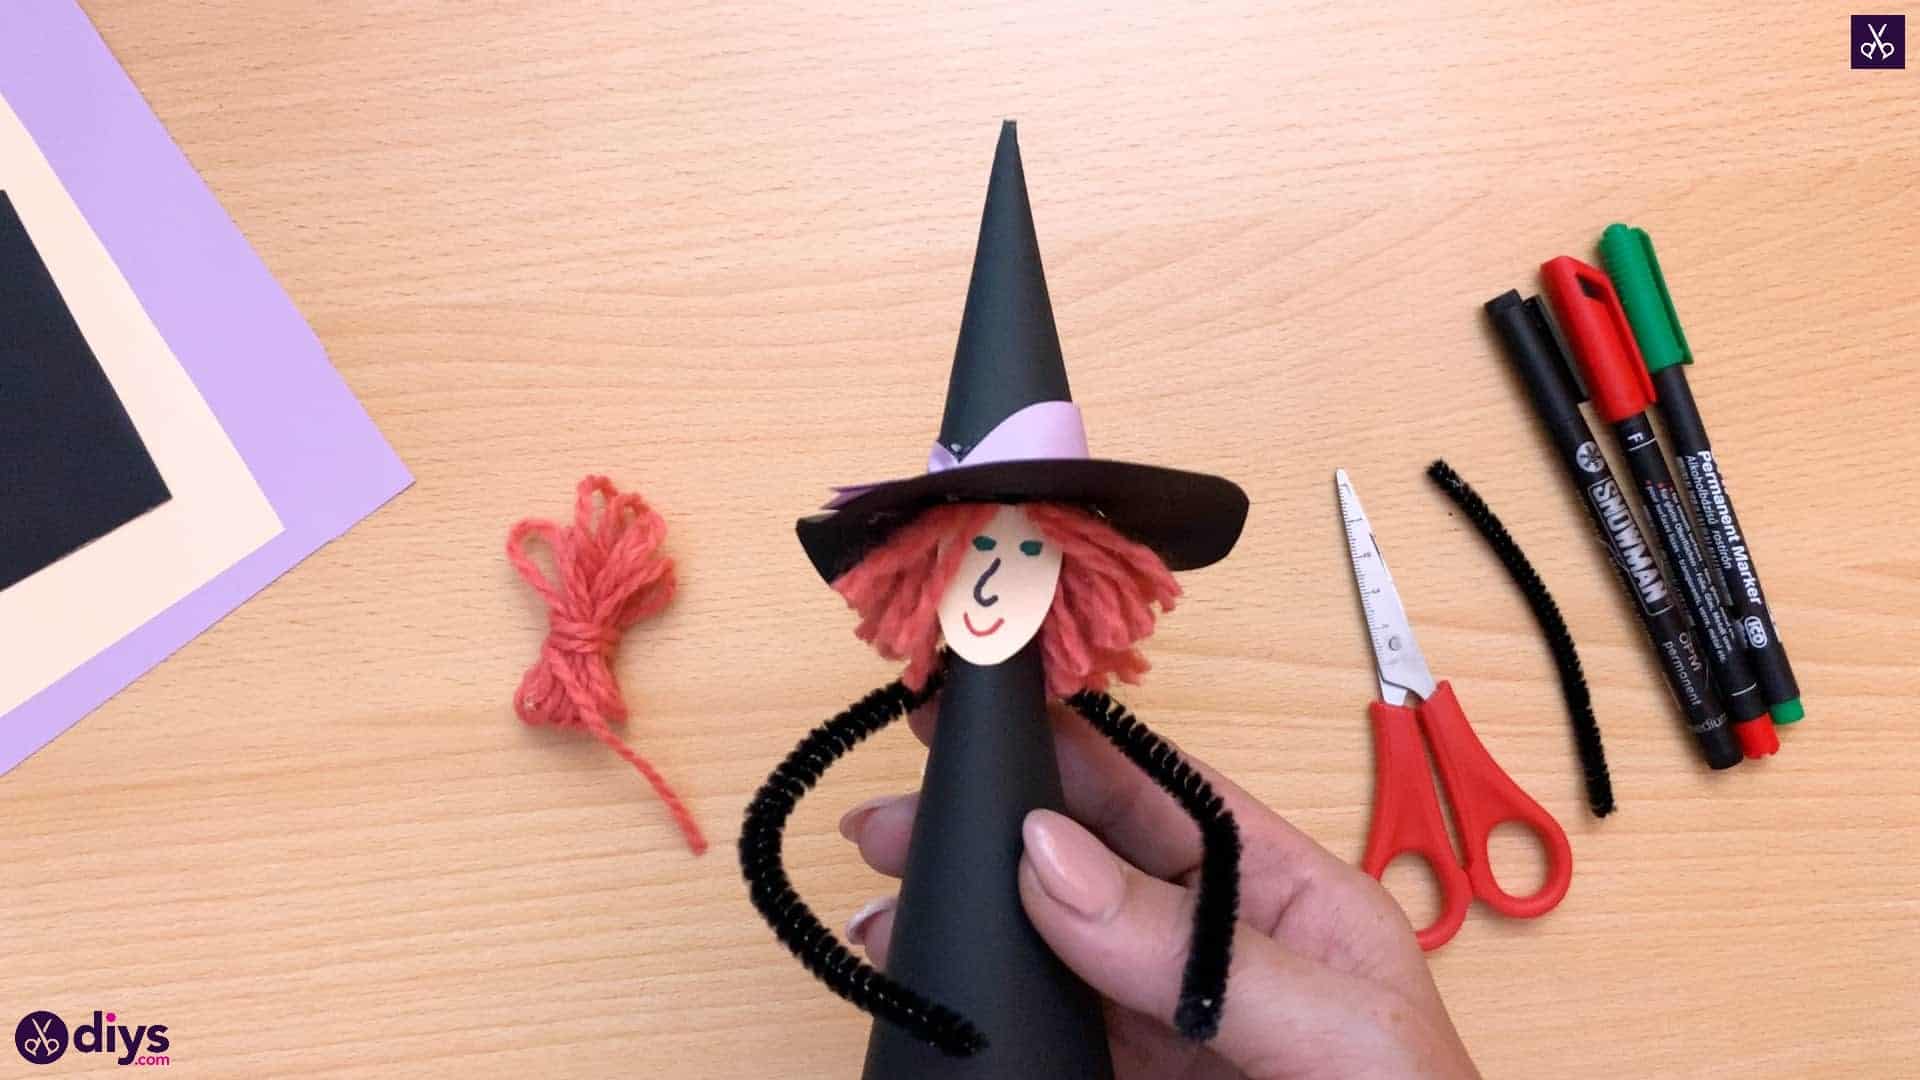
If you are looking for a simple do-it-yourself project for your kids, check out this paper cone witch design that makes it a perfect addition to any Halloween indoor decorations. It’s made out of a paper cone and several other details that are easy to add.
To complete this project, you will need a pair of scissors, black, cream, and purple construction paper, orange yarn, black pipe cleaner, black, green, and red felt tip pens, and a hot glue gun.
Once everything is gathered, you can start working on the witch’s hair by wrapping the yarn around your fingers, tying it in the middle, and cutting it on both sides. Then, you can cut a small rectangle out of the cream paper and make the corners rounded on only one end to create the witch’s face.
When it comes to hat accessories, you can cut a strip of purple paper that’s as long as the paper’s width to create the hat’s band. Next, take the black paper and cut a rounded arc to create the witch’s body in the shape of a cone. Using the remaining black paper, also cut out a circle and another cone as you did for the body but make it as small as the circle.
After preparing all pieces, it’s time to assemble them. Do this by drawing the witch’s facial features on the small piece of cream paper: make the eyes green, the nose black, and the mouth red. Then, glue the hair to the face and the face to the top of the cone.
You can then fold the small black hat into a cone and glue it, as well as fold the large black body into a cone and also glue it. Next, cut out a small hole in the center of the black circle and use it to glue the brim of the hat before adding the purple ribbon. Once the hat is ready, you can glue it to the hair.
When it comes to the witch’s arms, all you need to do is cut the black pipe cleaner in half, pinch each arm in the middle to create the elbows, and then glue one end of each arm to the witch’s body. It should be complete now. But, to be sure, review the YouTube video tutorial on our guide page.
30. DIY Rosette Pumpkin Fall Garland
Every child’s room needs a garland for Halloween, so you can go with this intuitive tutorial to quickly make a pumpkin fall garland out of paper. It will surely brighten up the room.
For this project, you will need a paper trimmer and a scoreboard, black, orange, and brown cardstock, black tissue paper, a hole punch, black twine, a pair of scissors, double-sided tape, as well as a hot glue gun with glue.
Begin by cutting two strips of orange cardstock, and then make sure to score them with 1/2 inch score lines. You can now fold the strips of paper into accordions, add a piece of double-sided tape to one end of each strip, and use it to connect the two strips into a large circle, thus forming a rosette.
In the following steps, you can create the pumpkin’s stem by taking a small strip of brown paper, rolling it, and gluing it into a stem shape. It’s also necessary to cut out the pumpkin’s eyes, nose and mouth out of the black cardstock.
Next, take the nose and glue it to the center of the rosette. Follow this by gluing the eyes and mouth. Take the hole puncher and create two holes on the sides of the pumpkin, on the left and right of the stem, so that you will be able to put the string through there. You will have to repeat these steps to create several rosette pumpkins this way.
Afterward, you can create mini tassels out of black tissue paper and finally put the string through all pumpkins, making sure that there’s a mini tassel between two pumpkins. Once the garland is done, you can hang it somewhere in your room and admire your work.
25 More Indoor Halloween Decorations
Now that we have seen so many cool decorations, how about we check even more. We can never have enough inspiration!
31. Indoor Halloween Decorations – Ghost Blinds
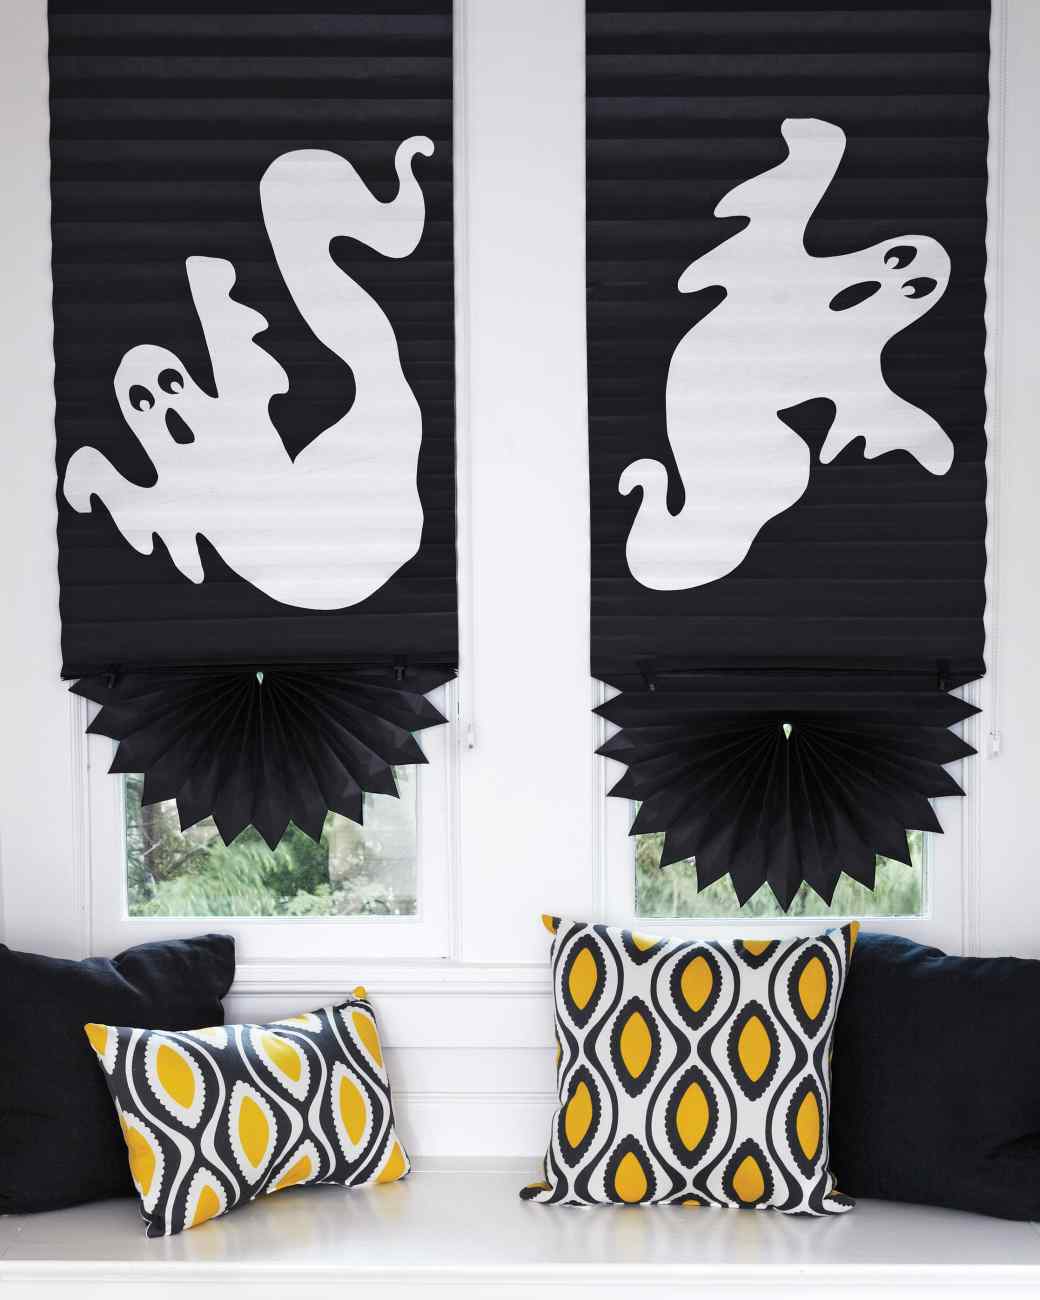
Martha Stewart always has great ideas, and these ghost blinds are no exception. Hop on over and learn how to create them for yourself!
32. Halloween Decoration Ideas – Poison Bottles
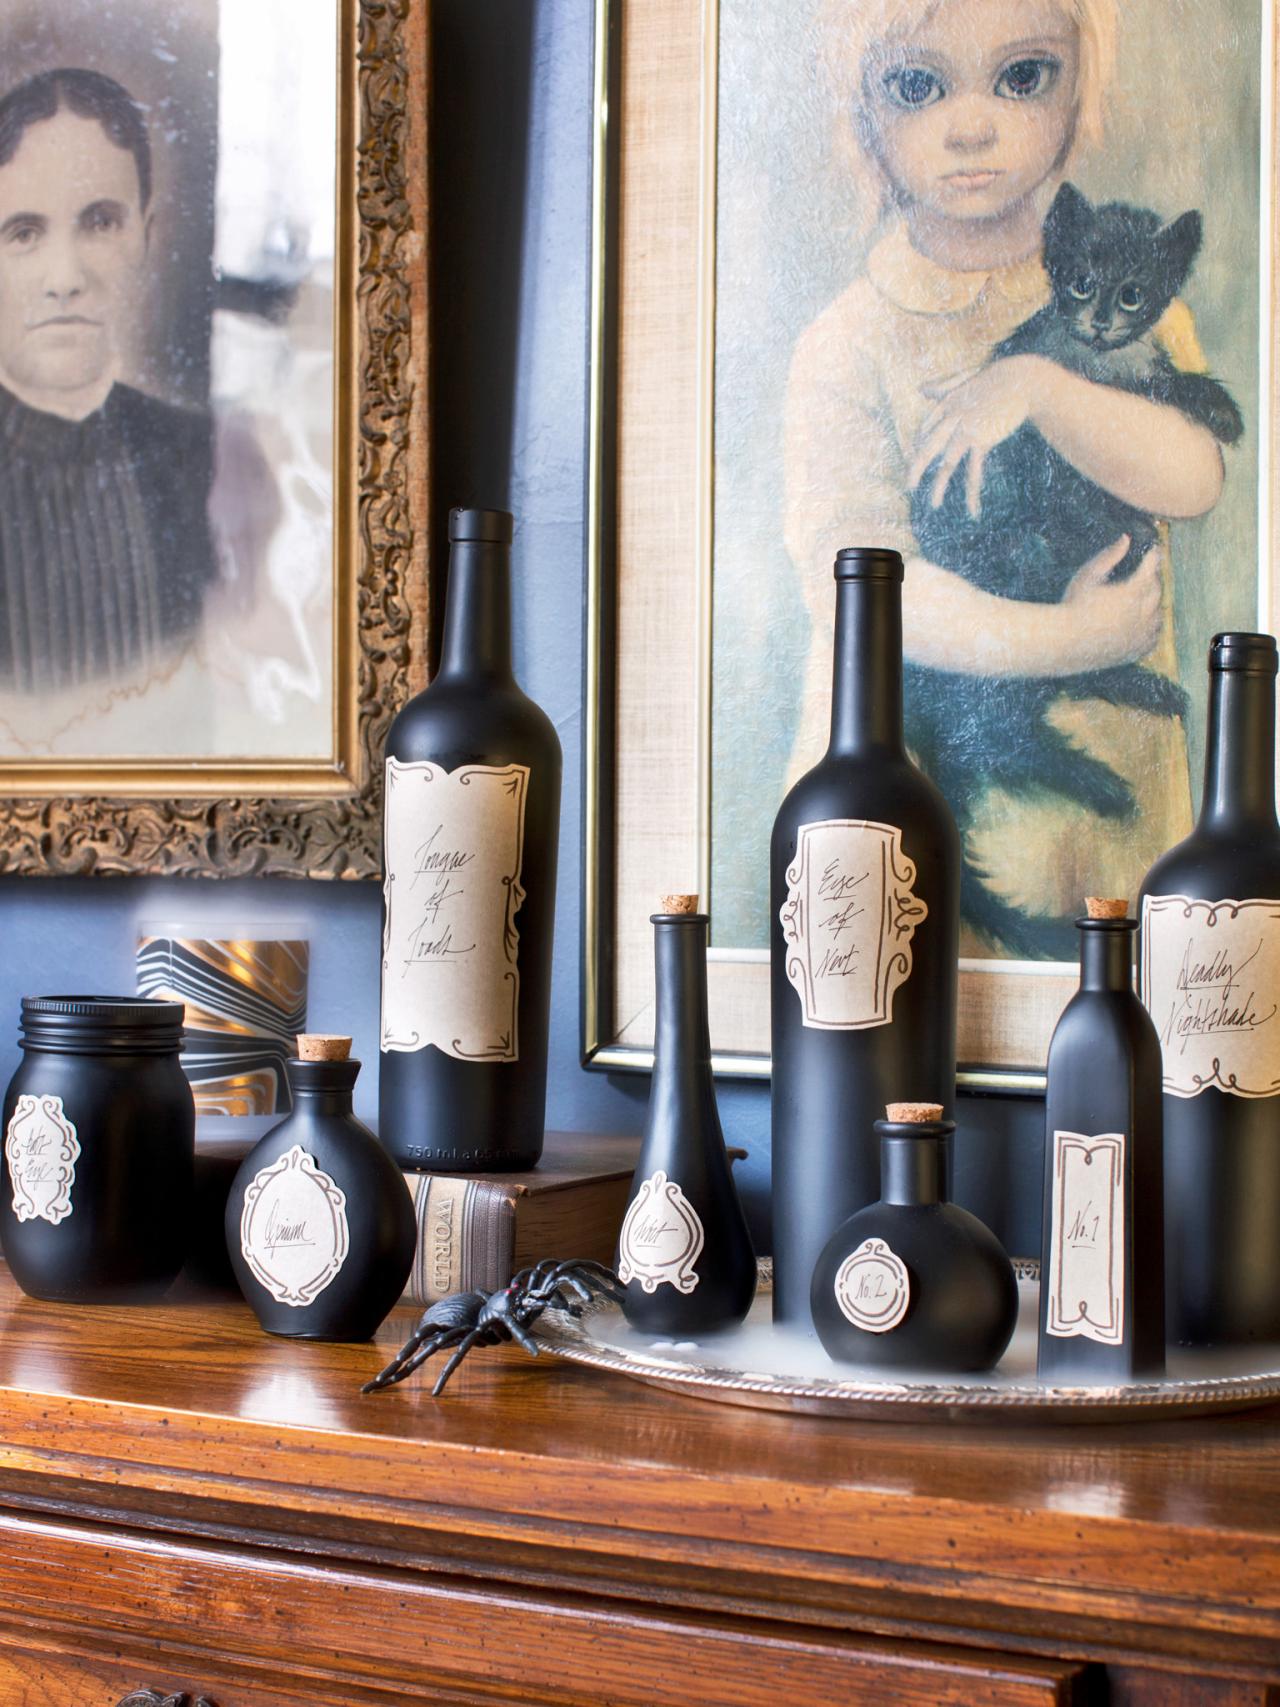
Create a witches’ altar or a black window spookfest with a mantle or counter filled with DIY “poisonous bottles.” Learn how over at HGTV.
33. Halloween Decorations – Pumpkin Silhouette
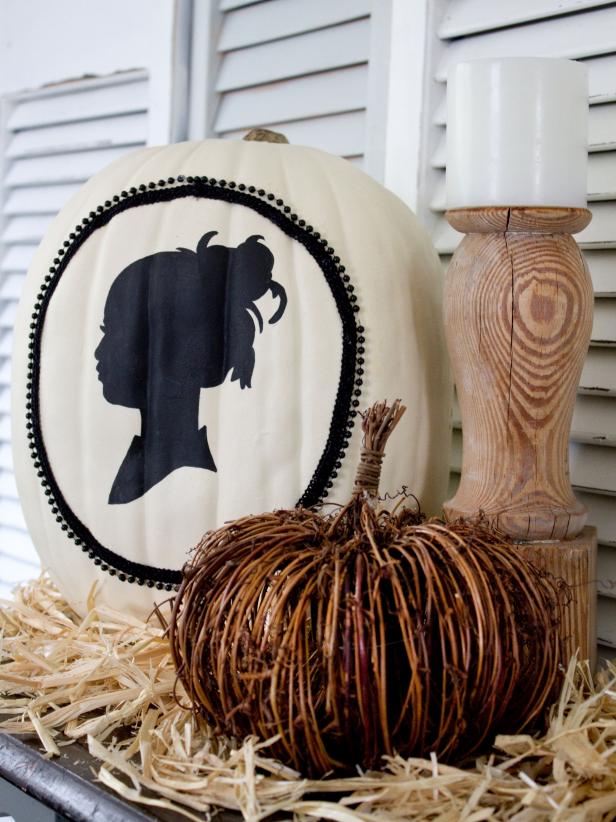
This is just another way to sprinkle around a “haunted” house feeling inside (or even outside) your home in a classy, stylish way. This, too is over at HGTV to learn how to make!
34. Halloween Indoor Decorations – Window Silhouettes
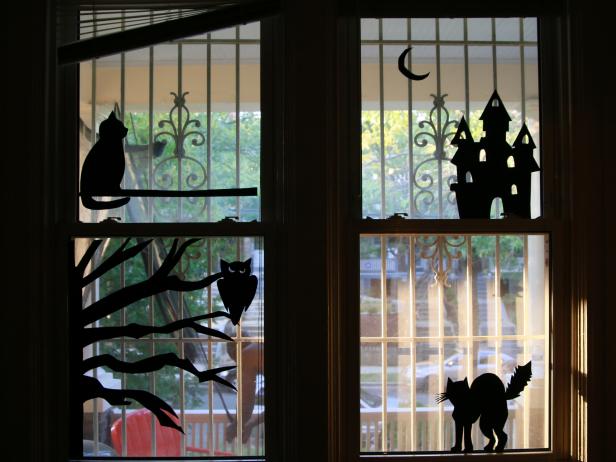
Create a silhouette on a pumpkin-like above, or create some spooky ones in the windows for guests inside and outside to enjoy. DIY Network shows us how.
35. Halloween Indoor Decorations – Skull String Art
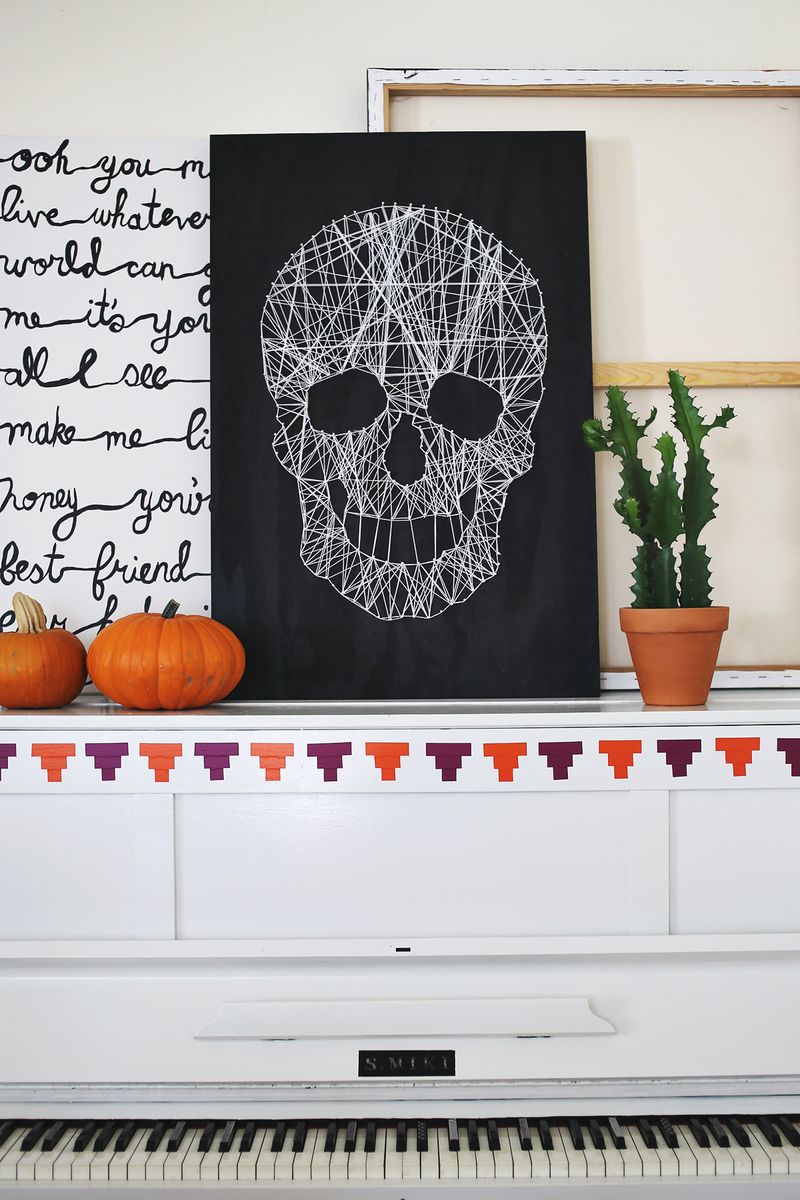
A Beautiful Messmade this gorgeous string art and shows us all how to recreate it. It’s the perfect mantle piece for creating a Halloween-inspired space!
36. Spider Pinata as an Indoor Halloween Decoration
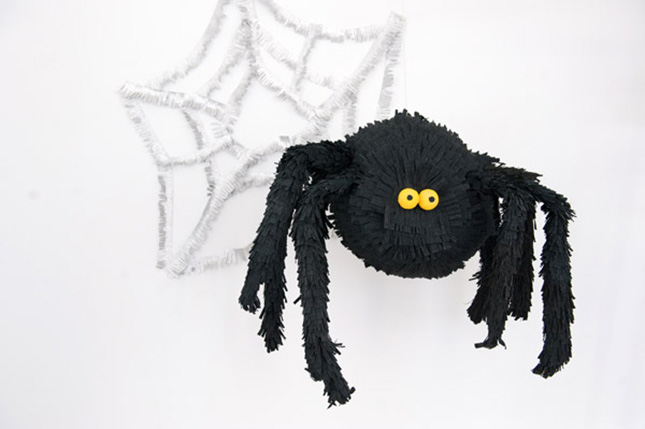
This spider pinata from Oh Happy Day not only acts as a great piece of indoor decor for Halloween but a great way for the kids to get involved in the fun too!
37. Vampire Pumpkins Halloween Decor
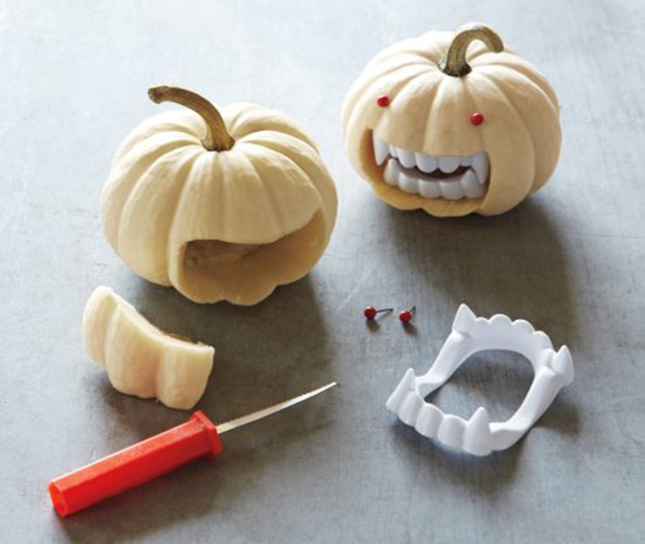
Martha Stewartcreated these adorable mini vampire pumpkins that could be a great addition to the mantle or even in the kids’ rooms to add somefestivity.
38. DIY Halloween Decoration – Knitted Candy Corn

Over at The Purl Bee, you can check out these adorable knitted candy corns and learn how to try and make them at home. How charming would these be sprinkled around the house throughout October?
39. Halloween Decoration Idea – Glowing Balloon Ghosts
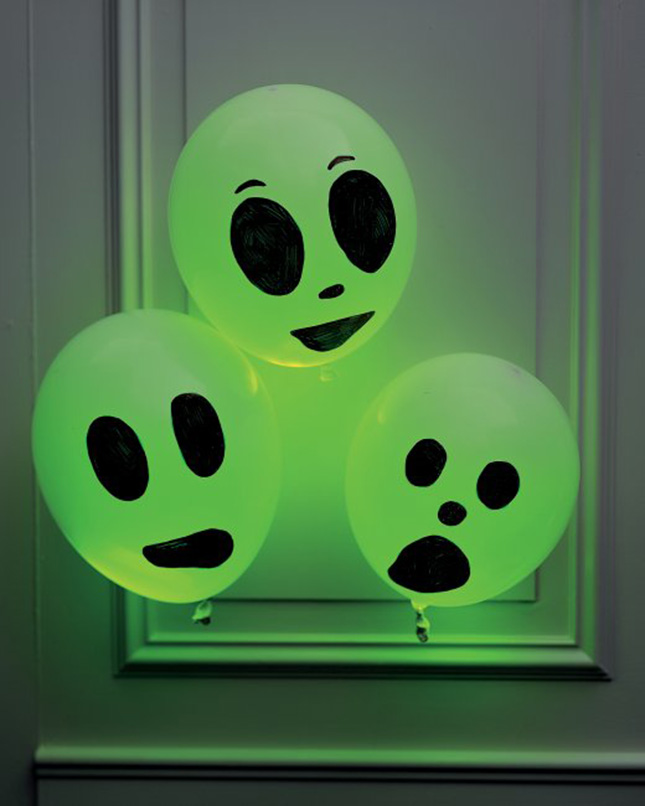
Add some ghosts to the Halloween decor and make it glow to spook your guests. Check out these DIY over at Martha Stewart and add something special to the house.
40. Spider Magnets Halloween Decorations
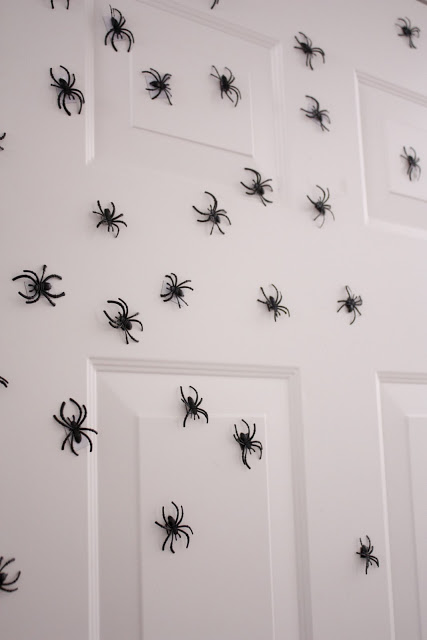
Delia Creates used favor spider rings and turned them into magnets to decorate the kitchen with. It’s inventive, and it’s super easy to recreate and get the kids involved.
41. Boo Hoop Halloween Wall Decoration
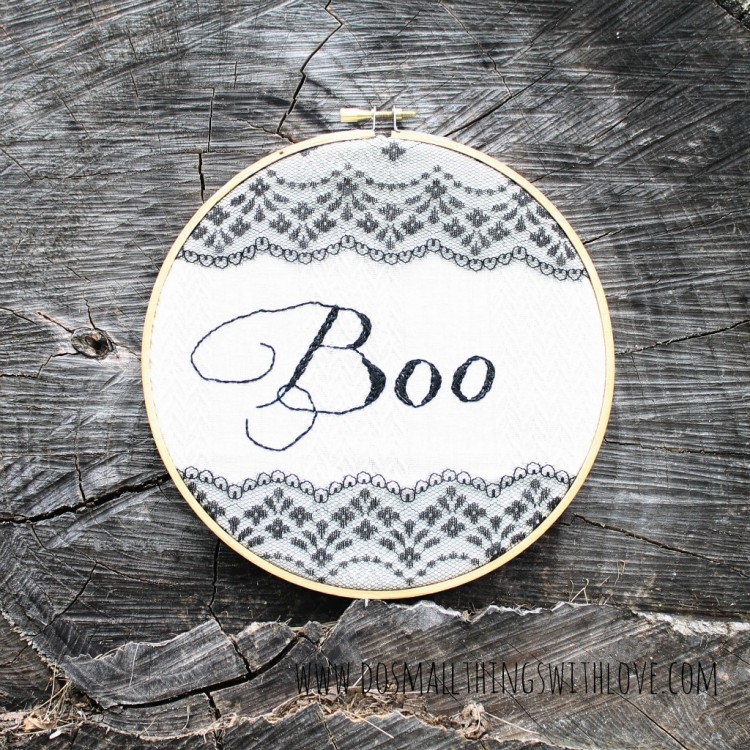
This adorable “Boo” embroidery hoop is fromDo All Things With Love. And we love the subtle festivity that it can create around the house for the holiday.
12. Halloween Decoration – Newspaper Skull
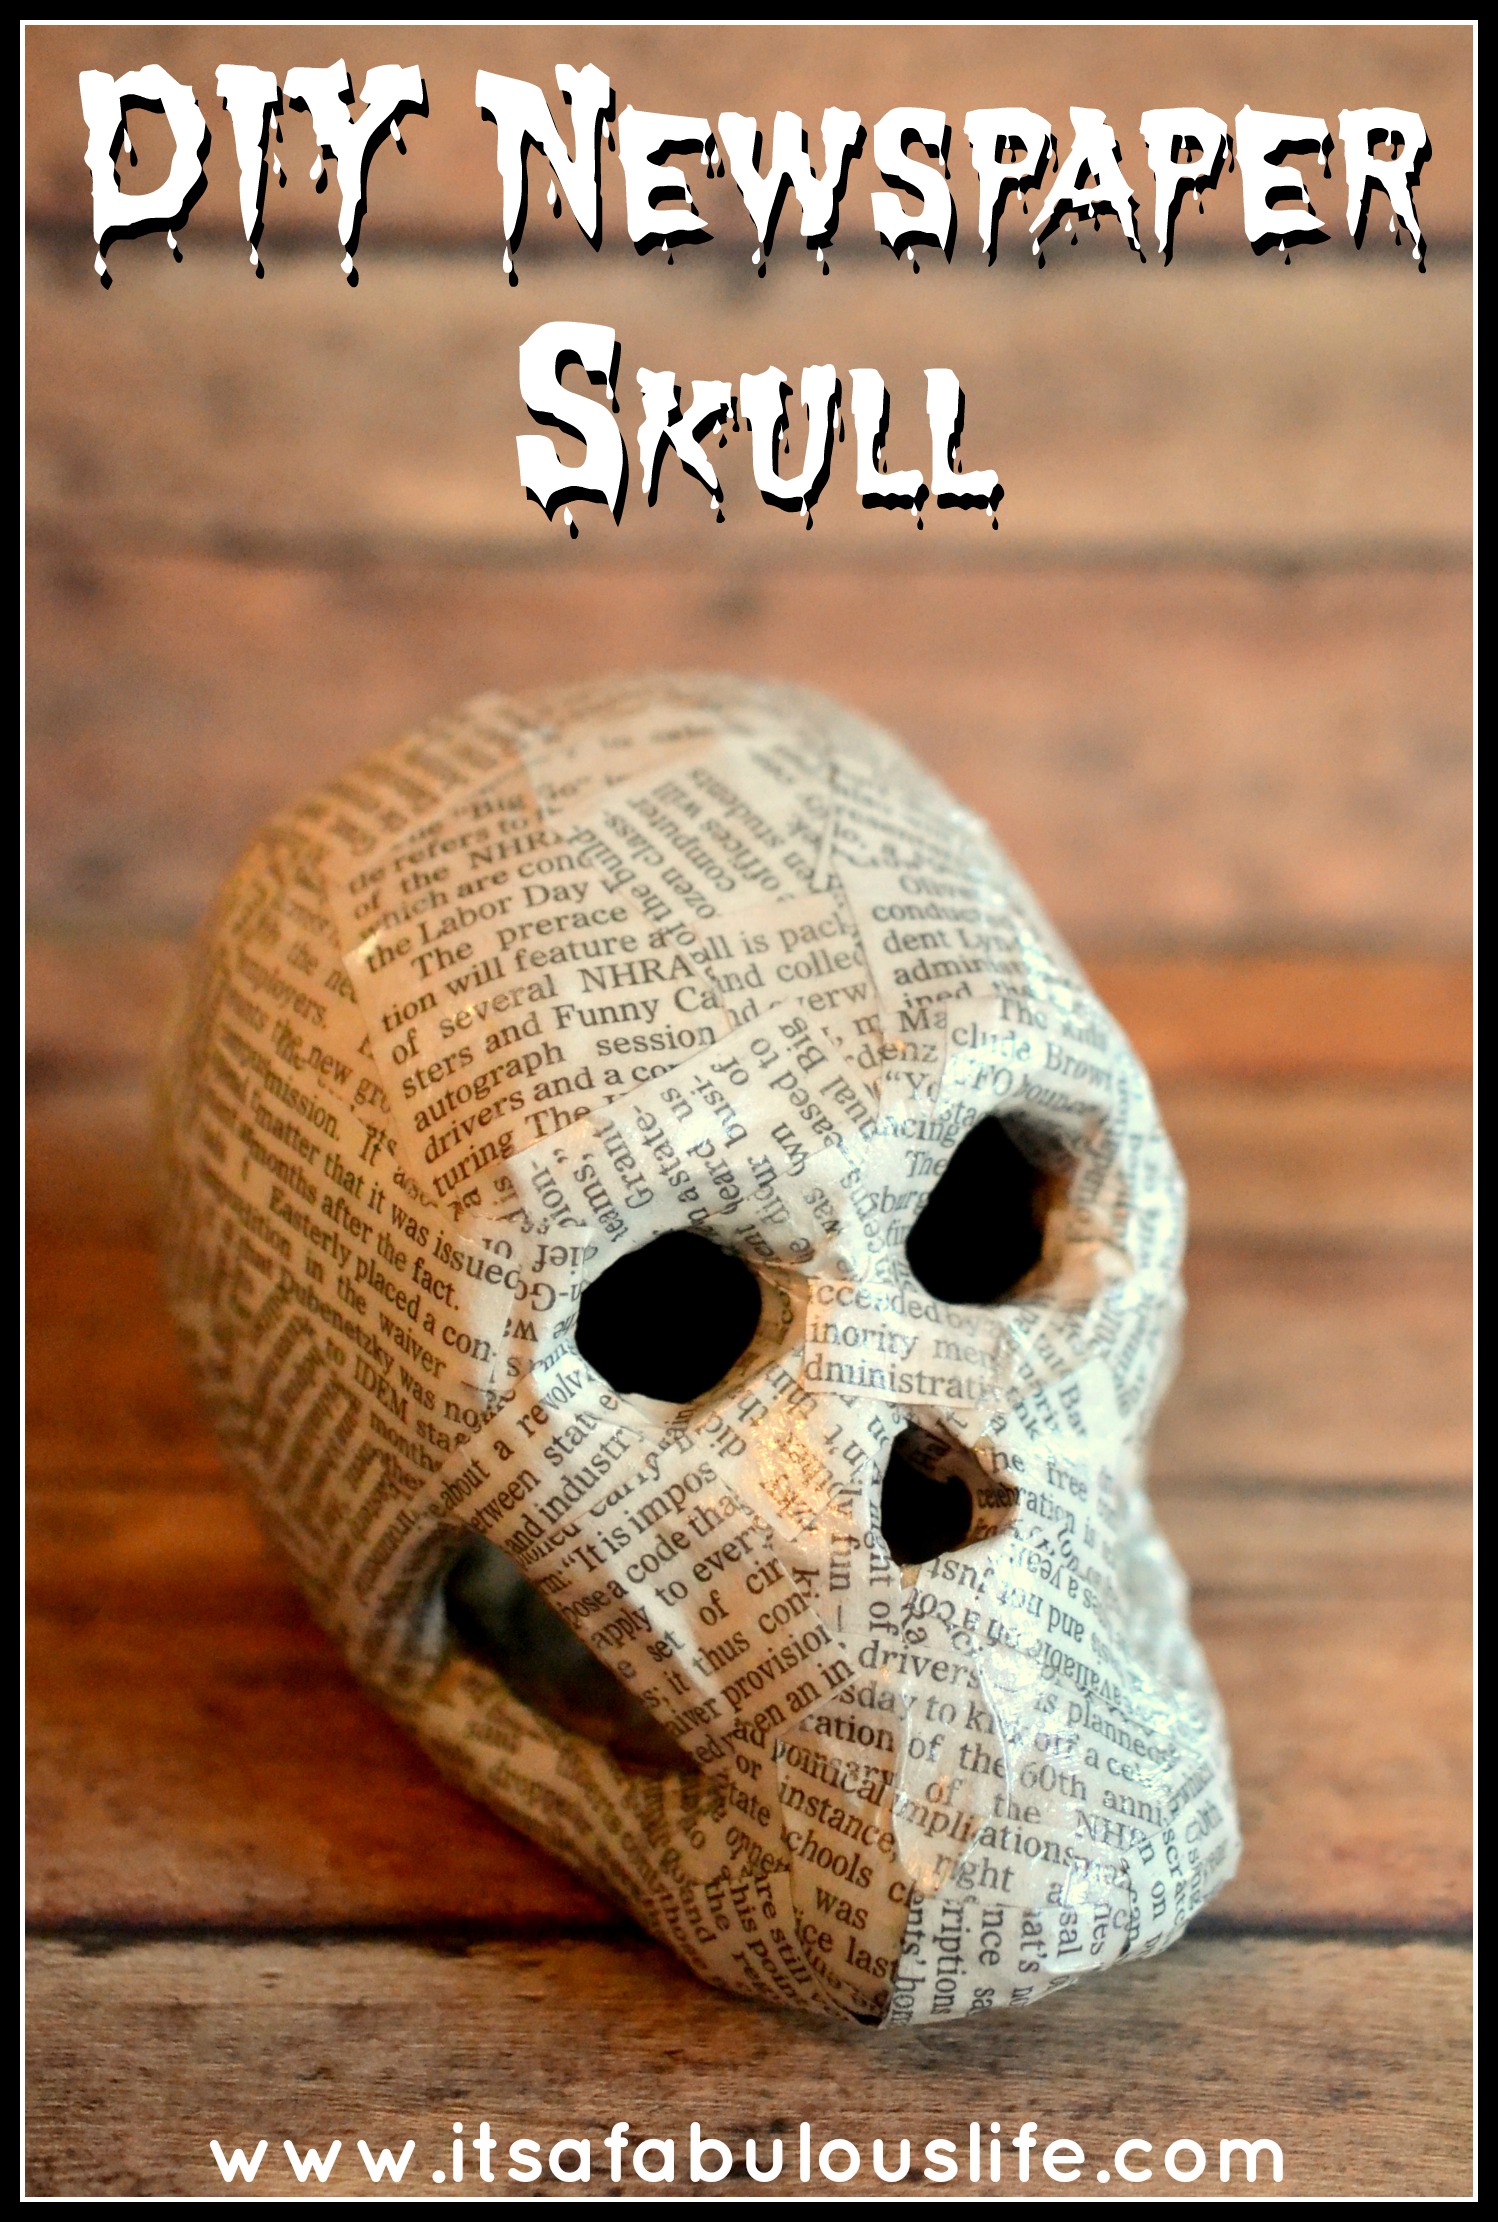
Check out this newspaper skull from It’s A Fabulous Life. Create a collection of these at the fireplace, on the mantle, or even inside the dining room.
43. Indoor Halloween Decoration – Feathery Wreath
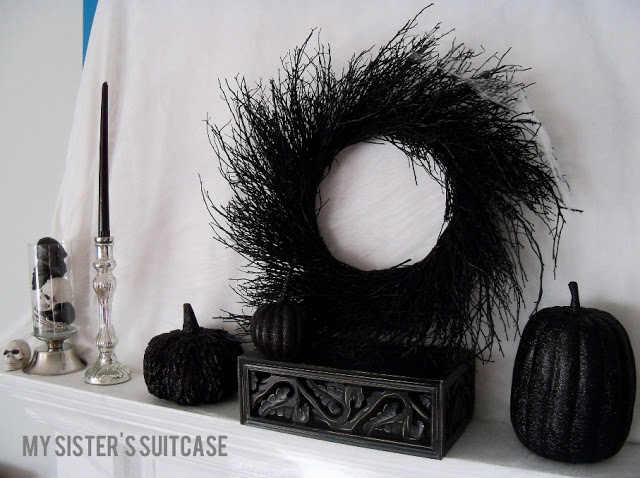
This entire mantle is a great inspiration, and the wreath was such a quick and easy makeover that we had to showcase it. Find out what was done at My Sister’s Suitcase.
44. Lacey Ghosts Halloween Decoration
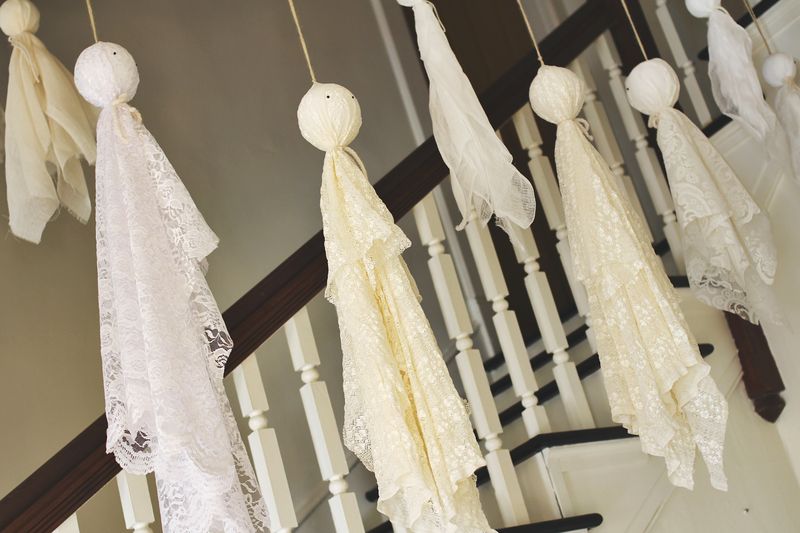
A Beautiful Mess made these adorable, hanging ghosts to decorate some hallways with such ease and quirky style! We love how they utilize scrap pieces of lace for this project.
45. Indoor Halloween Plates Decoration
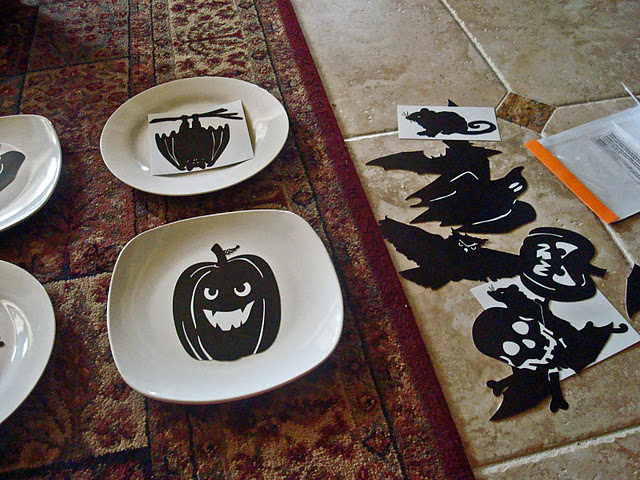
Over at Shelterness, you can check out how to create these charming Halloween-inspired plates. From pumpkins to bats, you can utilize lots of Halloween classics.
46. Indoor Halloween Decoration – Candy Corn Trees
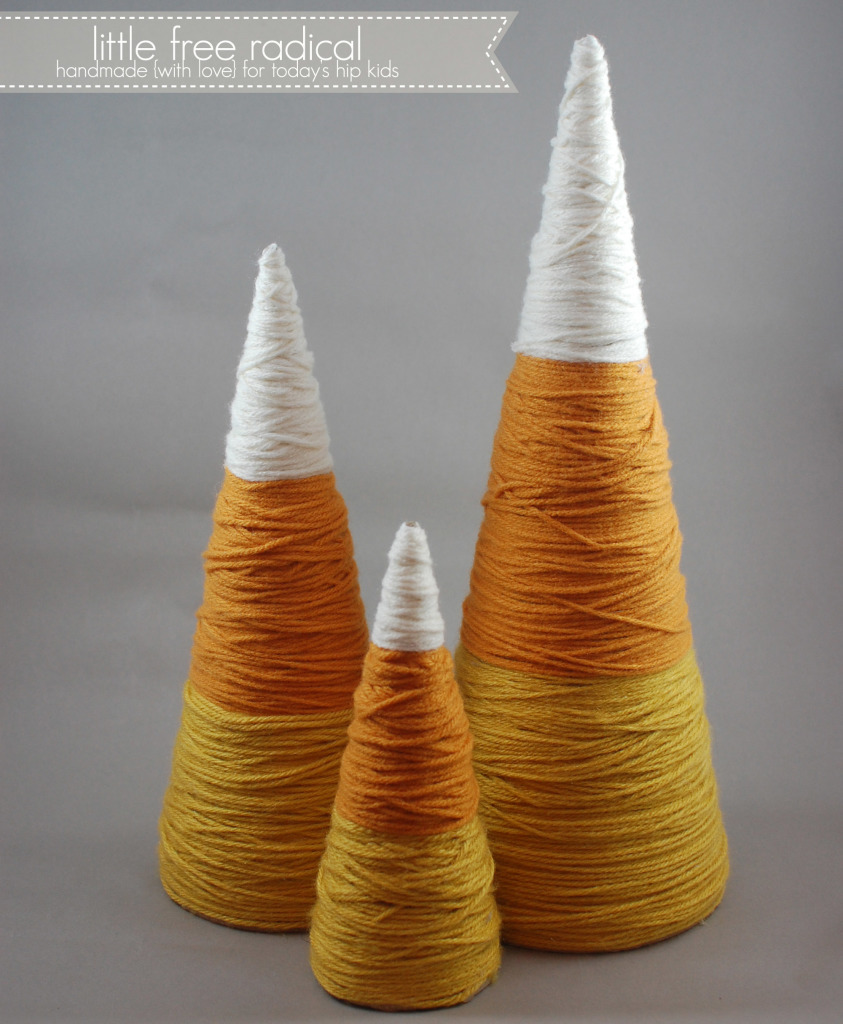
Little Free Radicalmade these adorably charming candy corn trees, and it was hard not to fall in love with the family-friendly festivity. Have everyone help out in their creation!
47. Indoor Halloween Decorations – Zero the Ghost Dog
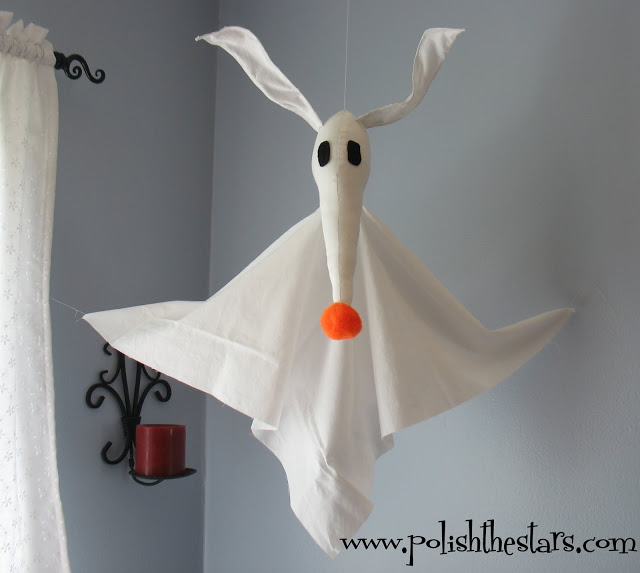
Have you ever seen A Nightmare Before Christmas? If it’s one of your favorite Halloween movies, inspire your holiday decor around it like Polish the Stars did!
48. Indoor Halloween Decoration – Ribbon Bats

Cover doors or mantles with these DIY ribbon bats! Hop on over to The Happier Homemaker and learn how to whip off these cute piece of Halloween decor.
49. DIY Halloween Decorations – Witch’s Hat
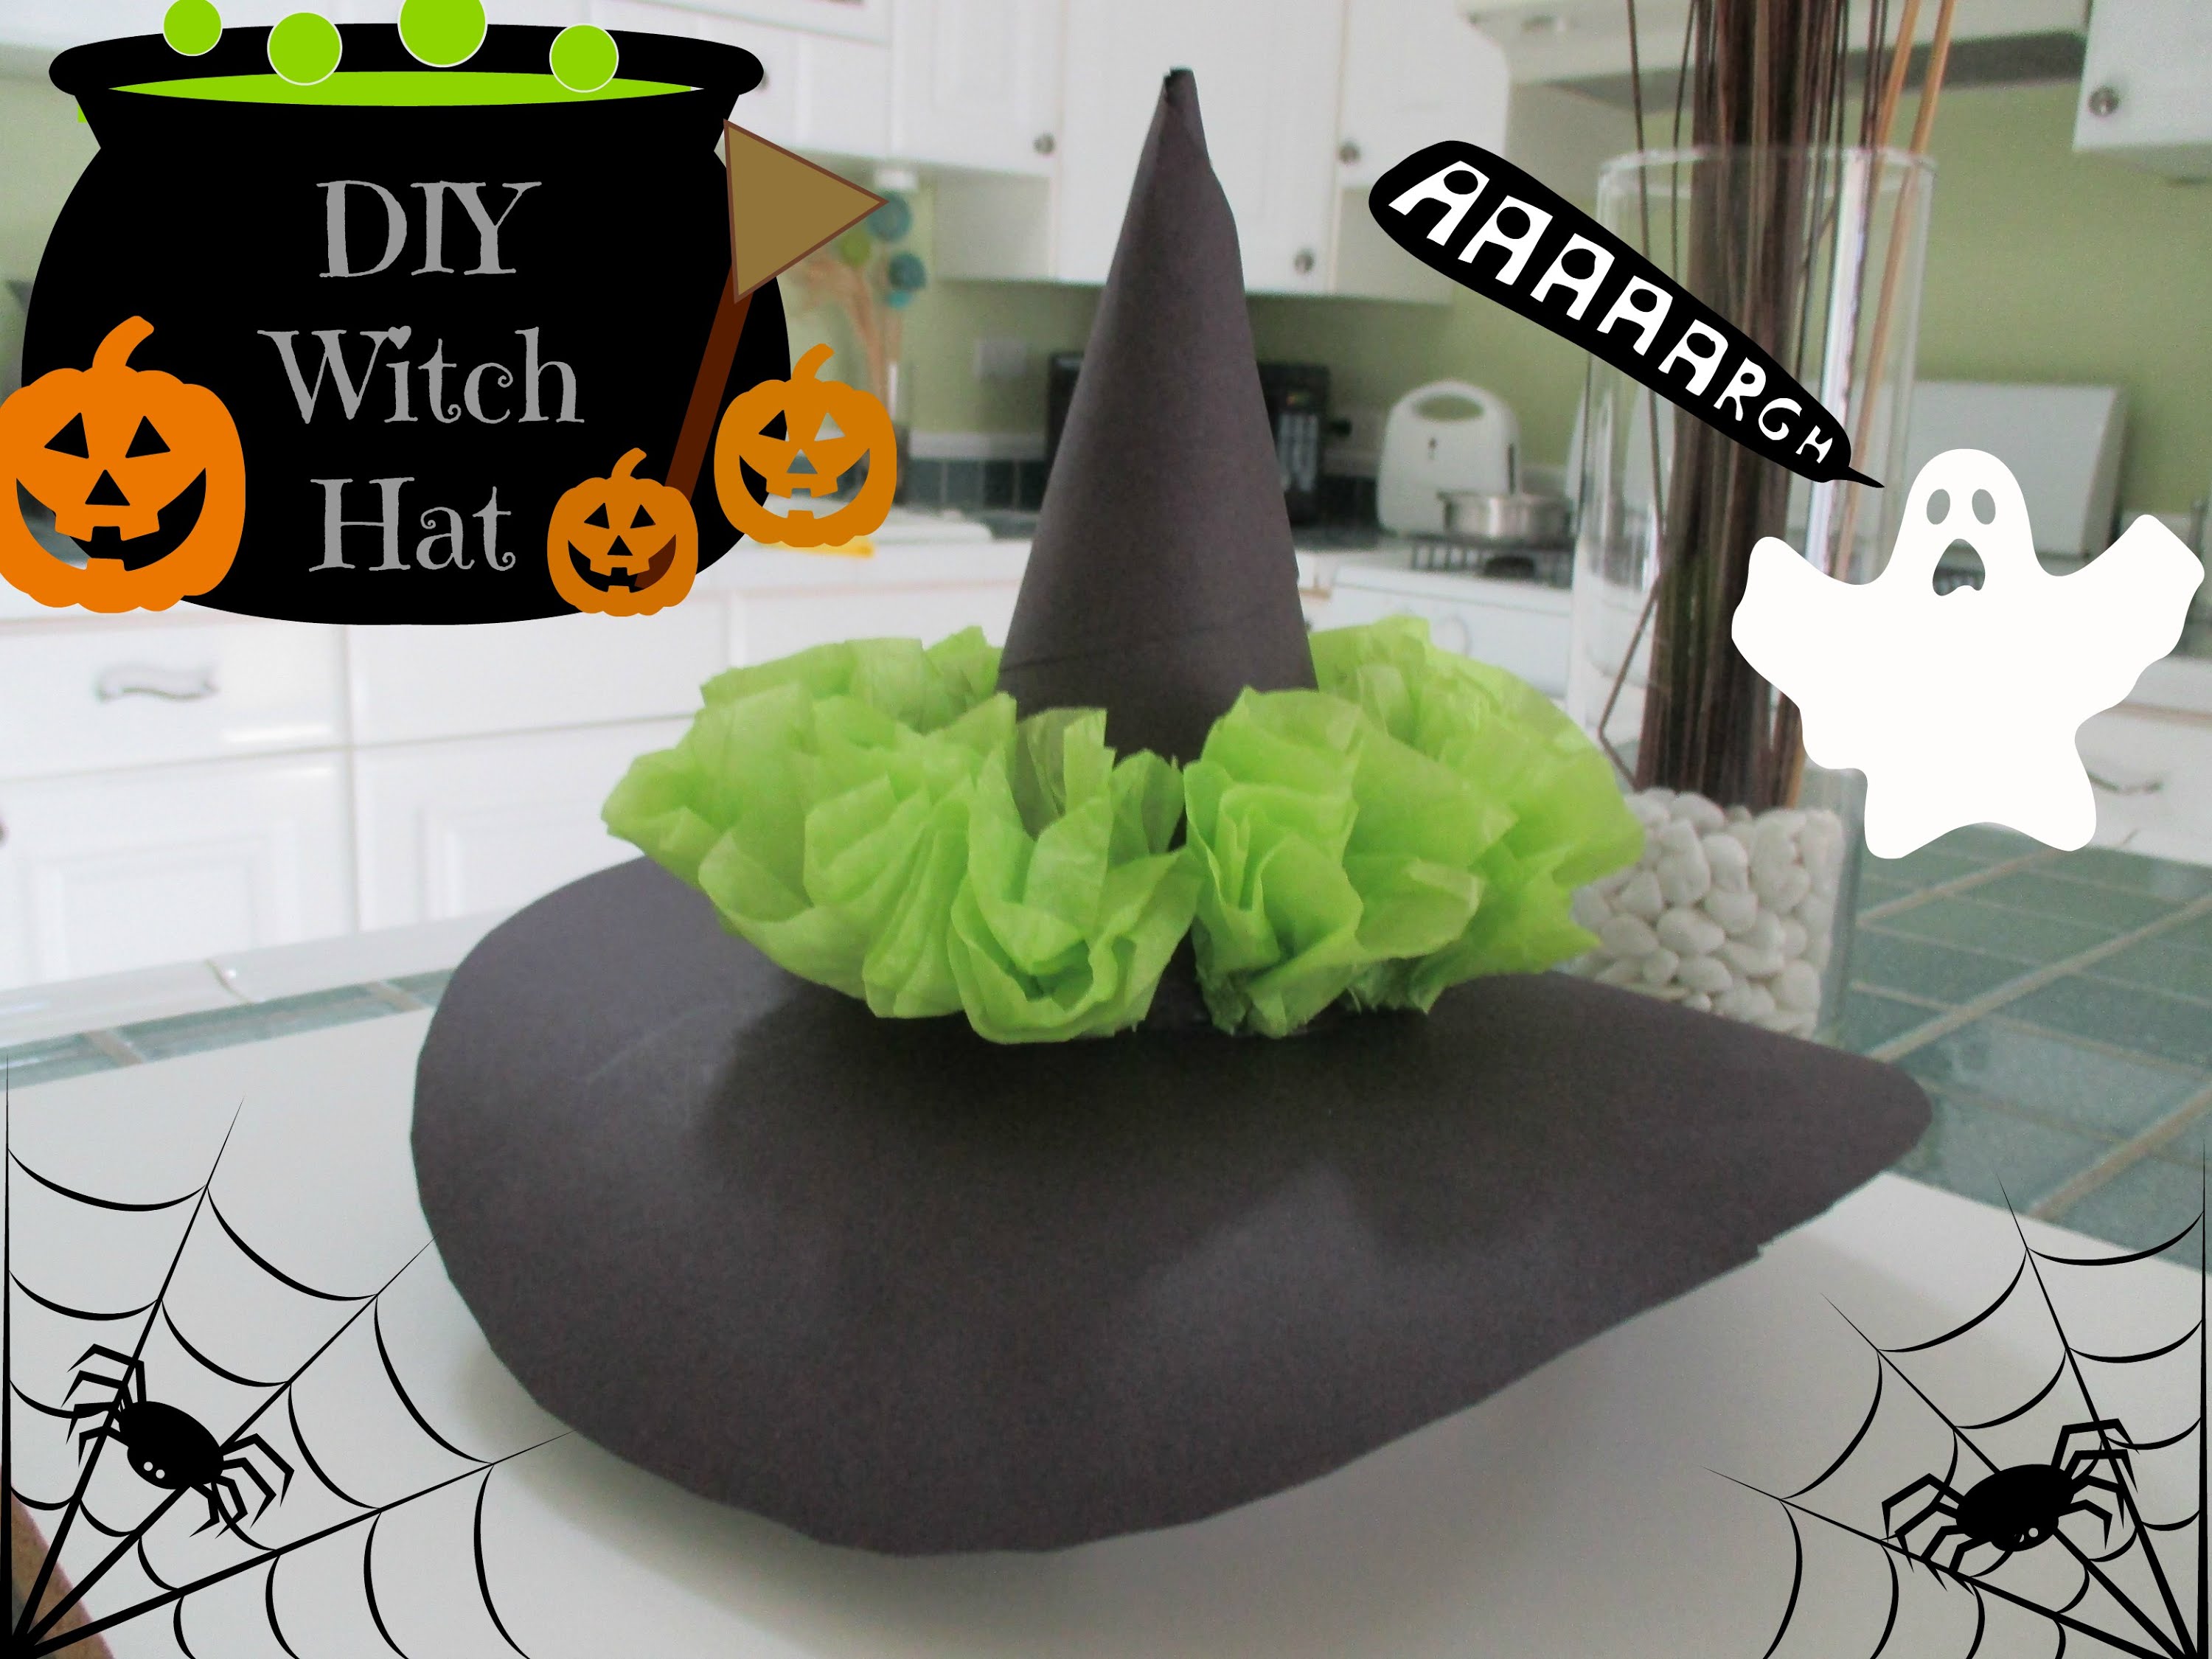
Over on YouTube, you can find out how to create your very own witch’ hat and use it as a centerpiece. It’s the perfect way to round out the food table for your Halloween party!
50. Mice Silhouettes Halloween Decoration
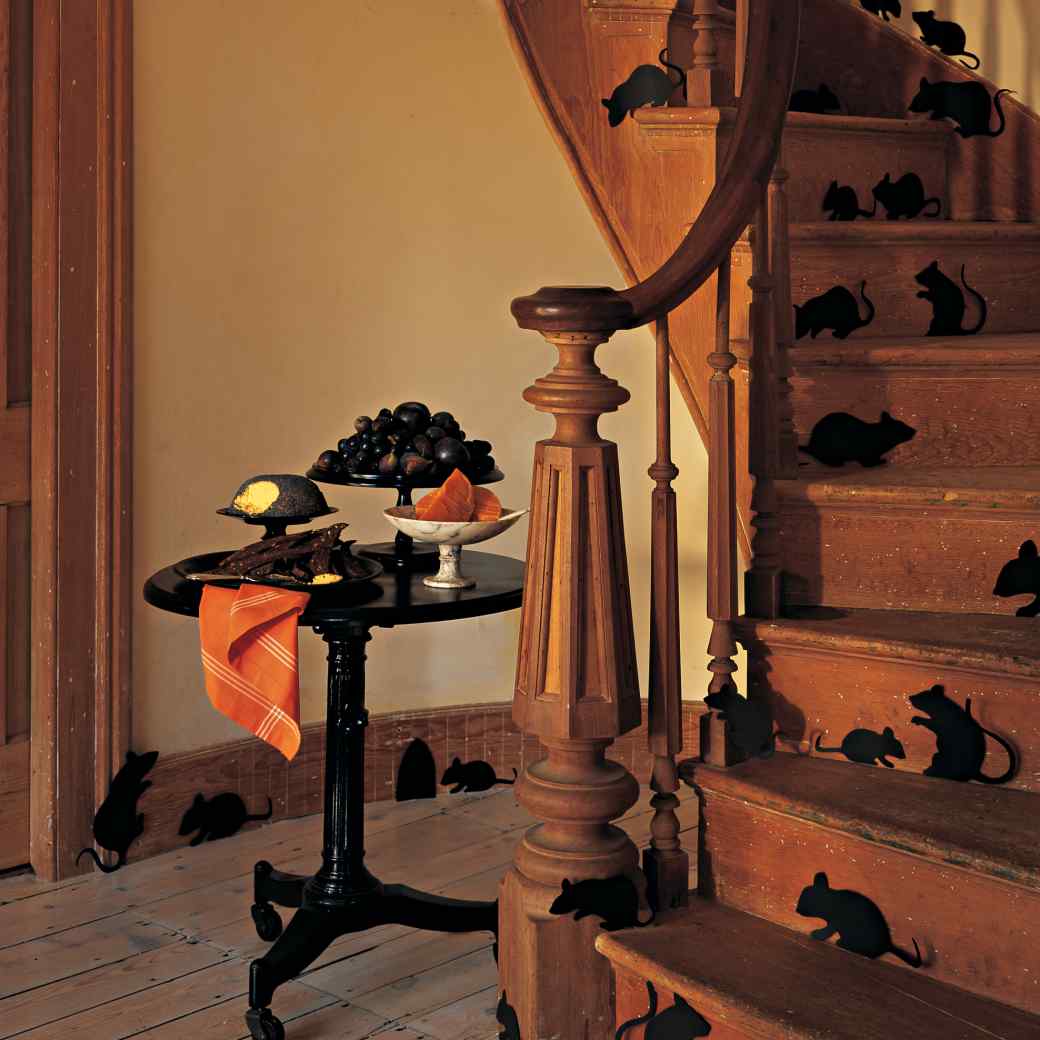
And now we have yet another silhouette idea that creates a creepy Halloween vibe but also a stylish way to use the festivity behind the holiday to create decor. Thanks, Martha Stewart!
51. Hanging Bats Halloween Decoration
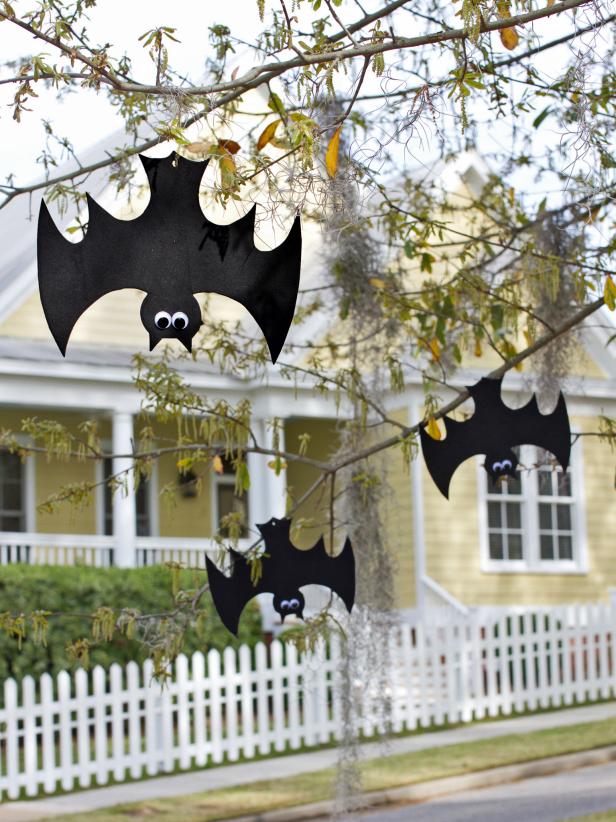
HGTVmade it easy for crafters to learn how to create these easy bats that can jazz up the front yard and complete the transformation.
52. Trash Bag Spiderwebs Halloween Decoration

Here’s another great way to create spiderwebs, and this time it’s with some classic trash bags. Cover doors, windows, and the like after you visit How About Orange and learn how to create them.
53. Cross-Stitch Canvases Halloween Decorations
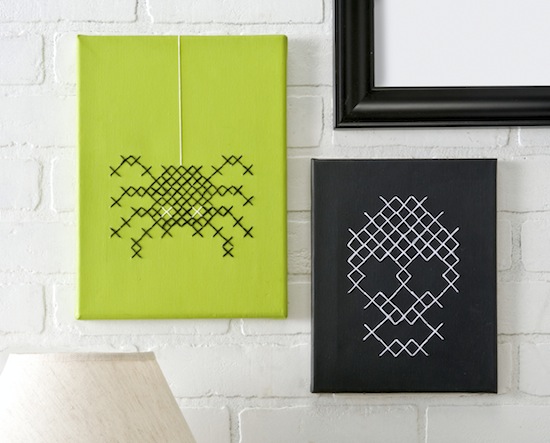
Decor Hacks shows us how to recreate these creative pieces of Halloween canvas art. From spiders to skulls, learn how to create some of the spookiest staples.
54. Indoor Halloween Decorations Doorway Spiderwebs
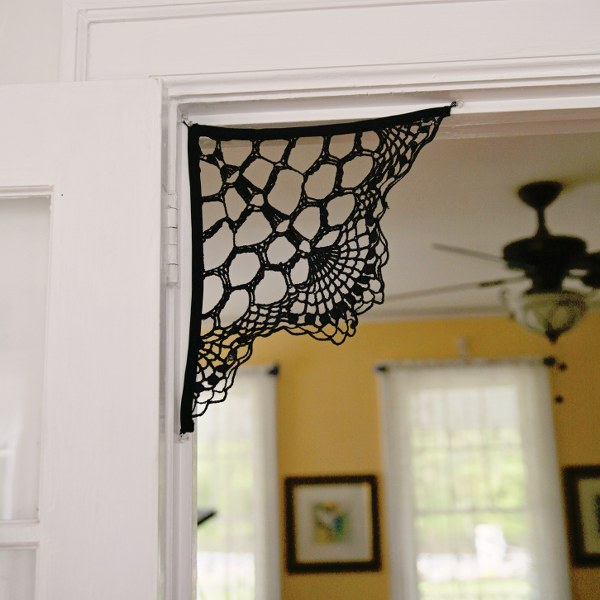
Check out these doorway spiderwebs from My So Called Crafty Life. And guess what they’re made of. Doilies! They’re quite easy to recreate, hop on over and find out!
55. Black Poison Apples Halloween Decorations
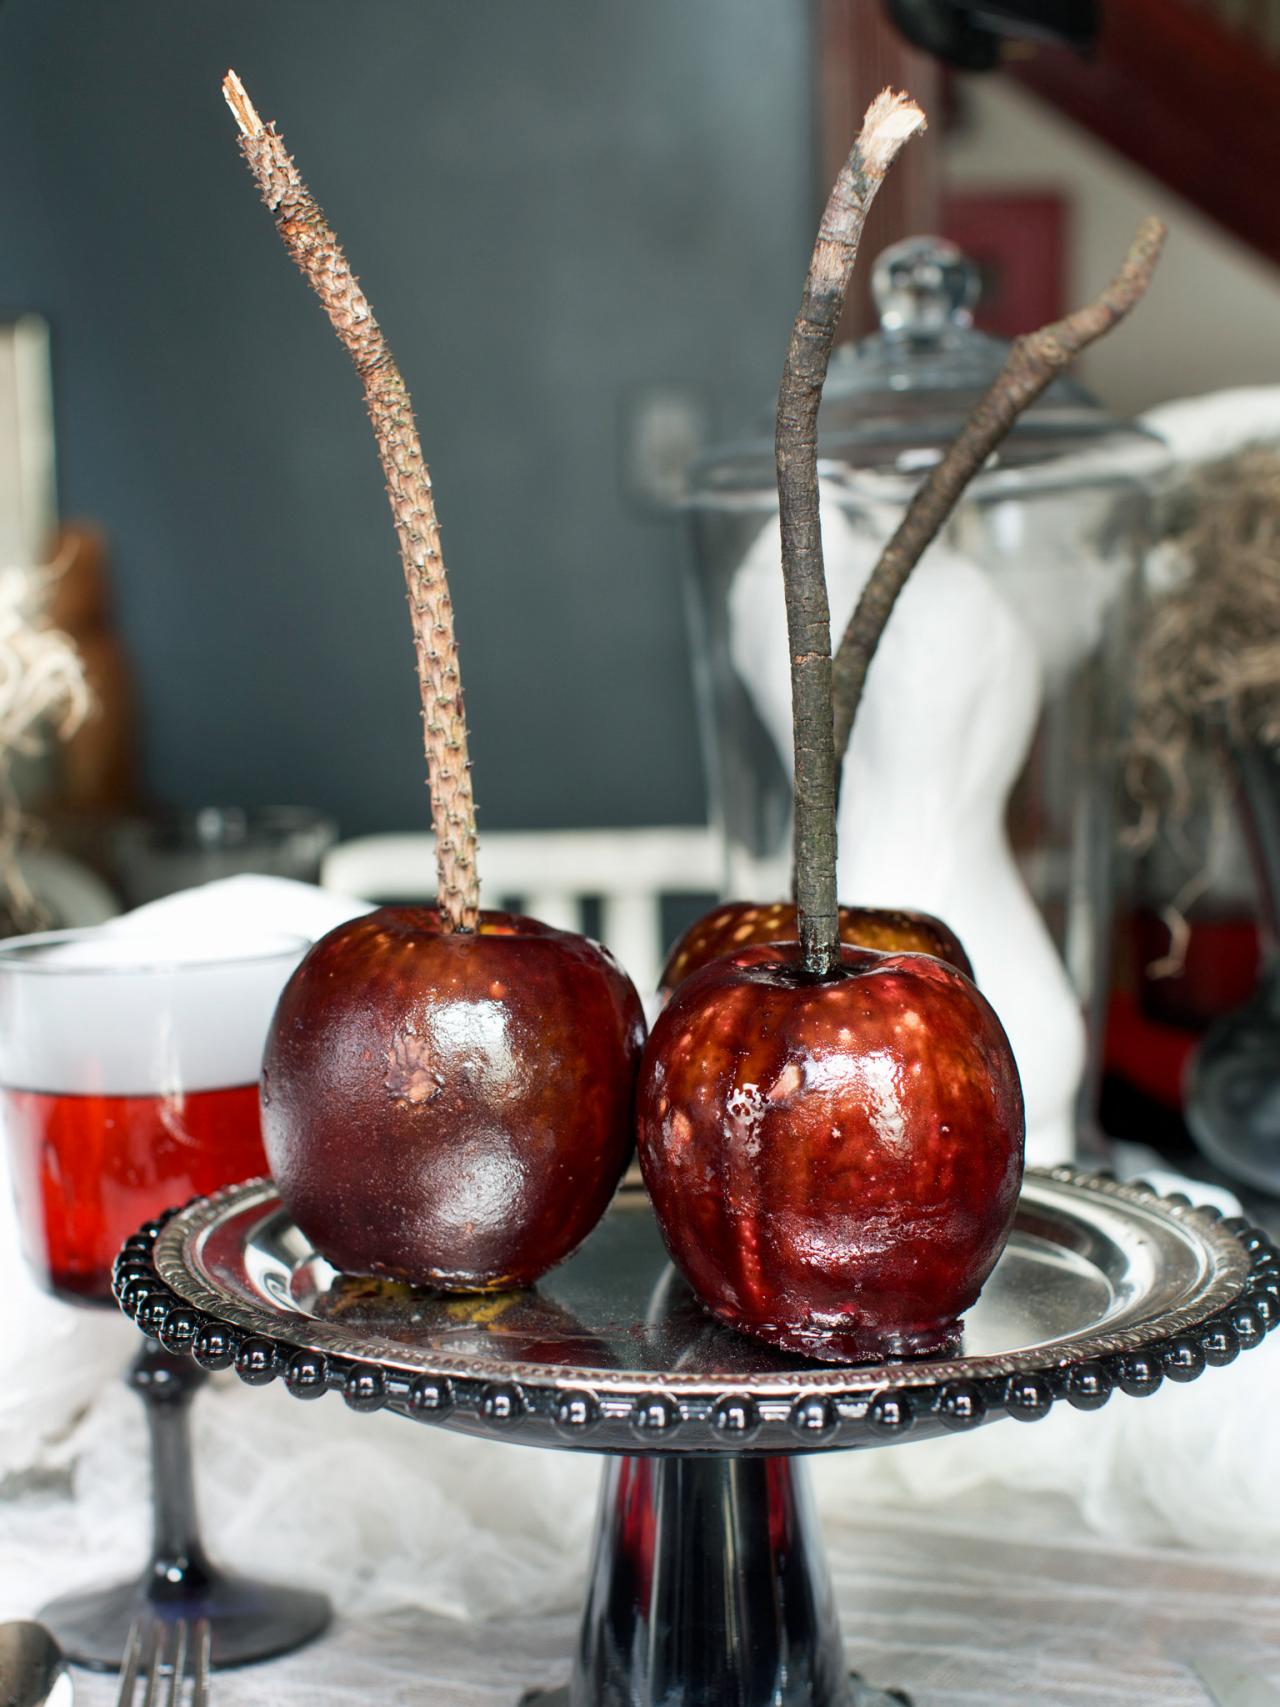
Over at HGTV you can learn how to recreate these sassy black poison apples to play at a witches’ themed Halloween party. They’re super easy to make a provide such a special detail.
Final Thoughts on Indoor Halloween Decorations
There are numerous options to choose from when it comes to designing the best indoor decorations for Halloween. Some of them work for kids, some work for adults, and other ideas work for all age groups.
That’s why it is important to come up with a Halloween theme and commit to it by adopting only the decoration elements that go with your theme. You will be surprised by how easily ideas will flow once you have a specific goal in mind.
No matter which indoor Halloween decoration you end up making, be sure to later return to this page and post a photo in the comment section below. Also, feel free to share your ideas with us and the rest of the world by dropping a line.