30 Pumpkin Carving Ideas – Pumpkin Designs to Try on Halloween
Updated on September 24, 2021

Although Halloween is a spiritual holiday that symbolizes the end of summer and harvest, it has become a people’s holiday, and it can mean a lot of things, depending on who you’re asking.
For kids, it’s a time to dress up in creepy outfits and knock at neighbor’s doors in a relentless pursuit of candy, for instance. However, ask an adult, and they’ll say it’s either watching over their kids trick-or-treating, answering doors and giving out candy, throwing or attending parties, or decorating houses.
Is Pumpkin Carving for Me?
If you’re throwing a party or just want to make your house look creepy for trick-or-treaters, then you probably know that a staple item, in this case, is none else but the Jack-O-Lantern, or, in other words, the carved pumpkin in which you place a candle so it can light the way for trick-or-treaters or partygoers to your house. Surely you’ve at least seen a few carved pumpkins before in your life, if not downright carved some yourself.
While there’s nothing wrong about carving a set of eyes and a mouth for your pumpkin, you’ve also probably seen what other people can do with their pumpkins and what masterpieces can be created by simply applying more or less pressure while cutting, using different tools, and even re-arranging bits of the pumpkin so that they resemble something else entirely.
More than that, you probably even wondered if you could do the same with yours, and the answer is yes.
How to Get Nice Pumpkin Designs?
However, pumpkins are not as forgiving as canvases, meaning that you can’t erase something that you’ve already cut into, so you’d have to, you know, measure twice and cut once in order to succeed. The secret is leaving just enough room for a candle to fit inside the pumpkin and make it so that the light within it can actually do it justice rather than obscure its trademark elements, whether they’re eyes, mouths, or silhouettes.
Pumpkin carving, much like any other artistic outlet, requires a lot of patience, a steady hand, a bit of strength (you can’t possibly imagine how hard pumpkin shells can get), and a lot of practice. You can’t expect to be a master sculptor just moments after touching a pumpkin and a chisel for the first time in your life.
In fact, most pumpkin carvers still rely on transfer paper and draw the model they’re gonna sculpt on the pumpkin before getting started.
Incidentally, that’s what we recommend you do, as well, if you want to keep things simple and still yield a more-than-satisfying result after your carving attempt. The first few times, you’ll probably end up getting bored and freehanding the whole thing, which, again, isn’t wrong, but you’re here for a specific reason, right? You want to learn how to turn your plain pumpkins into true works of art, so that’s precisely what we’re going to teach you.
Well, not teach you as in offer you guidance through the whole process, but at least give you some pointers on what to do next once you’re sitting there holding the chisel or CNC machine (yes, some people use carving machines such as the Dremel Stylo to carve pumpkins) staring at your pumpkin.
It could be intimidating at first, you know, staring at a blank canvas (i.e., your uncarved pumpkin), but with the right attitude, we can transform it into something jaw-dropping.
30 Inspiring Pumpkin Carving Ideas
That being said, we’ve compiled a list of 30 designs you can borrow to help you decorate your pumpkin and turn it into an awesome lantern for your Halloween partygoers or trick-or-treaters. While most of the designs on our list involve carving bits of the pumpkin so that you create a contrasting picture using the thinner and thicker parts of the shell, some of them may have you get a bit more creative, detaching some parts and attaching them in some other places.
If you’re ready to start, here are 30 of the most creative pumpkin carving designs for you to try this Halloween.
1. Ghostface – Pumpkin Design

If you’ve ever been a fan of slasher horror movies, then you must’ve seen Scream, a movie that has become a classic of the genre since its release. We won’t get into detail and blabber about that movie, nor its horrible sequels, but if you didn’t see it and still recognize the mask, you might’ve seen it in the parody, Scary Movie. The Ghostface killer had a mask that almost anyone can recognize nowadays, as it’s become somewhat of an icon for Halloween and horror movies.
Thus, it would make perfect sense for you to decorate your house with it this Halloween, whether you’re just lighting a candle within it and placing it on your porch or bringing it inside and using a less-flammable source of light, such as an LED light. Your guests will definitely be spooked by it, and trick-or-treaters will probably think twice before throwing eggs at your front door or covering your house with toilet paper.
Luckily for you, this pumpkin carving design isn’t exactly difficult to do; all you have to do is cut the holes to match the holes in the Ghostface mask, and that’s it. As opposed to other designs that rely on thinning the shell of the pumpkin, this one simply relies on cutting holes, which you can either do with a sharp knife or with a handheld CNC machine (such as a Dremel). Be careful to shield your fingers from the blades, and use stencils or transfer papers if necessary.
2. Kitten And Stars – Cute Pumpkin Carving Ideas
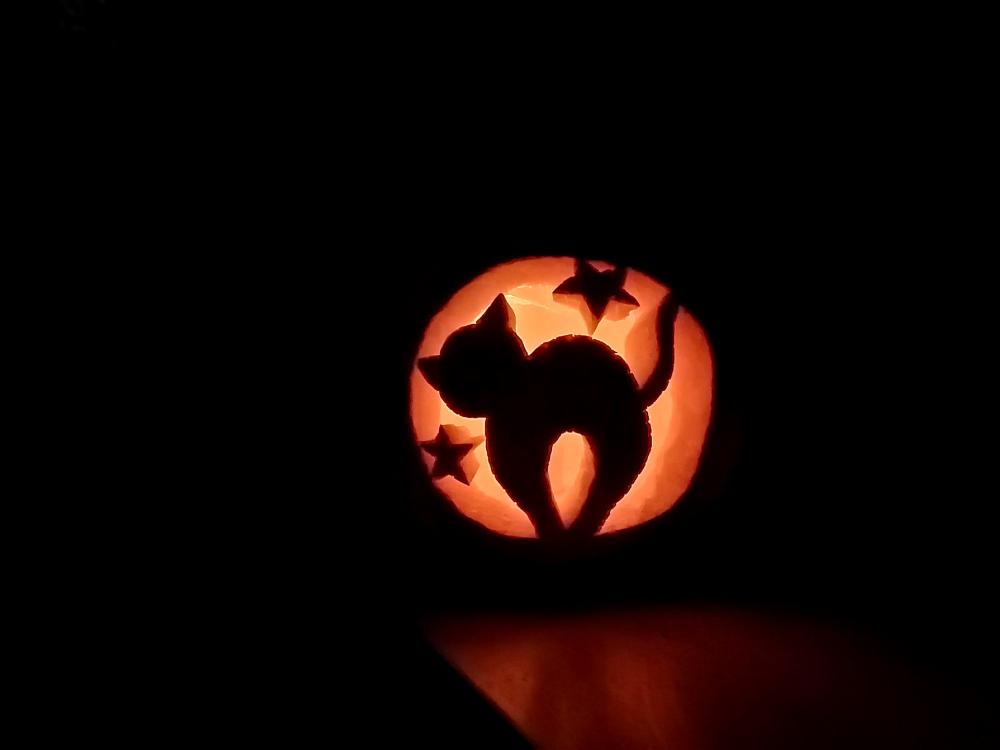
As we’ve previously stated in other articles on our website, spookiness isn’t fit for everyone. In fact, there’s an alarming number of people who don’t like to be spooked, surprised, or scared during Halloween, but they like dressing up. Just kidding about the alarming part, but jokes aside, it’s perfectly fine if you want to carve a pumpkin with something else other than ghosts, vampires, spooky figures, or killer masks, and this design stands here to prove this point for once and for good.
The kitten and stars combination is just enough Halloween reference for the non-spooky enthusiasts, seeing as it has a cat, which we all know that it’s a common Halloween symbol, and stars, which could reference fantasy or even mysticism. Combining the two will result in this awesome design that will create a nice atmosphere for you and your guests and could really look great on your front lawn or on your porch if you plan on leaving it outside for all to enjoy.
Note that this design is a bit more delicate, considering that the stars only seem to be barely hanging on to the edge of the pumpkin. However, the secret is merely thinning the seemingly empty part of the design so that the light can pass through it. That way, you’ll have the full parts (the stars and the cat) resting on the inside of the pumpkin without worrying about gluing them together. Feel free to use a carving machine for this one, but don’t forget to stay safe and use protective gloves and maybe even goggles.
3. Jack Skellington – Cool Pumpkin Carving
If you’re a child at heart, you might be familiar with Tim Burton’s The Nightmare Before Christmas and the main characters in it, Jack Skellington and Sally. While it’s not exactly clear why a character from a Christmas movie crept all the way into Halloween (well, it’s because it’s somewhat creepy, I suppose), people seem to love Jack Skellington as a Halloween decoration, whether it’s dressing up as it, painting it on walls and various other surfaces, or even carving its face into pumpkins.
Whether you’re trying to be spooky or quirky about it, Jack seems to be a great choice for any given Halloween scenario, so you can carve and place this pumpkin on your front lawn, on your porch, or even bring it inside if you’re throwing a party and want something nice to set the mood for your guests. Sure, most people might confuse it for a regular skeleton face, but you’ll definitely strike a conversation with those who not only saw the movie but watched it a bunch of times and are a fan of the character.
Another great thing about this pumpkin carving design is the fact that you won’t need to be a Michelangelo to pull it off. You can even draw the design on the pumpkin before you start carving it so that your cuts will be more accurate and the end result will look better. Furthermore, seeing as you need to make full cuts to the core of the pumpkin, you can use a knife or a handheld CNC machine, whichever tool you see fit for the occasion. Regardless of which tool you’re gonna go with, make sure to practice caution and use protective gear.
4. Pinhead (Hellraiser) – Cool Pumpkin Carving Ideas
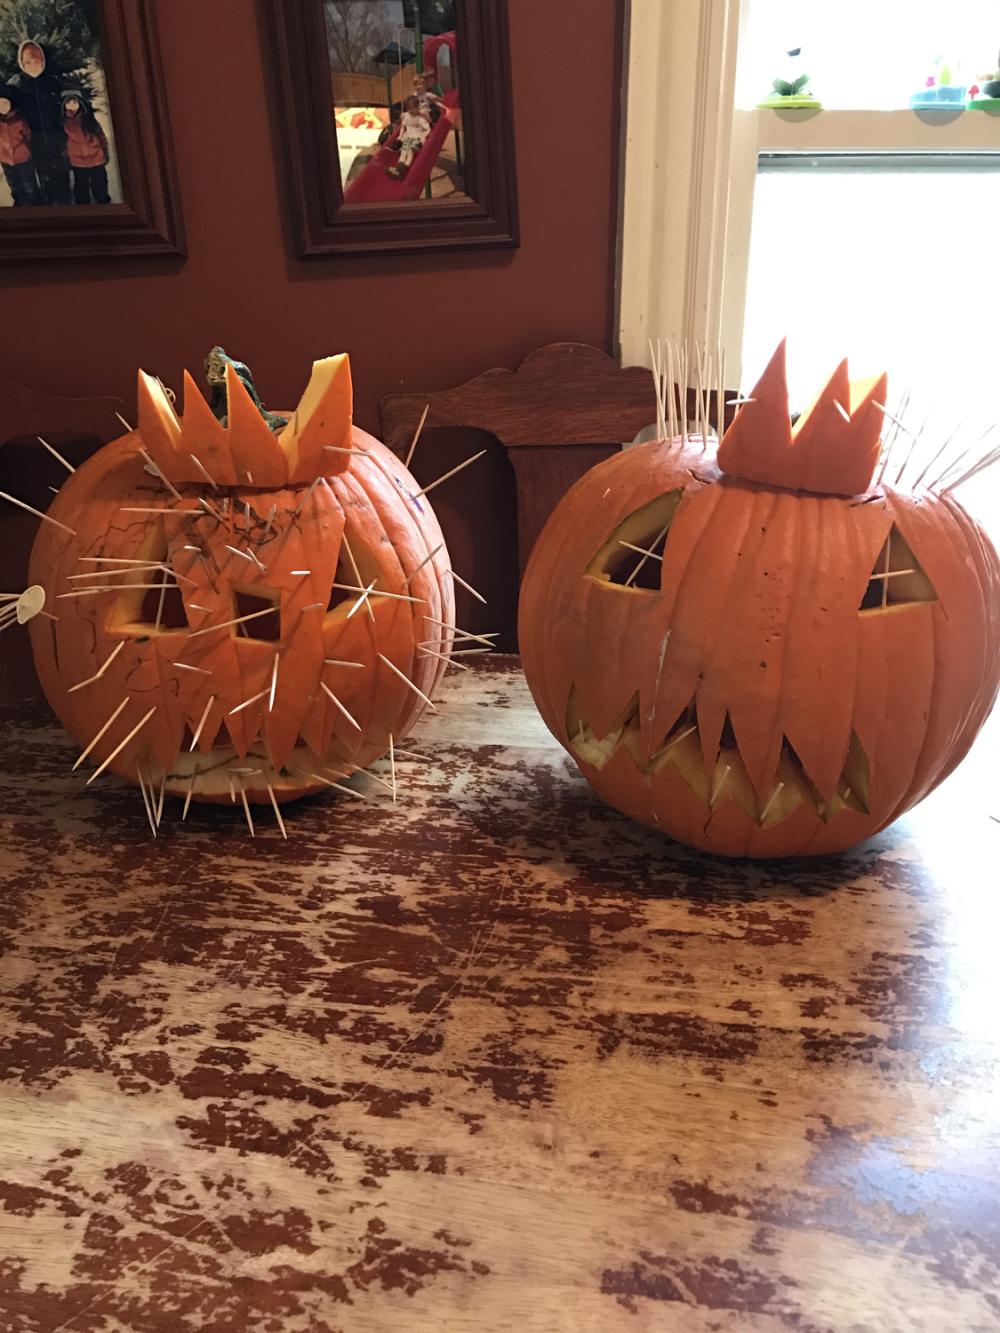
Big fan of classic horror movies, now are we? Well, if you are, then Hellraiser’s Pinhead shouldn’t sound foreign to you, and the fact that we’re pushing you towards embracing this design and carving it into one of your pumpkins shouldn’t seem like such a crazy idea. While this design isn’t exactly a replica of Pinhead, you can probably see the resemblance by looking at all the toothpicks that are sticking out of the pumpkin. The fact that it has a crown also doesn’t add much to the equation.
However, you shouldn’t treat the example in our photo as a final design you need to reach with your pumpkin, but instead, you should draw a bit of inspiration from it. For instance, instead of giving the pumpkin a crown, you could just leave the top as it is and draw a straight net pattern all over it, sort of like a math notebook but with larger squares. Once you do that, just place a toothpick at each junction point (i.e., where two lines intersect), and you should have a Hellraiser pumpkin in no time.
Now we know that Pinhead was painted white and all that and that this design might actually fit better in a pumpkin painting section, but you can still make it work as a carving. What about instead of drawing the net pattern, you carve it into the pumpkin? Now placing a candle (or a source of light) inside the pumpkin should light it up nice and give you the Hellraiser vibe you’re seeking. Just make sure not to go all the way through the pumpkin with your carving knife or CNC machine.
5. Cyclops – Jack-O-Lantern Faces
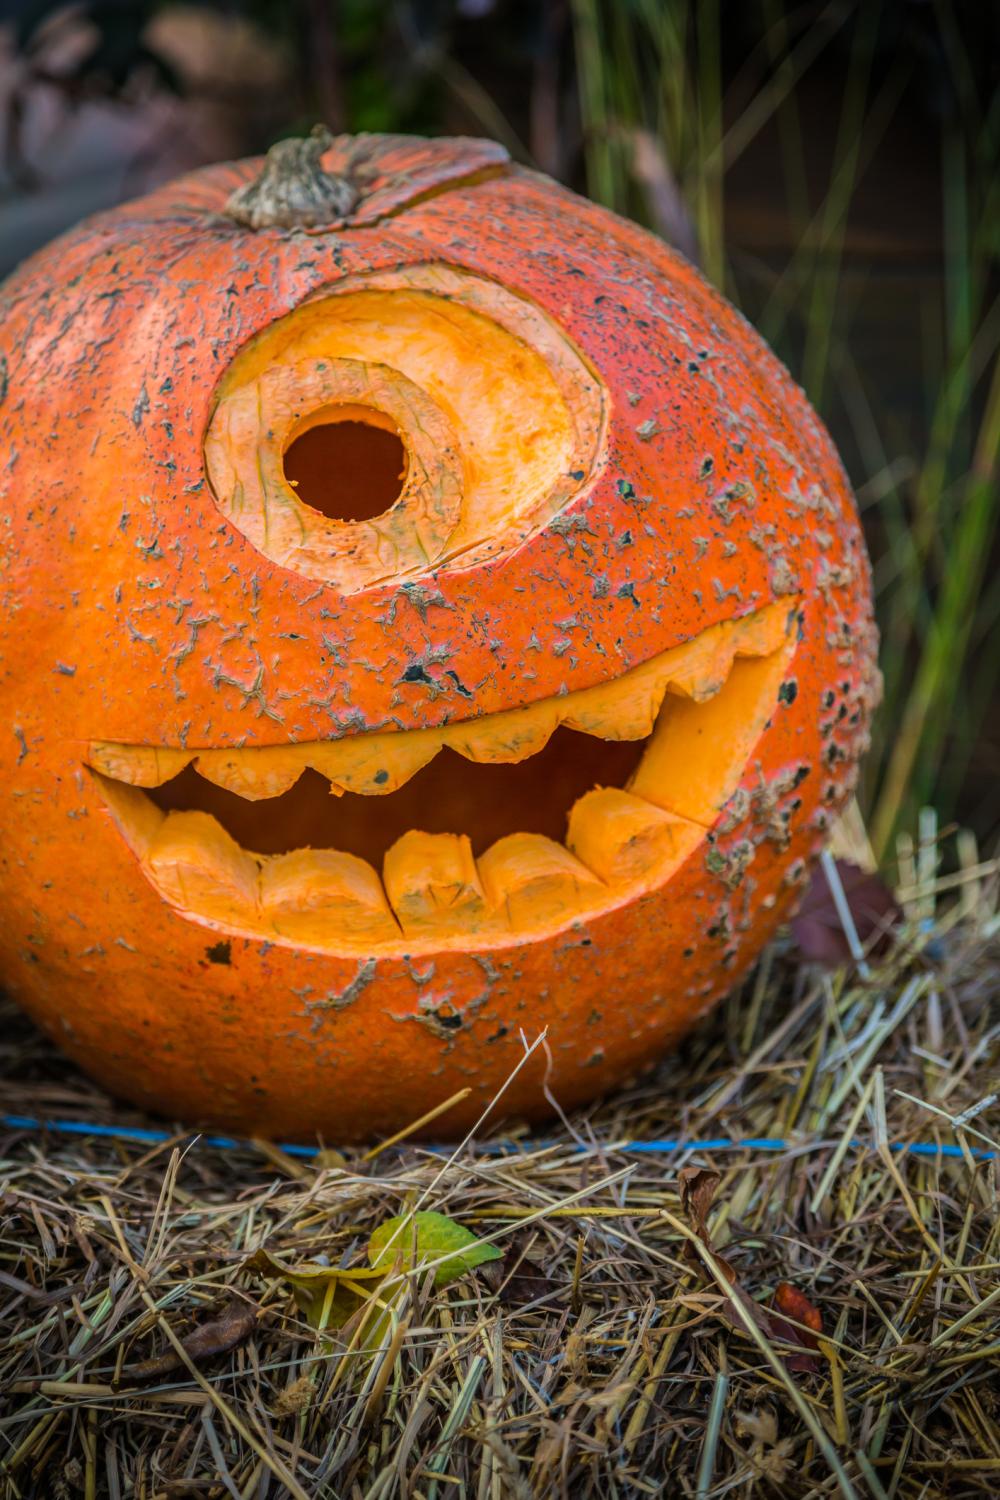
This design best fits the scenario of throwing a cute Halloween party for your guests (or for kids) or waiting for children to come trick-or-treating without scaring them too much with your hyper-realistic decorations. Now we call this design a cyclops because it has just one eye, like the mythological creature, but obviously, it looks a lot like Mike Wazowski, one of the main characters of the ‘Monsters, Inc.’ movie. That’s exactly why we said it’s a better fit for a cute Halloween party instead of a scary one.
By the looks of the example in our photo above, you’ll need to put some skills into it, so simply slashing the pumpkin and drilling holes into it won’t be enough to pass this time, unfortunately. As you can notice, the design has varying levels of depth for both the eye and the teeth, so you’ll have to be careful how far you’re driving the carving knife or CNC machine on it. We recommend working with layers, seeing as it’s a lot simpler than freehanding the entire carving pattern.
For instance, if you’re doing the eye, just drill the center part first, then work around it by carving at a certain depth without breaking the pumpkin (i.e., drilling all the way through), and evening out the entire surface. If you’re satisfied with the result, you can move on to the next layer, and if not, you can continue carving the current layer a bit deeper and then even out the surface before moving on. You can put a source of light inside the pumpkin to check if the depth is right and lets light shine through it.
6. Dead Pumpkin – Simple Pumpkin Carving
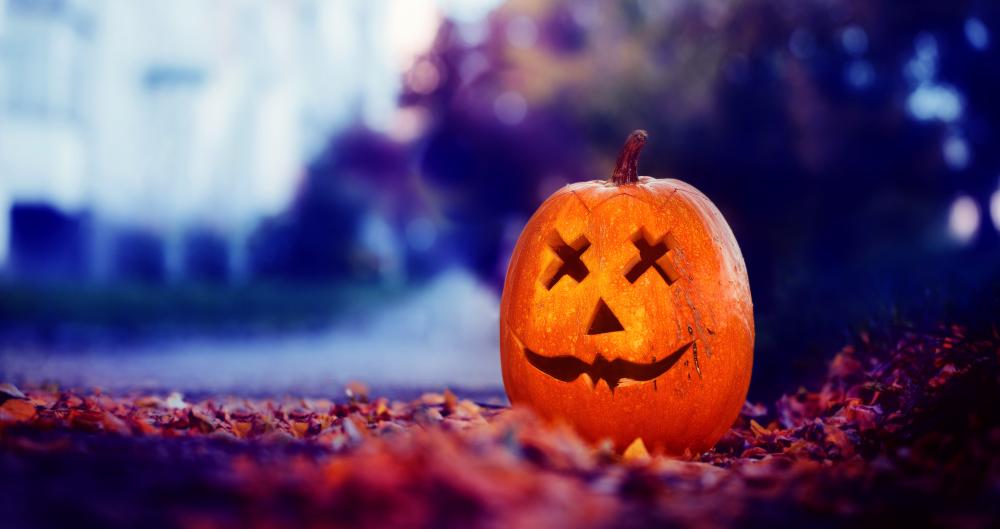
The ‘x for eyes’ face is one of the most common ways to symbolize death in cartoons. You have probably seen it a thousand times by now that when a character dies, its eyes become a couple of xs, so it makes complete sense that if you want to go with the dead pumpkin aesthetic this Halloween, you can put a couple of xs for eyes for your pumpkin instead of the regular round or evil eyes you’ve been carving all your life.
One of the greatest things about this design is its overall simplicity. You don’t have to go overboard with complicated designs and patterns for this one, you can just carve the pumpkins the way you’ve been doing it all these years, but instead of drilling round or angry eyes, you just draw the letter ‘X’ for each eye. It will definitely draw a few waves of laughter from other partygoers or the kids that will visit your house trick-or-treating this Halloween season.
If you want to go a bit further, you could also hint at the reason the pumpkins croaked by leaving certain objects next to them, such as a green-painted bottle with a skull sticker on it, some bloody tools (props, of course, we wouldn’t want to risk injury) or whatever else you can think about. It’s Halloween, so it’s acceptable to bring a little dose of spooky to the table. However, we’ll leave the extras and whether you want or not to include them entirely up to you.
7. Creepy Mask – Cool Pumpkin Carving Ideas
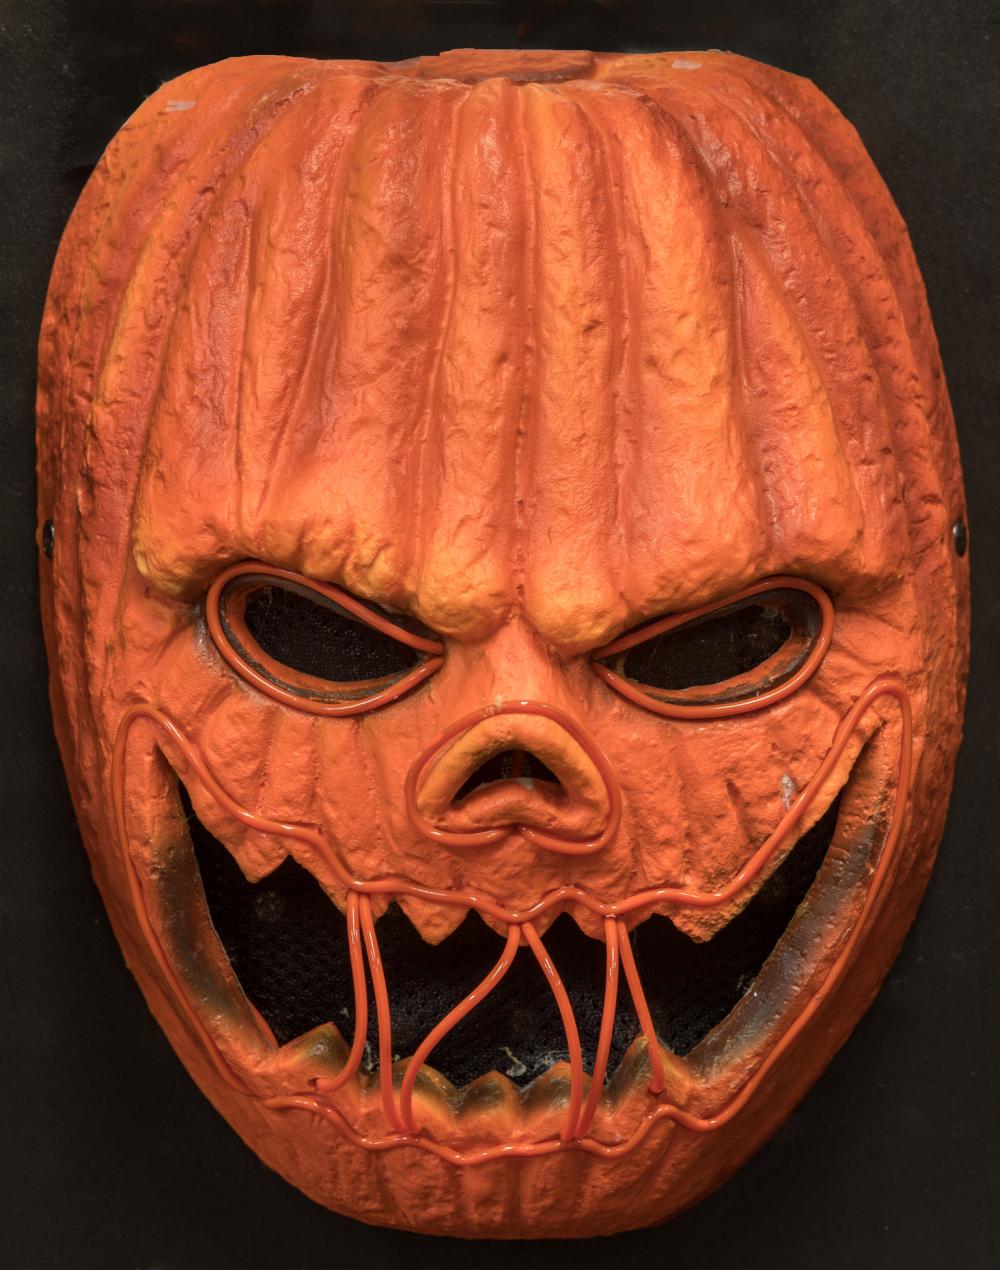
The creepy mask design you can see in the picture we’ve attached is one of the most realistic ones we’ve included in this guide, so it will require a lot of patience, and possibly some artistic talent and/or experience with pumpkin carving. However, the end result will definitely blow away your guests and scare trick-or-treaters that dare approach your house and ask for candy this Halloween. That’s the spirit, right?
While it’s obvious that our picture actually depicts a mask (possibly made of foam), it’s not at all complicated to adapt this design and apply it to your pumpkins. Sure, you’ll have to be extra careful as this design consists of a bunch of extra-sensitive details (the wires holding the mask’s mouth together, for instance), and you’ll have to be very gentle with your carving knife (although a handheld CNC machine would be infinitely better in this situation).
Alternatively, you could just focus on the rest of the mask (i.e., the eyes and the actual mouth), and use wire, yarn, rope, or a thicker thread to sew the mouth shut. If you do that, just make sure not to place a candle within the pumpkin, seeing as the extra material that’s non-pumpkin will most certainly catch on fire. Just use an LED light or something that doesn’t generate as much heat as a candle or a regular incandescent lightbulb.
8. Halloween Cat – Cute Pumpkin Carving Ideas
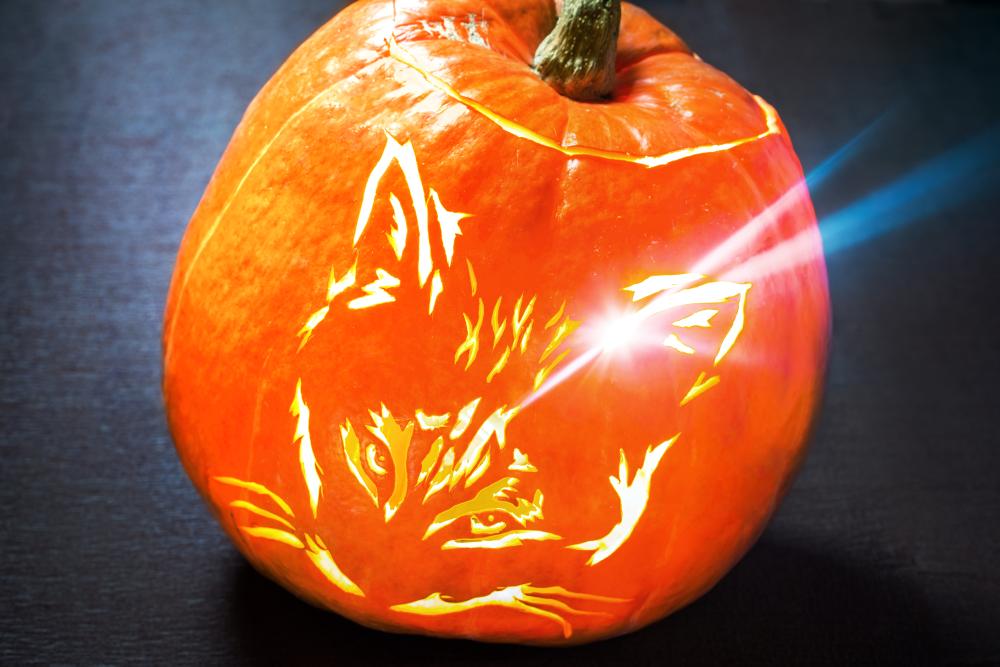
If you’ve had enough of traditional pumpkin carving and you want some fresh ideas to decorate your house this Halloween, then this feline face design will definitely be right up your alley. However, this is one of the more realistic designs we have in store for you this Halloween, so you might want to brush up on your carving skills before you start working on this one, else you’ll probably end up with a ruined pumpkin and maybe just a bit frustrated.
Notice that the lines of the cat face design aren’t simply drilled through the pumpkin, and there are different depths of carvings there, so you should either sharpen your carving knife very well or just use a handheld carving machine such as a Dremel. Dremel is compatible with a huge variety of drilling and carving bits, which makes it a very versatile tool that could fit perfectly into your pumpkin carving scenario, seeing as it can help you create your favorite designs fast and easily.
For this design, you can either draw a stencil of the cat’s face on the pumpkin and use darker colors or higher contrast to mark areas where you need to cut deeper. Trust us, this little tip could save you from a lot of headaches, considering that you won’t have to guess which line was a deep cut, and which one was a shallow one or stare at the picture while you’re carving this design into your pumpkin. Obviously, you can add various things to it if you’re feeling creative.
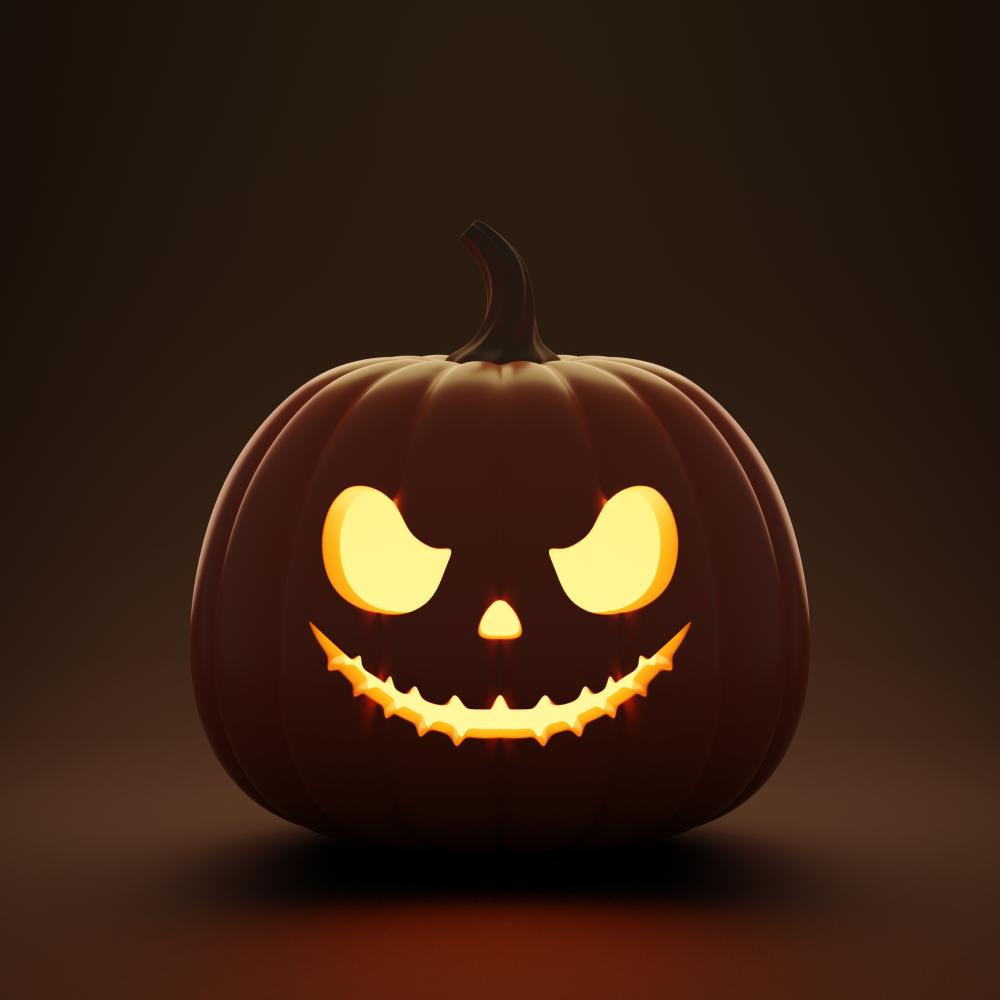
9. Creepy Grin – Pumpkin Carving
The creepy grin is a bit more complicated than others, seeing as you have to make certain parts of it (the teeth) round and work with various carving depths to achieve the best results. However, once you place a lit candle or another light source inside of it, you’ll understand that the fact that it’s a bit more complicated than other designs also has a huge payoff. In the dark, this carved pumpkin does look very creepy when you light it up.
If you’re gonna use a carving knife, you’ll probably have a hard time getting all the shapes and angles right, so, as before, we suggest you use an automated tool such as a Dremel with an appropriate carving bit.
We also suggest you start on a low-speed (RPM) setting so that you can grow accustomed to the machine and test how well it carves into your pumpkin, and then work your way up from there. Most of the time, you won’t need to increase the speed, as the low speed works great results as far as details are concerned.
If you have no idea how to get started on this one, you could drill the eye holes first, then carve the area surrounding the eyes without reaching too deep into the pumpkin’s shell (check the photo if you need a bit of guidance). Afterward, drill the mouth hole and work your way through the teeth by alternating carving depths with your tool. Once you’ve done the outline of the teeth, you can start adding more detail to your carvings, such as texture and the spaces between the teeth. You can also separate the teeth by drilling holes between them if you want to, like in the design below.
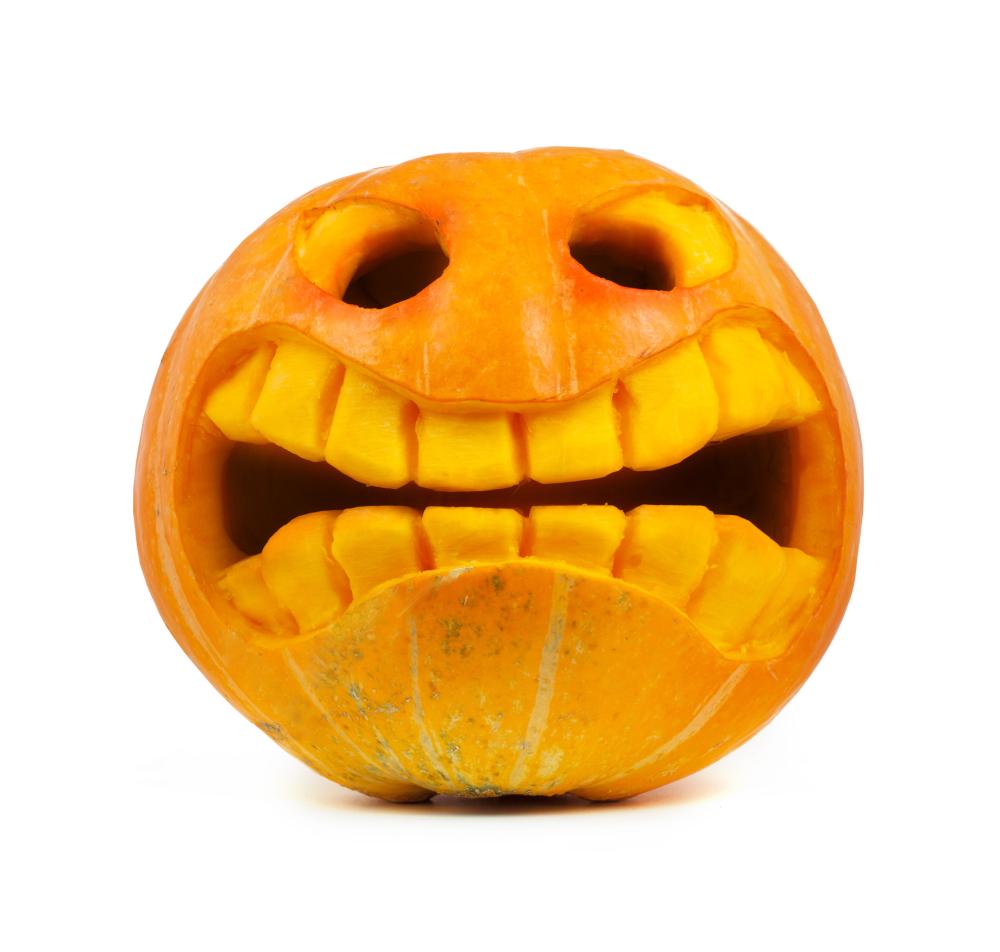
10. Toothy Smile – Pumpkin Carving Ideas

I honestly have no idea who smiles like that, but what happens there in that design doesn’t exactly look like a smile. A better description would be a creepy unveiling of one’s front teeth, but hey, it’s Halloween, and we’re allowed to bring a bit of ‘spooky’ in our lives if we feel like it, right? We don’t even know whether to be spooked or amused by this little pumpkin’s attempt to scare us, but we’re sure that your peers and the kids that come trick-or-treating this year will love this design.
It’s not really complicated to create it, but it could get a bit messy if you’re using a carving knife, even more so if you forgot to sharpen it thoroughly before you started working on this project. If you have a Dremel just laying around, or if you can afford one, just don’t think twice and go for it, especially if you have a knack for DIY projects. In other words, you could use the Dremel to carve the pumpkin nice and easy, but you’ll also be able to use it for other projects when you’re done with this one.
The first step would obviously be drilling the holes for the eyes. Since there’s no extra texture this time, holes will be just enough. You can change the shape of the eyes if you want to, the example above is there just so you can paint a better picture of what your project should look like. After you finish with the eyes, you can start working on the mouth. Our suggestion would be to carve the full mouth hole first and work your way around the teeth afterward. Furthermore, you could carve the teeth all attached to each other and then carve the spaces between them instead of trying to carve them separately from the start.
11. Cat, Moon, And Fishbone – Cute Pumpkin Carving Ideas
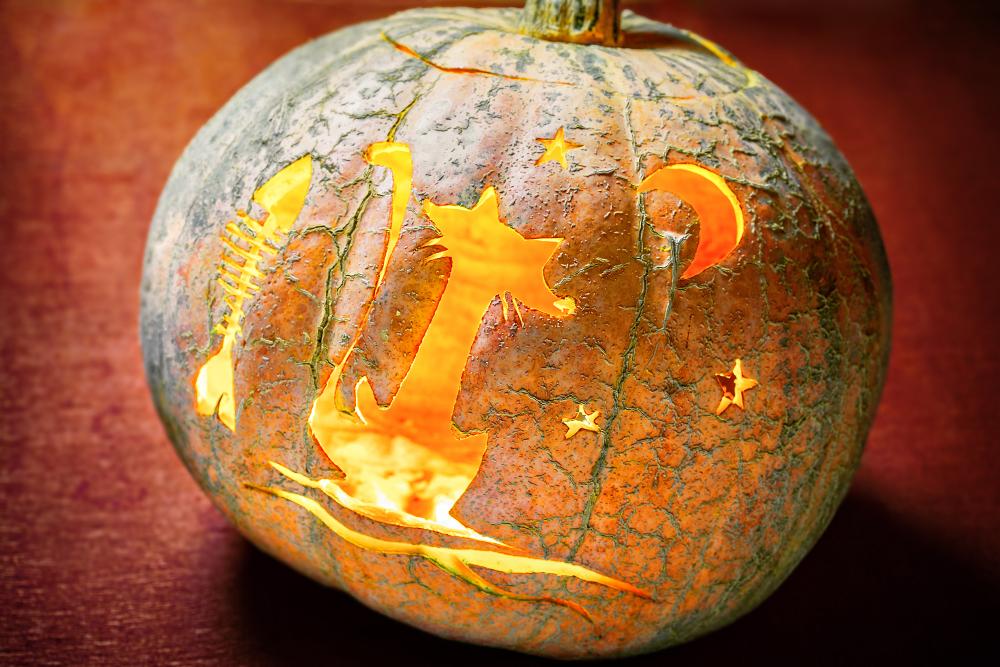
Alright, there’s a lot seeming to go on in this design, we’ll give you that, but wouldn’t you agree that it fits well and looks nice? Not convinced? Well, you could try to carve this design into your pumpkins, place a source of light inside it, and turn off the lights; we guarantee that you’ll appreciate the mood it will set to your party or front lawn while it’s one of the few things that emit light.
We can all agree that cats are a staple Halloween item already, and the moon and stars have this sense of mystery and fantasy about them, so matching them all together certainly seems like a great idea. We’re not so sure about the fishbone, though, but it honestly doesn’t bother us at all, and we actually believe that it ties everything up pretty well. Hey, carved pumpkin kitties must go hungry at some point, right?
One of the best parts about this pumpkin carving design is that creating it shouldn’t take you a lot of time, and it certainly doesn’t require you to be a Michelangelo with a hammer and a chisel. There’s no varying carving depth, everything is just drilled to the core, so that should be a relief. If you want the best results for this design, make sure to use a stencil to draw the pattern on the pumpkin, or some transfer paper, whichever you see fit.
12. Creeping Halloween Cat Cat – Easy Pumpkin Carving
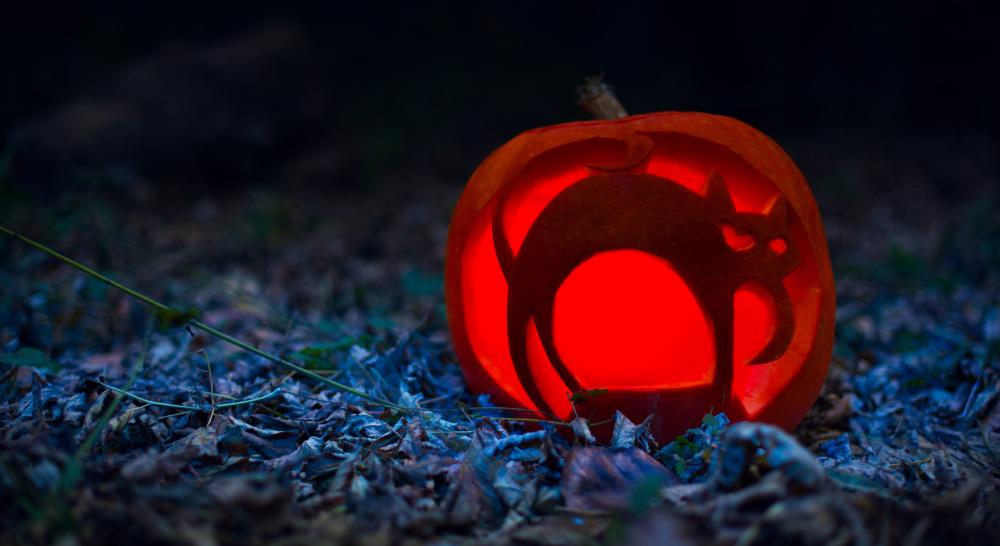
Cats, cats, cats, everybody loves them, and Halloween is incidentally a great opportunity to show your affection for these little (sometimes evil) bundles of joy. Although it’s not the first example of carving a cat into your pumpkin (and trust us, it’s not the last, either), it’s different. This creeping cat design looks like it’s been pulled from a Tim Burton movie, as it’s incredibly frail, with thin members, and some over-exaggerated features, but we absolutely love it!
The thing about this design is that the drawing itself (the cat) is easy enough to sketch on the pumpkin, but you’ll have to experiment a bit with the colors and lighting if you want the best results. Some people have carved the creeping cat on their pumpkins by simply drilling out the background parts, but others swear by carving until a thin layer of inner shell remains, so that the light passes through it, creating an eerie effect for the cat.
Whichever way you want to go about it is fine with us, just as long as you keep safe. You’re going to need a sharp carving knife and a lot of patience if you plan on leaving an extra layer of the inner shell for background lighting. However, if you plan on doing that, it’d be way better and easier for you if you just used an automated handheld carving tool such as a Dremel. Using a tool like that will enable you to create this pumpkin carving design in just about no time.
13. Magic Lantern – Simple Pumpkin Carving
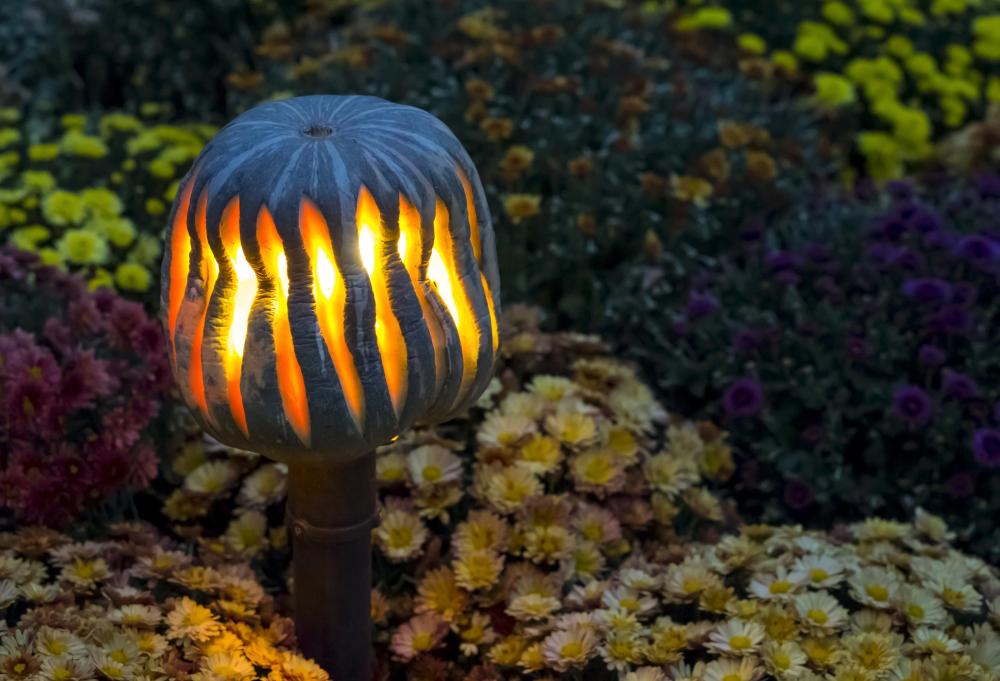
Lanterns always fascinated me in the sense that they’re usually there to light your path, which can be a very comforting thought and has great significance (symbolically) for many. More so, lanterns usually light up a place without being too heavy on your eyes, so Halloween could be an awesome opportunity for you to decorate your house, front lawn, or porch with such objects. You already know that the most popular type of lantern is, indeed, the Jack-O-Lantern.
Well, this time, we won’t give it eyes, a nose, and a creepy grin; no, for once, we’re going to help you turn a pumpkin into a magical lantern that can spread smooth light and set an incredibly cozy mood for you and your peers in no time. Although you’d get the job done way faster with a Dremel (or similar automated carving tool), a carving knife could also work fine since we’re not dealing with incredibly detailed textures or complicated patterns this time.
So what you have to do is take the pumpkin, put it on a table, and start carving bars on it, no thicker than your fingers. However, somewhere at the top of the bar, instead of cutting a straight line to connect the bars, just cut the pumpkin and connect the bars at an angle so that the bars appear to be having sharp edges, more like double-headed spears, if that makes sense. All in all, this project should be a fun pastime activity, and you can get everybody involved, as it doesn’t require advanced artistical skills.
14. COVID-19 – Easy Pumpkin Carving Ideas
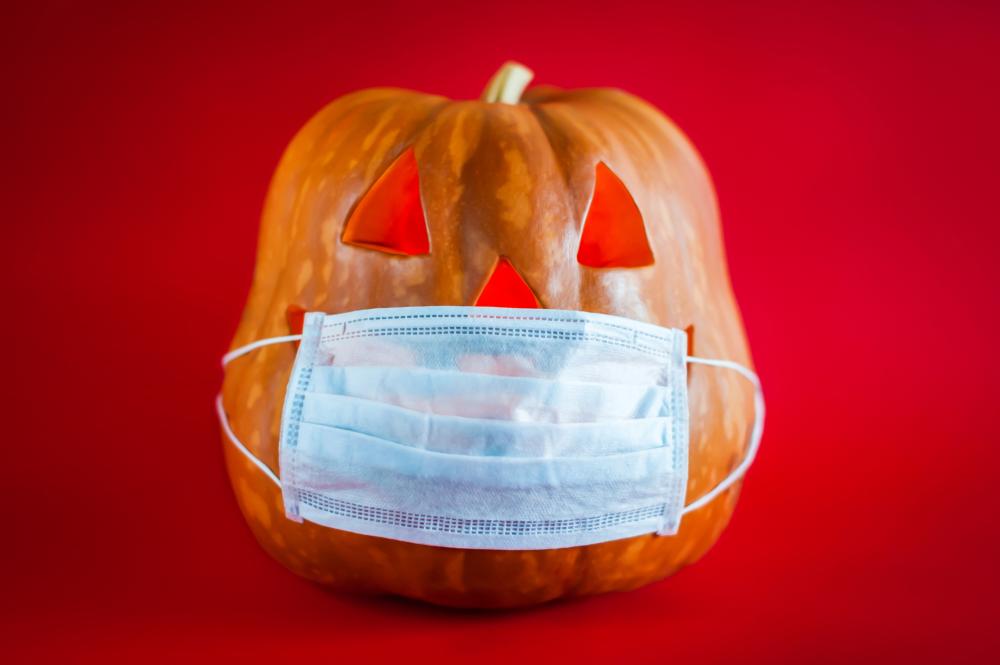
You’re constantly thinking of it, even when you’re not, because, let’s face it, COVID-19 has really turned our lives around. Big time. So it goes without saying that most people are afraid of it, which makes it a great match for a Halloween prop. By any means, this doesn’t mean that you shouldn’t take it seriously, but having a COVID-19-inspired decoration could help raise awareness, if not serve as a silent reminder that we’re not exactly in the clear yet with the whole pandemic situation and be as responsible as we possibly can.
If you’re really up for a demonstration of your talent as a visual artist, we guess you could try to recreate the infamous virus’ shape out of pumpkins, but I can’t exactly imagine how you’d go about it. I guess that’s why you’re the artist, and I’m just the one that tries to inspire you for your next pumpkin carving project. However, a much simpler way to do it would be exactly the way you’ve seen it in the example photograph we attached above.
You take a pumpkin, and you carve it just as you normally should; you give it a mouth, a couple of eyes (or more, or less, it’s really your call), a nose, and everything. After you finish carving, just take a medical mask and place it over the mouth and nose of your pumpkin. You can either use a double-hook clip or a paper clip to attach the mask to the pumpkin, or you can simply tie the elastic bands behind it, granted you don’t have to pull too hard and risk breaking the mask. Stay responsible!
15. Surprised Face – Cute Halloween Pumpkin Idea
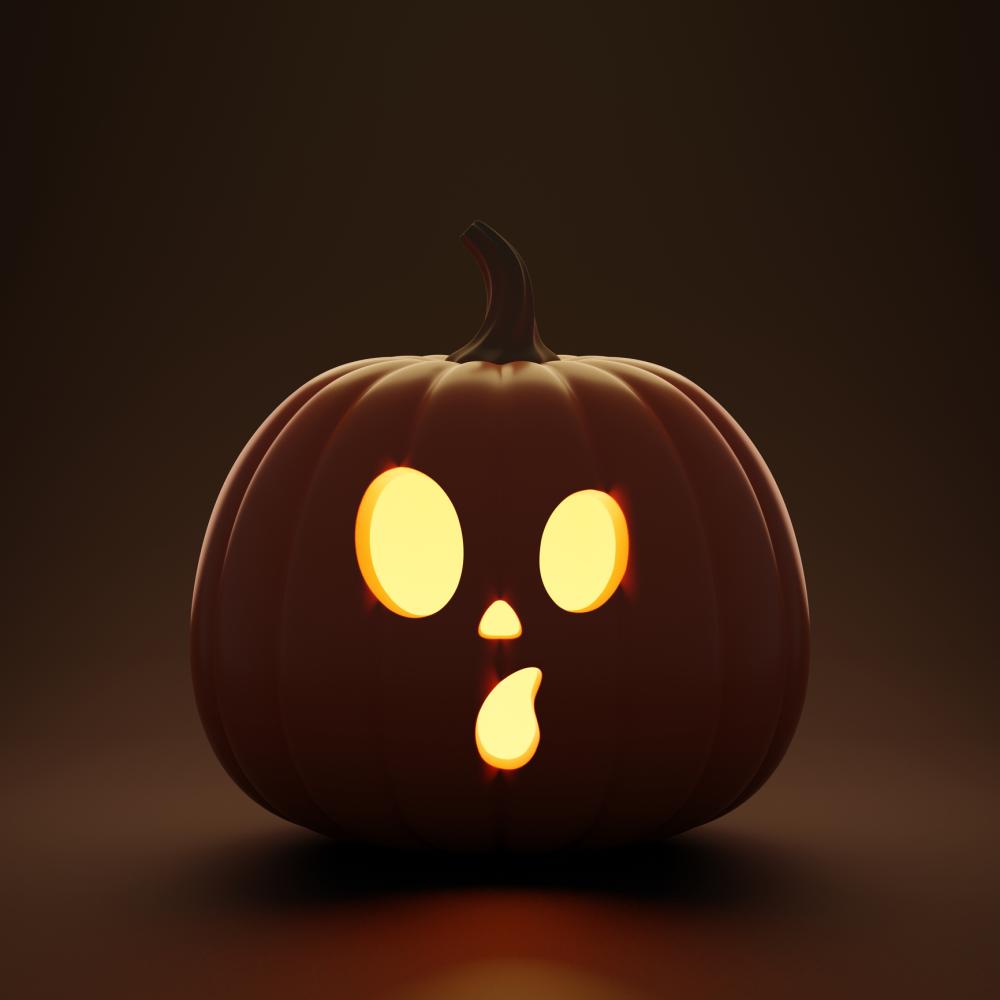
Quite a lot of people don’t get the overall spooky feeling from Halloween or are simply annoyed by it, and that’s completely fine! Everyone celebrates in their own way, and if spookiness is not your thing, then who are we to judge? However, this doesn’t mean that people who are not into being spooked can’t enjoy Halloween decorations just as much as the ones who do like living on the edge (you know, spooky-wise).
If you’re over scary masks, creepy faces, witches, goblins, skeletons, and ghosts, you could carve a cute, surprised face on your pumpkin this year for Halloween. It’s actually even easier than carving a smile since the ‘surprised face’ basically involves drilling three ping-pong-ball-sized (approximately) holes into the side of your pumpkin. No complicated pattern, no drawing, no artsy, pretentious stuff.
However, that doesn’t mean you can just drill three identical holes and say, “Look, it’s all surprised now!” because that’s not how it works. If you do that, you’ll basically have a pumpkin-shaped bowling ball, and we don’t want that now, do we? Instead of drilling round holes for the eyes, try making them look like upright eggs, and for the mouth, try making it look sort of like a comma (the symbol) but upside down. You can also add a tiny little nose between the lower sections of the eyes, and if you’re confused, try using our photo as an example.
16. Pumpkin Design – Drilled Vases

Usually, when you carve a pumpkin, you use a very sharp knife or a small saw in order to cut pieces out so the light can shine through and show your pattern in the dark. Crafty Nest, however, suggests using a drill to create circles instead! I know Halloween is supposed to be spooky, but how pretty do those flowers look in the top of that pumpkin with the flame of a tea light candle glowing through?
17. Halloween Pumpkin – Disney’s Snow White
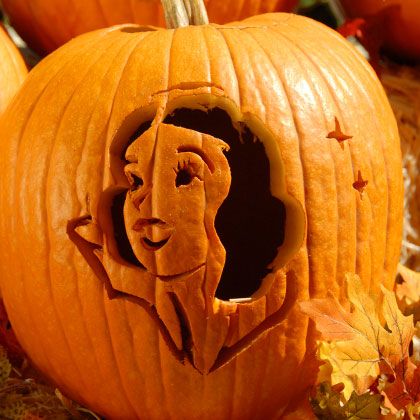
Family Disney guides you through the process of carving out little pumpkin portraits of your favorite Disney princesses! This Snow White version is absolutely adorable, but the website gives you instructions for making other princesses, too, if you prefer. This is a great option for little kids who aren’t so sure about this whole “scary holiday” thing yet. They’ll get to participate without feeling uncomfortable.
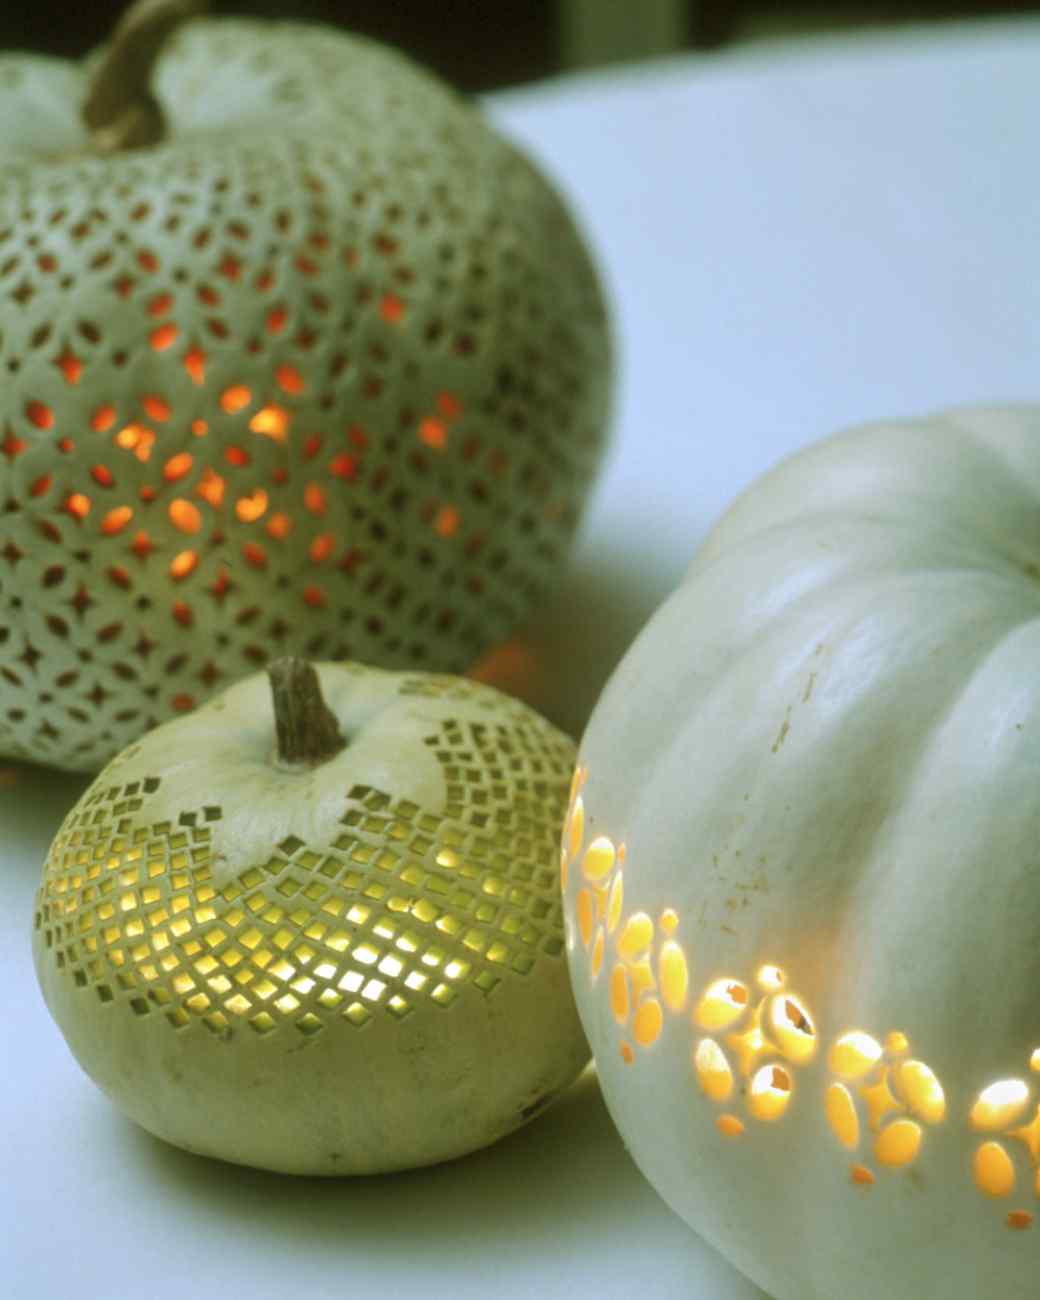
18. Pumpkin Carving Idea – Lace

Are you looking for a more decorative design, and you’re willing to invest a little more time and energy into its intricacy than the average trick or treater might be? Then take a look at how stunning these lace designs by Martha Stewart look in white pumpkins of all different sizes! They’ll look gorgeous glowing from your porch on fall nights.
19. Pumpkin Carving Idea – Tinkerbell & Fairy Dust
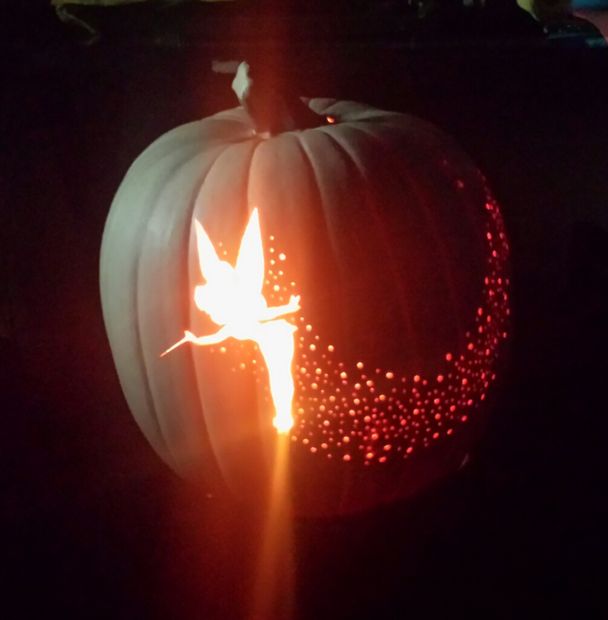
Maybe your kids were a big fan of the Disney idea, but the princesses aren’t their favorite part? Here’s a design for the fairy lovers in the group! Instructables shows you how to cut out a big piece in the shape of Tinkerbell, followed by tiny circles in different sizes to make it look like she’s just flown in, leaving a trail of fairy dust.
20. Cool Pumpkin Carving – Skull in a Pumpkin
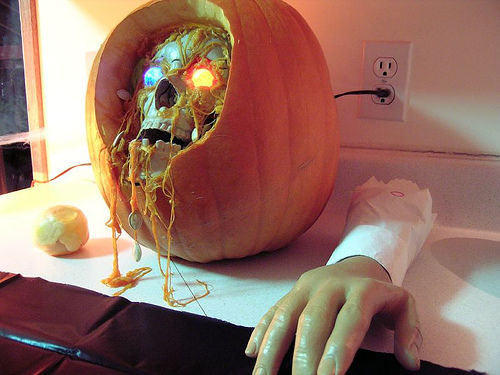
Maybe you’d rather incorporate your pumpkin into a gory display rather than carving in it the traditional sense the way you’d normally see? Then you’ve got to see this spooky smashed and stringy pumpkin idea with a creepy skull sticking out. It’s easier to make than most fancy carved designs, but it’s pretty effective if you ask me! Check the full instructions out on Instructables.
21. Pumpkin Carving Idea – Winnie the Pooh
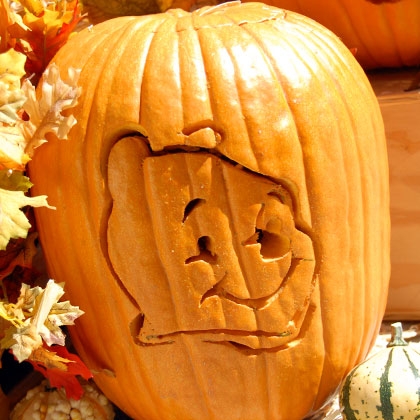
Perhaps your kids are still young enough to prefer Disney cartoons to ghosts and goblins, but they’re not that invested in either princesses or fairies? In that case, Family Disney has you covered with an adorable Winnie the Pooh alternative! This design is also great because it’s easy enough that older kids can try it themselves.
22. Pumpkin Carving – Moon and Star Foam Pumpkin
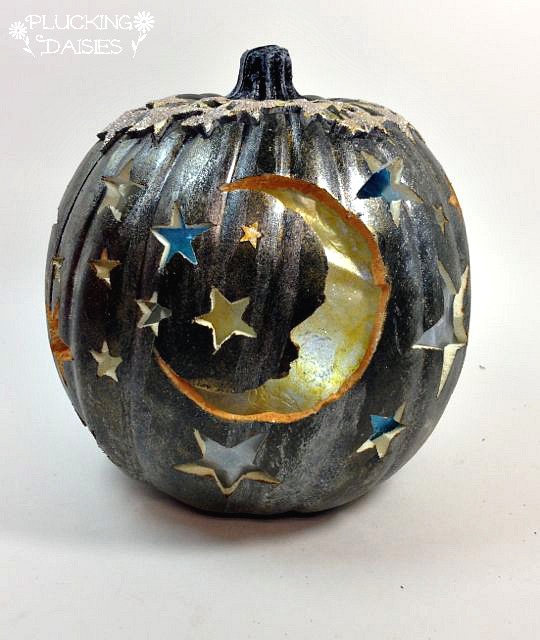
Perhaps you’re a bigger fan of foam pumpkins than you are of real ones because you don’t have to gut them and deal with all the slimy insides? The designs you cut into a foam pumpkin will also last longer than ones that eventually dry up and rot. Plucking Daisies suggests this dark night sky pattern, using the star shapes that you cut out of the sides as embellishments to stick on the top.
23. Pumpkin Carving Idea – Happy Whale
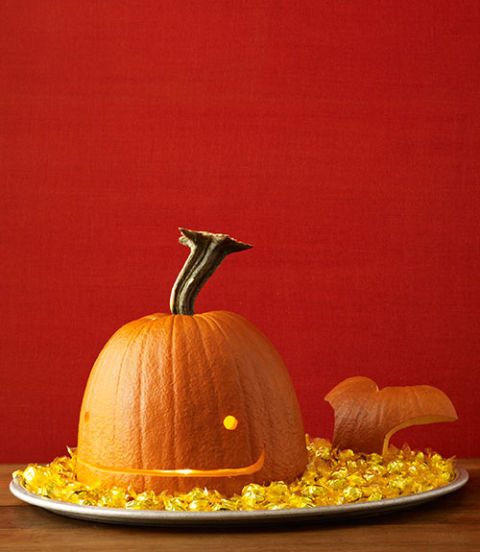
Are you looking for fun, unique ideas for the Halloween party you’re throwing for your kids, and you’d rather something a tad more creative than just a classic jack-o-lantern? Try this funny little whale on a tray instead! Fill the tray with candies as the “water,” just like Woman’s Day did, so people can help themselves throughout the night.
24. Pumpkin Carving Idea – Raccoon Pumpkin
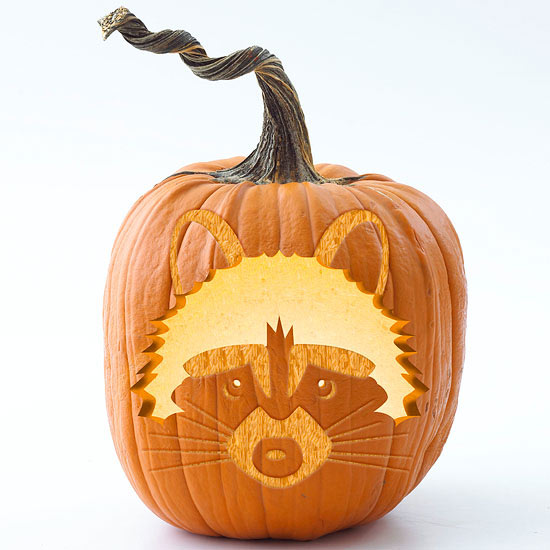
Are your kids big fans of anything involving cute animals? Then try making this adorable, furry little raccoon with them! The design is quite simple except for the muzzle, where you’ll simply carve away enough of the outside that the light and shine through the pumpkin wall, rather than actually cutting the piece out completely. BHG shows you how it’s done.
25. Pumpkin Carving Idea – Anatomy
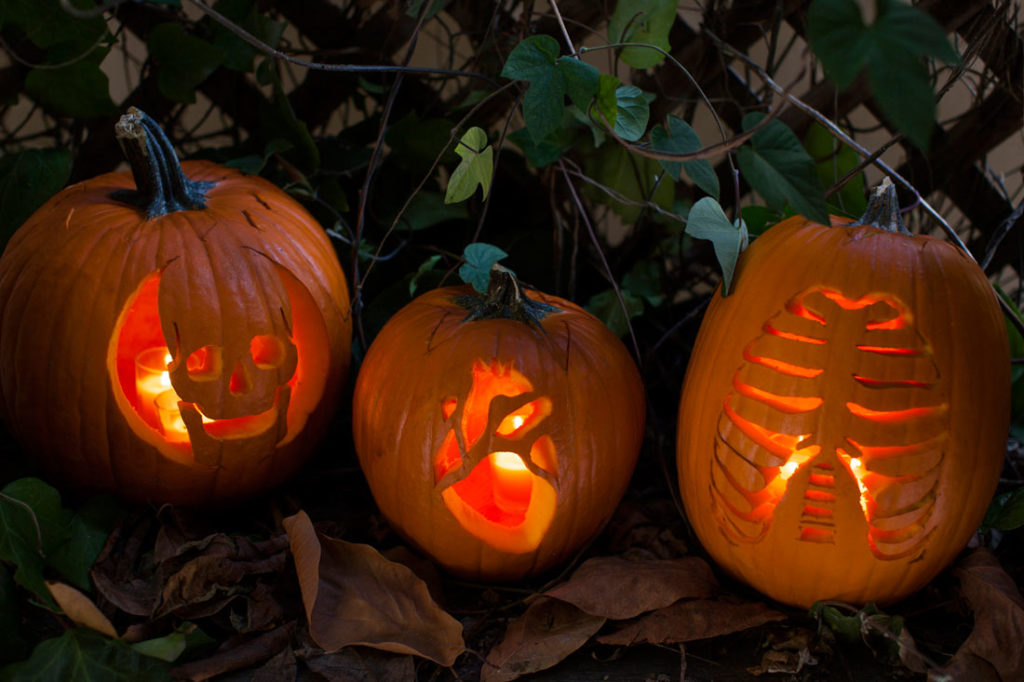
Do you have some budding little scientists or doctors in your midst at home? Then I’d be willing to bet that they’ll take an innocently gory fascination in these body part pumpkin carving designs! Despite looking rather impressive, they’re made of nice, big chunks, making them quite easy to carve. That means that kids who are old enough to handle little carving saws can try this pattern themselves! Check out the patterns for making each of these on Brit + Co.
26. Pumpkin Carving Idea – Constellation Over Black Pumpkin
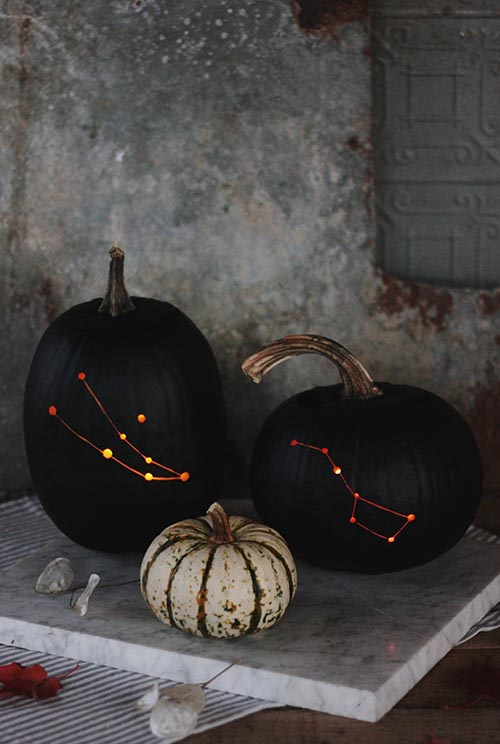
Have you ever seen people choose to paint their pumpkins instead of carving them? It’s an awesome look, but many prefer to stick with the classic carving idea. Design Sponge, however, suggests combining the two techniques to make an awesome constellation effect! Paint the entire pumpkin black and then drill holes in the shape of your favorite star pattern into the surface of the pumpkin. I’m so obsessed with these that I’d make them all year round if pumpkins were so available in every season!
27. Pumpkin Carving Idea – Painted Pumpkin Candy Jar
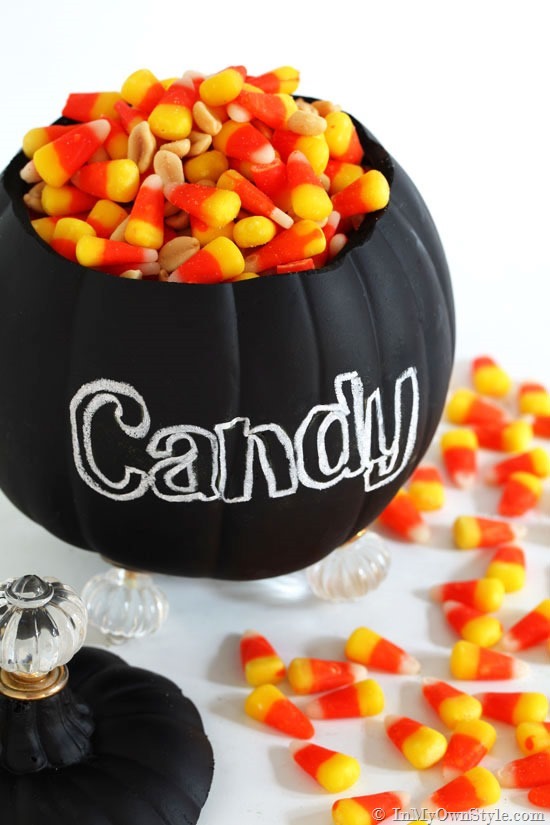
Perhaps you really want to have pumpkins around, but you just don’t want to worry about whether they’re rotting or you’re very sensitive to smells? Try this adorable little DIY pumpkin candy holder design instead! In My Own Style suggests finding a cute pumpkin shapes jar and painting it for the season, then setting it out at your Halloween party for people to help themselves.
28. Pumpkin Carving Idea – Alarm Clock
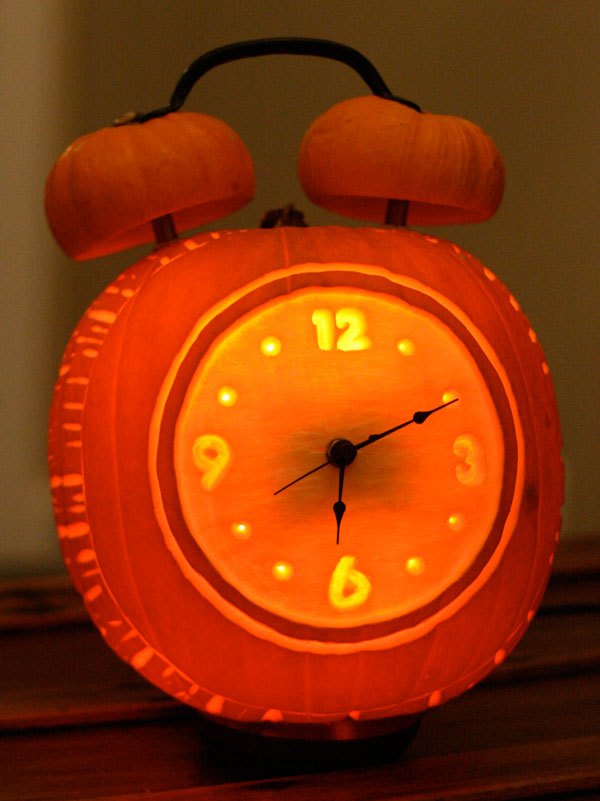
Built by Kids guides you through the process of making more than just a jack-o-lantern. This pumpkin has been carved to look like a spooky little Halloween clock, complete with an alarm on top and hands! Use smaller pumpkins cut to make the bells on top and a little battery-powered clock handset from the dollar store. I love the artistic look of shaving the pumpkin very thin rather than simply cutting right through the side.
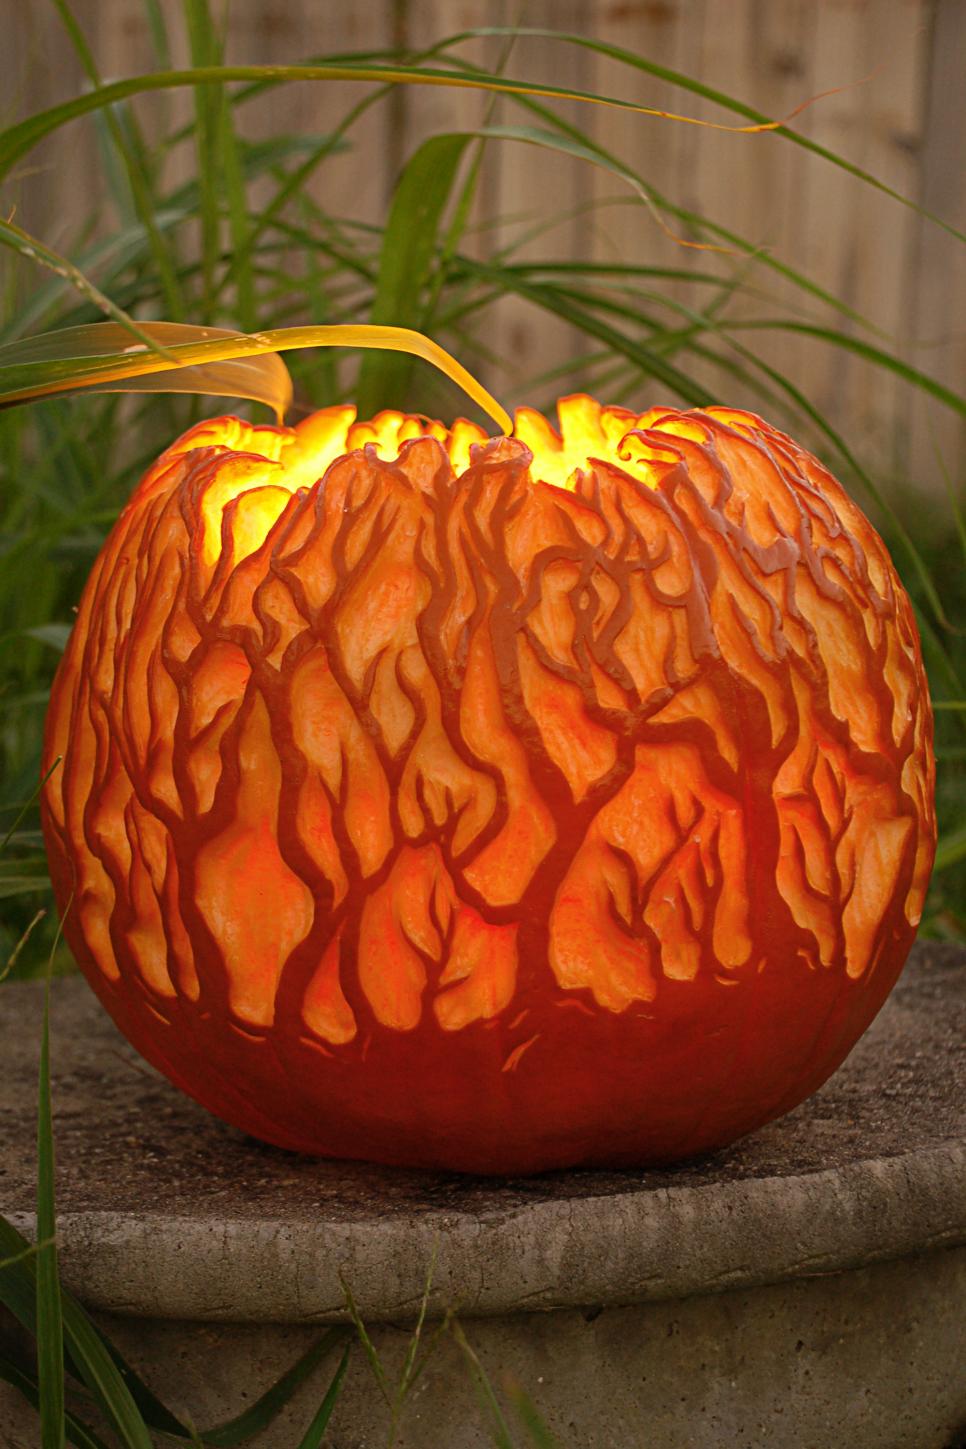
29. Pumpkin Carving – Spooky Forest

Are you a big fan of the thinly shaved pumpkin look too, but you’re not sure you’re ready to commit to an entire clock? Try this intricate and rather impressive shaved tree design instead! You’ll have to be very light-handed in order to get a thin layer without punching through the side, but the awesomely spooky effect is worth it! HGTV shows you how it’s done.
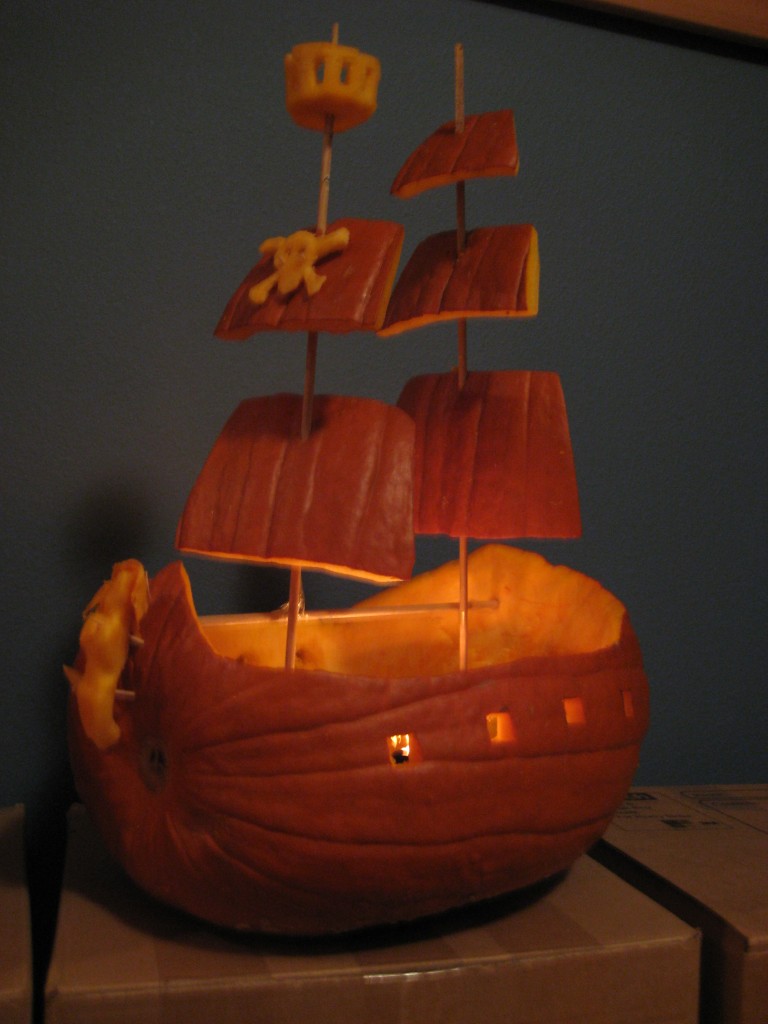
30. Pumpkin Carving – Halloween Pirate Ship

Are you looking for a way to make your pumpkin extra impressive, but you’d rather something a little more unique than just your standard carving? Try building an entire pirate ship instead! Cut a whole section from one side and tip the pumpkin on its opposite side. Use wooden kebab sticks and cut pieces from the larger section you removed to build your sails and masts! Check it out in more detail on erindean.
Final Words on Halloween Pumpkin Carving
Yes, Halloween is an awesome holiday that has you throw a spooky, goofy, or quirky outfit on and hang out with your best friends or go trick-or-treating around the neighborhood, but most of these funny activities require quite some planning beforehand. You didn’t believe that all those carved pumpkins around your neighborhood just spawned out of nowhere to brighten your day and lead the way until the end of Halloween, now did you?
Therefore, it makes sense that you’ll have to prepare ahead for this event in any way you can, and if somehow this year you’re in charge of buying, carving, and placing the pumpkins in your house, on your front lawn, or on your porch, then you might as well do a great job and have others stare in awe at your creations. Although we won’t help you physically with it, we’ll at least try to bring you some great ideas about the ways you could decorate the pumpkins and the designs you can choose.
Many of the ideas we’ve included here are easy to replicate on your own without any previous experience with carving pumpkins whatsoever, but others are a tad more complicated, so if you’re not exactly a Michelangelo of pumpkins, you may want to save yourself the tears and the frustration. After all, we believe that the most important thing about this holiday is that you have fun. Happy Halloween, everyone!