Amaryllis Flower Care: How To Grow And Care For Amaryllis Lilies
Updated on September 20, 2021
Amaryllis flowers take every opportunity to show off their stunning beauty and alluring colors. If you have received a bunch of amaryllis flowers as a Christmas gift before, you probably wished you could grow them and keep their eternal beauty blossoming in your house or garden.
As it turns out, that’s actually a lot easier than you thought. It’s true the sheer beauty of the flowers can be intimidating especially for a novice gardener. And for a good reason, since this bulb needs special care and the right conditions for the blooms to open. However, if you keep reading, you’ll find all you need to know about growing amaryllis lilies, which varieties to choose from, and how to take care of them to keep them flowering year after year.
Amaryllis at a Glance
The amaryllis goes all the way back to the early 18th century when the first cultivar was developed. It was cultivated from amaryllis belladonna, the South African species with star-like flowers. A century later, another botanist traveling through South America, discovered more species of the amaryllis. As the family grew, interest in the perennial bulb with its beautiful flowers grew.
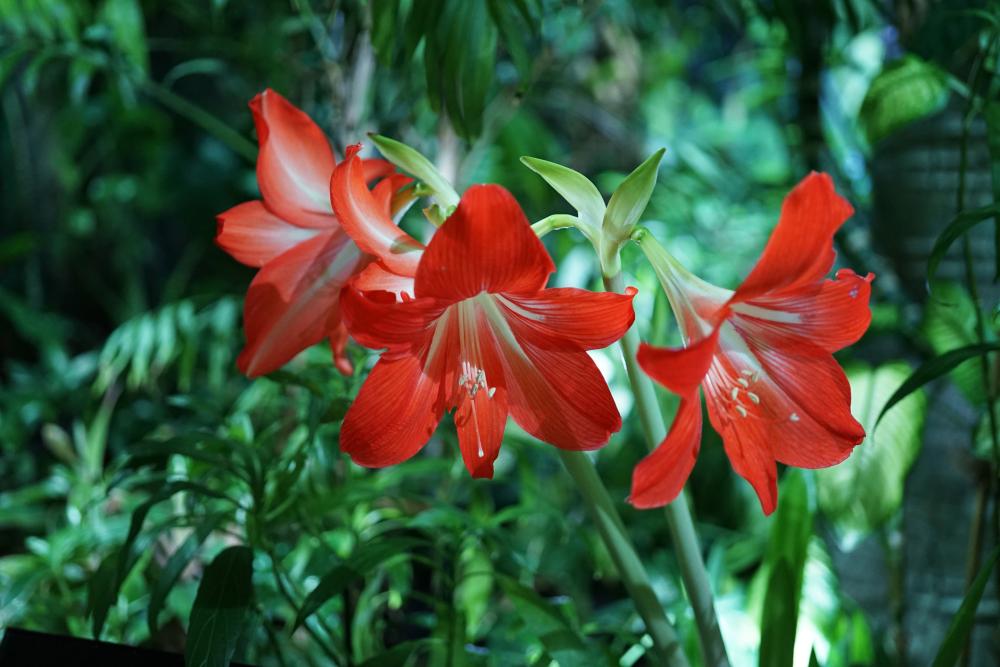
The bulb grows best in zones 8 to 10 and averages anything between one to two feet tall and one foot across. Within 8 to 10 weeks from planting the bulb, it will start flowering. The flowers grow on top of a long stem that towers over 25 inches tall. They grow in clusters of between 2 to 12 flowers.
Each funnel-like flower has 6 petals and measures about 4 inches in diameter. The petals are arranged in two rows, inner petals, and outer sepals, and they both have the same size and appearance. The flowers vary in color from purple to white, and pink. Sometimes the petals would have more than one color such as crimson and white or purple and white.
The bulbs are some of the earliest flowering plants to open up. Some varieties start blooming in the mid-winter while others wait until the early spring. But commercial growers have found ways to make the amaryllis bloom in the early winter in time for the holidays. This is why you’ll find the blooms in flower shops ready to be wrapped as a Christmas gift.
Amaryllis Varieties
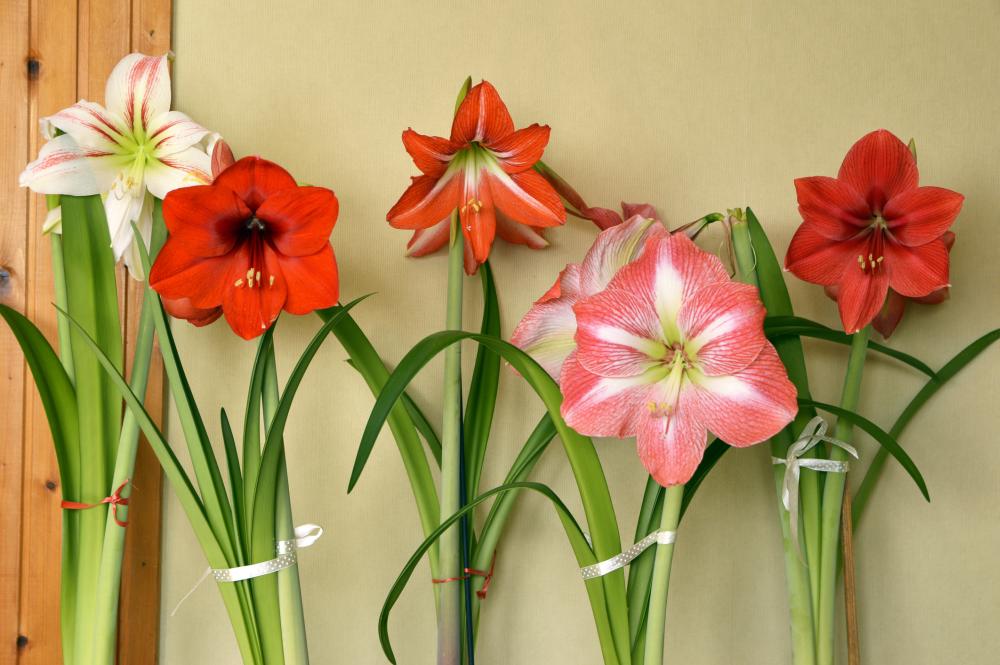
Since you can’t have too much of a good thing, more species of the amaryllis were discovered over time and more cultivars developed to meet the high demand for more varieties. So of course the first thing you need to do is decide on which variety to grow. Here are some recommendations to start your amaryllis garden.
- Sweet Nymph: As the suggestive name suggests, this delicate flower makes a splash of colors. With a crimson background and white stripes, the small petals are shorter than the average amaryllis flower. But because of their relatively long vase-life, these flowers are a good choice to make floral arrangements.
- Rosalie: An elegant variety that grows mostly indoors. The blooms are about 24 inches and are the centerpiece of any design. They come in one color variety with blushing apricot shades and a light green center. Each stem carries about 5 flowers making it a wonderful house plant to grow.
- Rilona: This variety has apricot flowers but with crimson veins. The intricate arrangement of the petals gives the flower its unique beauty. And although the colors are more subdued than the average flashy amaryllis, it’s suitable for many settings and interior designs.
- Pyjama Party: The name says it all here. This is a festive flower that brings a cheerful atmosphere and thus is a good candidate as a gift during the holidays. The patterns on the petals are catchy with crimson shades and pinkish stripes. Originally from Holland, the cultivar grows to about 20 inches tall. A single bulb often produces 3 stems and each stem bears a cluster of about 5 flowers on average.
- Purple Rain: It’s hard to tell whether this cultivar was named after the famous Prince hit, or it was the famous musician who was inspired by the flower’s whimsical beauty. One thing’s for sure, though. The flowers don’t have a single shade of purple on them. They’re actually pink with magical stripes and blooms that measure about 8 inches on average. Each stem carries a cluster of 6 flowers facing different directions. So wherever you stand opposite the plant, you’ll have a bloom staring back at you.
How to Grow Amaryllis
We said earlier that the beauty of the amaryllis can be intimidating for a gardener with little to no experience growing bulbs. But while caring for the perennial can be a little demanding at times, growing the bulb is actually quite straightforward. Here’s how to start this lovely flowering bulb in easy steps.
- Select a large bulb since it will grow many stems and plenty of flowers. Smaller bulbs will produce one stem at most.
- The bulb should be healthy with no mold buildup or scars on the surface.
- Pick a terra cotta container with large drainage holes at the bottom. You can start with a small pot that’s a little wider than the bulb.
- Fill the pot halfway with a general-purpose potting mix. Make sure it’s sterilized with a loose texture. Mix in organic material to improve the drainage.
- Place the bulb with the pointy end face up in the container and add the rest of the potting mix. Leave the top one-third of the bulb exposed.
- Water the pot to get the potting mix moist. Don’t dislodge the bulb and avoid covering it with the potting mix fully.
- Keep the pot on a window sill facing the west or south and gets at least 8 hours of sunlight every day during the growing season.
- Most bulbs will sprout and start blooming within the next 8 weeks. Some might flower just 6 weeks after planting the bulb while others would take up to 10 weeks to bloom.
Amaryllis Care
On average, amaryllis plants need specific temperatures for every season of the year. And while sunlight is essential for the flowering and success of this bulb. Watering and feeding are other aspects of the perennial plant’s caring that ensure that it flowers every year on time.
Soil
Loamy soil is usually the best for the amaryllis bulb. It allows the roots to grow without much hindrance and doesn’t retain water. In addition, loamy soil is naturally rich in nutrients and this bulb needs to grow in fertile soil. If you don’t have loamy soil, amend your clay soil to make it as close to sandy as possible. Add coarse sand or perlite to the heavy soil until the texture is loose enough when you clasp your hand on a fistful of soil. If the soil still turns into a clump, that means it needs more sand or perlite. Adjust the pH reading of the soil to bring it close to 6.5. Add an inch of lime to increase the pH by 0.5 points.
Light
When it comes to sunlight, amaryllis plants need plenty of it. But as usual, there are no cut-and-dry rules as to how much light it needs. It all depends on your zone, how hot and long is the summer, and whether you’re growing the bulb in the garden or as a houseplant. Outdoors amaryllis usually thrives in indirect bright light. Partial shade, especially in the afternoon sun, can go a long way into protecting the sensitive plant.
As a houseplant, keep the pot near a window that gets plenty of full sun but filter the light with a lace curtain. Avoid exposing the plant to direct sunlight during the summer months.
Water
Once you get the light conditions just right for the flowering amaryllis, you need to turn your attention to the watering habits of the plant. During the spring and summer, the perennial plant needs one inch of water every week including any rainfall you get. Watering should be aimed at the base of the plant and not the foliage or flowers. Allow the top couple of inches of the soil to dry out between irrigations and always water it lightly to get the soil moist not wet.
One more note about amaryllis and water. After the flowers have dropped, cut down on watering and allow the plant to rest. This is important for next season’s blooms.
Fertilizer
The bulbs of amaryllis require rich soil to grow and blossom. Before you plant the bulb, make sure to add 2 inches of organic compost or aged manure to every one foot of soil in the garden. If you’re growing it in a pot, skip the aged manure because of its unpleasant odors and use organic materials instead. Once the bulb takes root and stems grow out of it, side-dress the plant with liquid fertilizers at half strength. Before the flower buds emerge, cut down on nitrogen-high fertilizers and switch to phosphorus-rich liquid fertilizers. This will give you large and color-rich blooms. Apply the fertilizer once every two weeks during the growing seasons. Stop feeding the plant once the last flower has dropped to prepare it for the dormant season.
Flowering and Wintering
Getting the perennial amaryllis to bloom year after year is not a done deal. The amount and quality of care you provide the bulb and your gardening skills can be the difference between an abundance of flowers that bloom every year and a plant that fails to bloom some seasons.
When the flower season is over, cut off all the flower stalks still on the plant. But encourage the stems and leaves to grow. Robust foliage is important for the flower buds to develop in the coming year.
Before the first frost, bring the outdoor plants inside to protect them against the freezing cold. Cut back the foliage by one-third and keep the bulbs in a sheltered and warm place throughout the winter.
Pests and Diseases
Amaryllis bulbs are prone to the same bugs that attack other house plants and flowering plants in your garden. Thrips, aphids, fungus gnat larvae, mealybugs, and spider mites are the most common pests and you need to get rid of them as soon as you see the telltale signs of infestation. The two most effective ways to eliminate these tiny pests are either spraying the plant with neem oil or rubbing the leaves and stems with a swab soaked in rubbing alcohol.
In the case of amaryllis borer, snail, grasshoppers, and slug infestations, you can pick the bugs by hand and drown them in a bucket full of soapy water.
As for diseases, you’ll need to be wary of soft bulb rot and southern blight. Both are caused by waterlogged soil or inadequate watering patterns. Allow the top 2 inches of the soil to dry out before you water the bulb. Get the water moist but not wet and give the plant one inch of water a week during the spring and summer.