How to Use the Cricut Maker 3 [Cricut for Beginners]
So staying at home and having too much time on your hands has finally caught up to you, so you figured it would be a great idea to start a hobby, and crafting was the first thing to pop into your mind.
Well, unleashing your imagination is a good thing, and if you have the right tools to help you turn your ideas into reality, then things will be a whole lot easier (and potentially profitable).
Speaking of tools, there is one manufacturer that creates a wide assortment of tools that can help home crafters, and it’s called Cricut.
Cricut’s flagship machine is the Cricut Maker, along with the Cricut Maker 3, with the latter bringing several improvements compared to the first generation of machines.
Unfortunately, not everyone knows how to use the machine to its full potential, and even if most of you probably know their way around it, there’s a high chance that you’re not using it to its full potential, and you might be missing out on some amazing features.
Table of Contents
Creating Things at Home: A Form of Therapy
We all remember how when we were kids, our imagination would go wild, and we’d think about all manner of things, getting ideas that ranged from silly to downright genius just by staring at blank walls.
Truth be told, we don’t lose our imagination and our desire to create things out of fun just because we grow older, we just lose interest in doing it because we have other things on our mind and very little time to spare.
However, the world has changed, and working from home is something a lot more common now, and since more and more people save precious time (sometimes even several hours) by not having to commute anymore, you suddenly realized that your 8-hour work schedule actually takes just 8 hours.
With so much time on your hands, it’s time to return to your roots and start creating things that are fun and whimsical.
That’s precisely why we went ahead and created a complete guide to showcase just how you can use the Cricut Maker and how you can use it to create some amazing home-crafted items and maybe make a few dollars along the way too.
How Does a Cricut Maker Work?
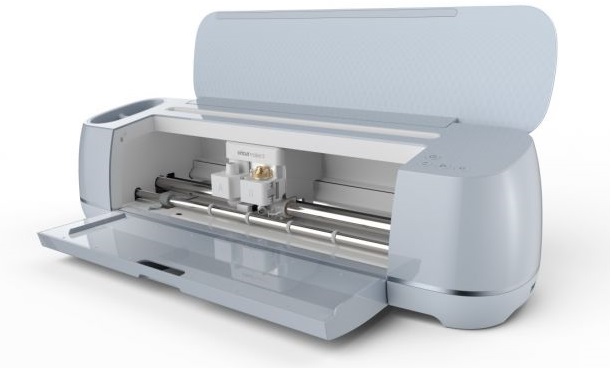
Without going into details, the Cricut Maker 3 is a computer-controlled cutting machine specifically designed for home crafters, and it is used for cutting paper, felt, vinyl, all manner of fabrics, and even harder materials like leather, matboard, and wood.
The Cricut Maker is part of a long line of machines created by Cricut, being part of one of the 4 major device families:
- Cricut Maker machines
- Cricut Explore machines
- Cricut Joy
- Cricut Heat presses
While somewhat similar in terms of functionality to the Cricut Explore, the Cricut Maker 3 is the heavy-duty flagship model that features the best cutting speeds, the most cutting force, and the highest potential for large-scale manufacturing.
With the help of this amazing machine, you can create custom designs and cut various materials, allowing you to decorate your home, as well as create custom gifts for your friends and family, and even make a small business of handmade objects.
For those of you that are interested in learning more about this amazing cutting tool, know that we have already written a complete review about the Cricut Maker 3 if you’re interested in more details about the product.
How to Use the Cricut Maker: Cricut Maker Tutorial
Now that you’ve learned about what the Cricut Maker 3 is, it’s time to learn how you can use it properly.
Keep in mind that Cricut designed all of their machines to be as easy to use as possible, but the Cricut Maker 3 is still admittedly the most complex of them all, so knowing how to use it fully isn’t something you’ll be able to do from the get-go.
Preparing the Cricut Maker
One thing you need to understand is that cutting machines are generally loud, and even if the Cricut machine was created to be as silent as possible, there’s only so much the designers can do since you are still talking about a machine that is basically cutting and pounding away at all kind of materials.
That being said, the first thing you should do before you start off with your first work project is to find a room where your Cricut Maker 3 will be housed, and if you’re one of the lucky few that can spare an entire room and turn it into a dedicated crafting room, it’s even better.
Once you have your room, the exact spot where you’ll be placing the machine is equally important. This is mostly because the Cricut Maker 3 is the largest Cricut machine (22.6 x 7.09 x 6.22 in or 57.4 x 18 x 15.8 cm), so you’ll need to find a place for it that will not hinder your movements.
Secondly, the machine is also quite bulky (22.7 pounds or 10.3 kg), so make sure that the furniture you’re placing it on is sturdy. More so, since you’ll be dealing with a machine that will probably be working for a few good hours at a time, cutting and embossing all kinds of materials, you should also make sure that your furniture can handle vibrations.
Once you’ve found a place for your Cricut Maker 3, you can finally go ahead and unbox it and then plug it in.
Note: It’s ok if you take your time and admire the machine purely for its design since Cricut arguably makes some of the best-looking cutting machines on the market.
Connect to the Internet and Update Firmware
Ok, so you’ve unboxed the Cricut Maker 3 and plugged it in, but that doesn’t mean that you can go ahead and start with your projects, or at least not just yet.
You see, the Cricut Maker 3 is not just a simple machine, it is a complex device that is powered by dedicated software, and with Cricut updating their software on a regular basis, it goes without saying that if your Cricut Maker 3 is brand-new, it may need a few firmware updates.
This can be done through the Internet, and the great thing about the Cricut maker 3 is that it can connect to the Internet both via a wired (USB connection to the PC) and a wireless (Bluetooth) connection.
However, while we do advocate for less cable management, firmware updates may take a while to complete, and since Bluetooth connectivity isn’t all that great for data transfer, we recommend that, at least for now, you’ll use a wired connection to the Internet.
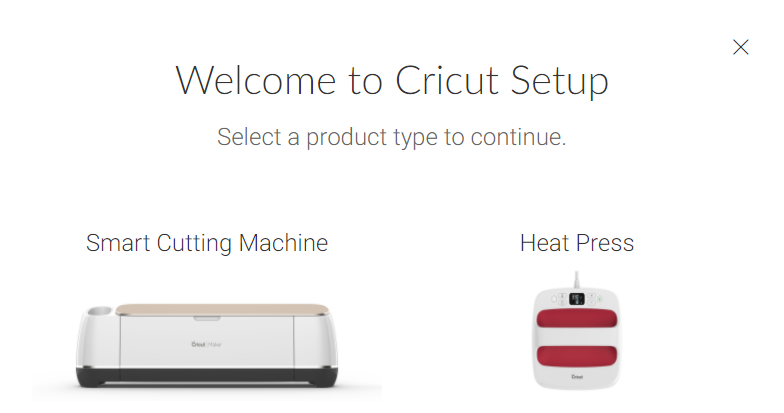
Here’s how to set up and update the firmware of your Cricut Maker 3:
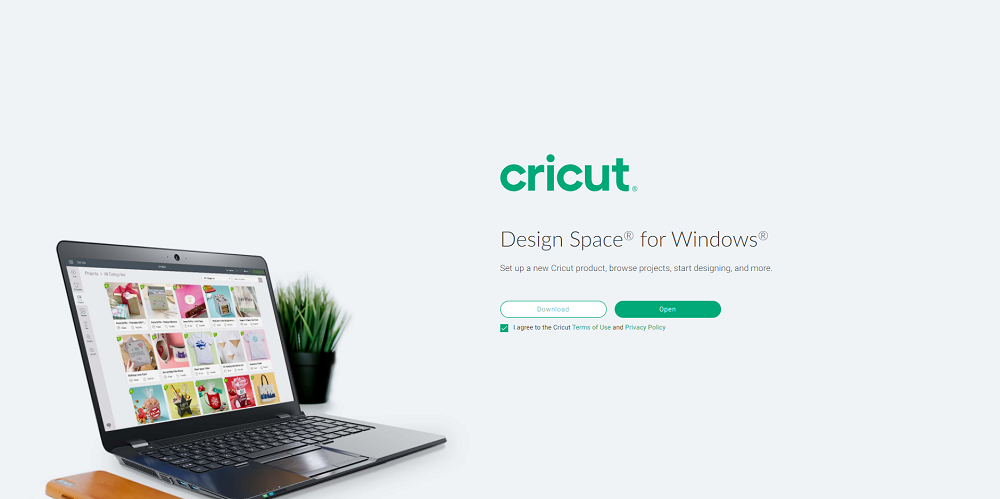
- Go to the Cricut Design Space webpage.

- Download and install Design Space for PC.
- It works on both Windows and Mac.
- Follow the on-screen instructions.
- Sign in or create your Cricut ID.
- Set up your new Cricut Maker 3 machine.

- The Design Space app will automatically scan your Cricut Maker 3 and detect whether it needs any firmware updates.
- Design Space will then list the available firmware version.
- Click on Update.

- Wait for the progress bar that appeared on the screen to complete.
- Your Cricut Maker 3 will restart by itself once the update is complete.
- Select Continue.
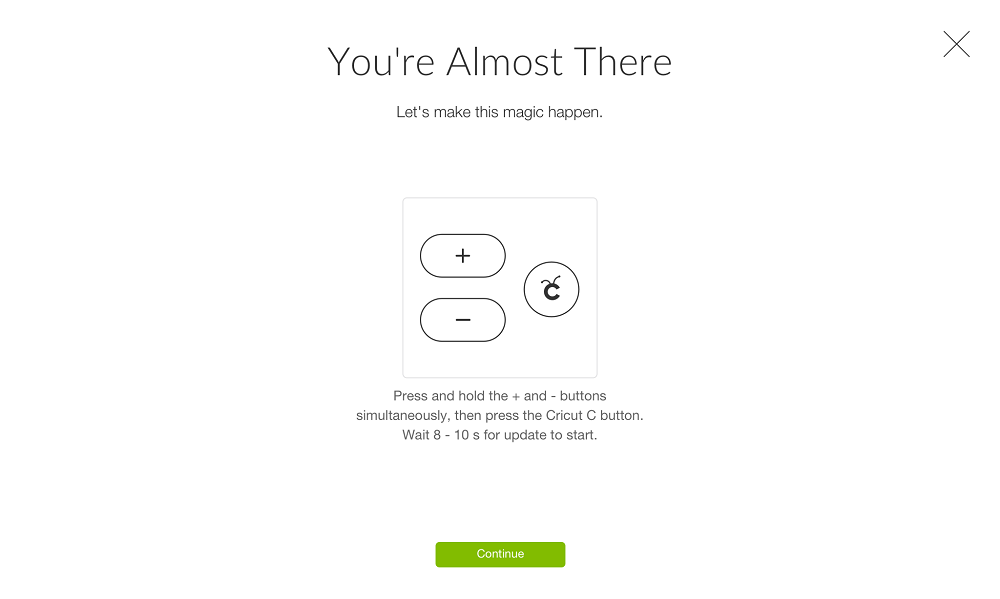
Note: The Design Space setup will let you know when it is complete by prompting you to do a test cut.
Learn About Cricut’s Design Space
We talked earlier about using Design Space to set up your Cricut Maker 3 and how you can also use it to update the firmware as well, but that’s merely scratching the surface of what this software can do.
You see, Design Space is a free software used with Cricut smart cutting machines, and it is available for Windows, Mac, iOS, and Android, although only the Windows and Mac versions can be used to set up or update the firmware of Cricut devices.
Its main purpose is to be a proprietary graphics design tool that also lets your program and wirelessly cut with Cricut Maker machines.
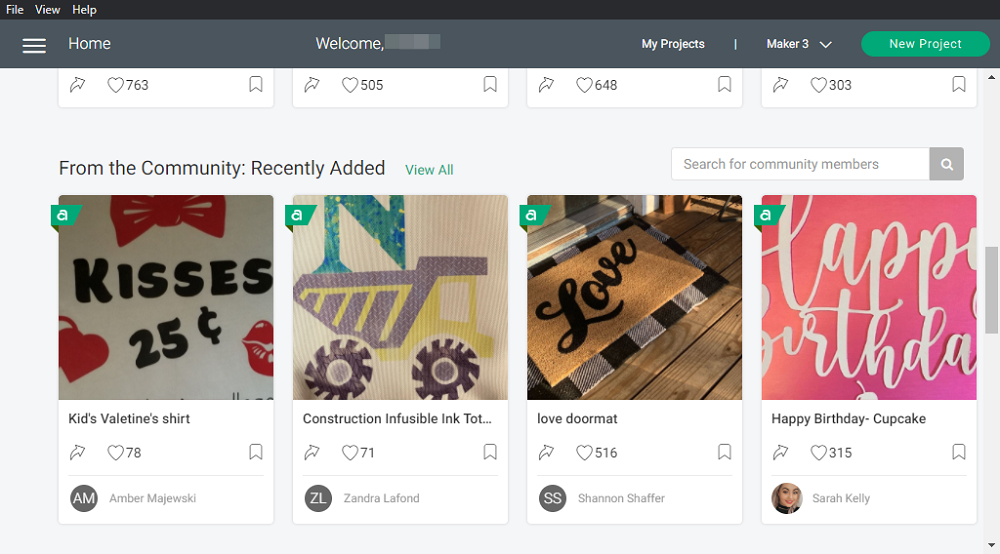
You can use this software to create a project from scratch, or you can go ahead and use some of the thousands of images, predesigned Make It Now projects, or even fonts that are available in the Cricut Image Library.
All versions of the app, both for PC and mobile, are cloud-based, and thanks to your Cricut ID, all data and projects that you are working on are synced across your devices, allowing you access to your designs 24/7, no matter where you are, whenever inspiration hits you.
For those of you that also use the smartphone app, you can use your built-in camera to visualize your project on a real-life background (via AR).
Note: Design space is installed locally on your PC, meaning you can design any time, anywhere, even without an Internet connection. However, you won’t be able to browse any of the resources from the Cricut Image Library.
Learn How to Use Design Space
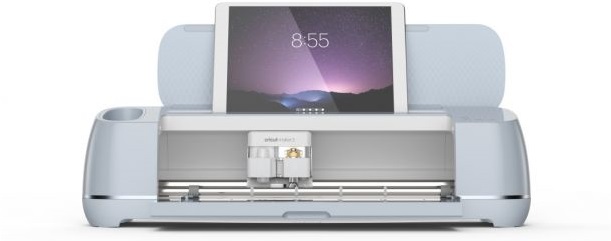
The Cricut Maker 3 lacks any onboard dials and buttons that let you create your designs, and everything that the machine does from a creative standpoint is controlled via the Design Space app.
That being said, you can’t expect to make even a simple cut in a paper without first learning the basics of how to use Design Space.
Fortunately enough, you don’t have to worry about how much it will take to learn the basics since the software was designed to be as intuitive and user-friendly as possible.
Here’s how to use Design Space on your Cricut Maker 3:
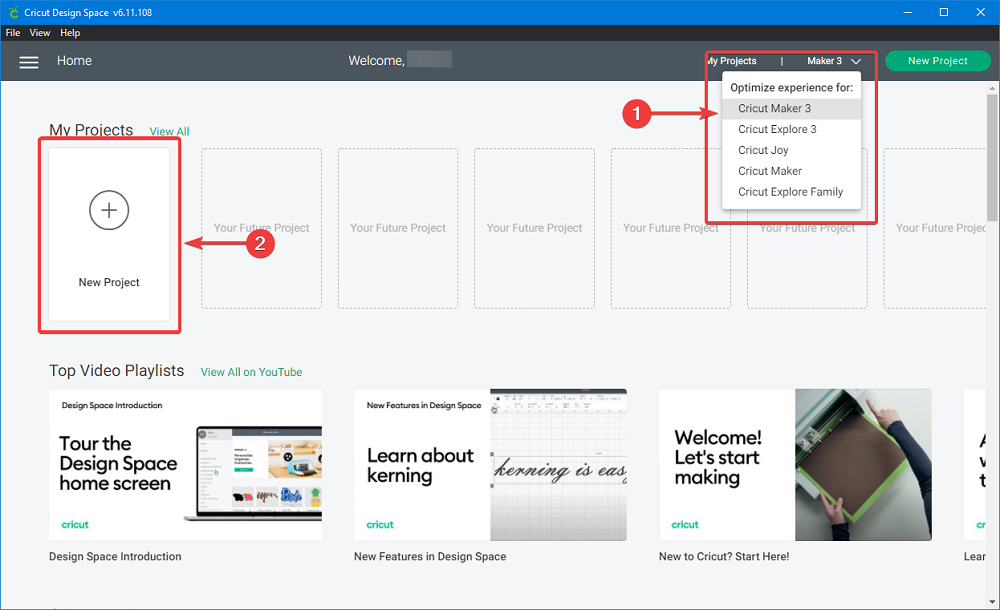
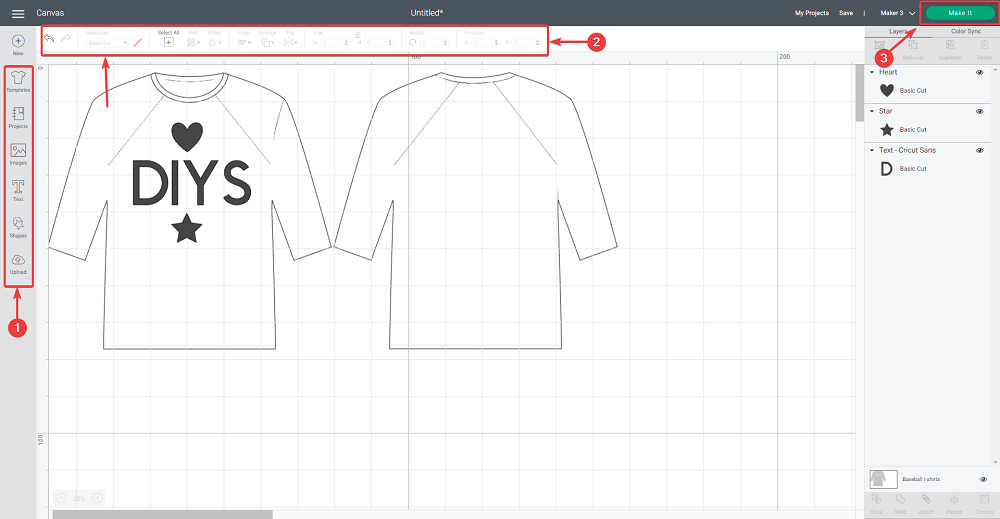
- Launch the Design Space app and log in using your Cricut ID.
- In the top-right corner of the menu, select Optimize experience for:
- Click on Cricut Maker 3.
- Click on New Project.

You will now be presented with Design Space’s graphics design UI, and this where you can create pretty much whatever you want, from posters to greeting cards and T-shirt models.
The next steps that you will need to take are purely up to you since it basically involves you working around with Design’s Space’s toolset and fiddle away while you create something fun to cut with your Cricut Maker 3.
Bottom line is that once you think that you are done with your design, all you need to do is press the Make It button in the top-right corner, and you can start cutting into your desired materials.
Learn About the Cricut Maker’s Accessories
We’ve already mentioned that the Cricut Maker 3 is a cutting machine at heart and that it can work with a wide variety (300+ materials), but that doesn’t mean that it uses the same blades for all materials.
You see, the Cricut Maker 3 has an adaptive system that supports 13 different tools to accommodate your need. These tools not only make the Cricut Maker 3 good at cutting, but they also make it well-suited for other operations like scrapbooking, quilting, leatherworking, engraving, debossing, and more.
Here’s a brief rundown of the 13 tools:
- Knife Blade
- Best used for deep cuts on hard materials with a thickness of up to 3/32 in (2.4 mm)
- Works best on balsa wood, chipboard, matboard, and tooled leather.
- Rotary Blade
- Best used for sewing projects
- Recommended for soft fabrics like cotton, fleece, or denim
- Fine-Point Blade
- Best used for finer projects where your working finer designs on softer materials, and it comes in 3 variations:
- Premium Fine-Point (Gold) – Works best on paper, cardstock, poster board, vinyl, and iron-on.
- Deep Point (Black) – Works best with magnet, chipboard, stamp material, thick cardstock, stiffened felt, foam sheets, and cardboard
- Bonded-Fabric (Pink) – Works best with bonded fabrics or fabrics with an iron-on backer
- Best used for finer projects where your working finer designs on softer materials, and it comes in 3 variations:
- Pens and Markers
- Used for designing and drawing shapes on your work materials
- Foil Transfer Tool
- Used to add a foil finish with Foil Transfer Sheets
- Wavy Blade – Used to make wavy edges in paper and thin cardboard
- Debossing Tip
- Used to create detailed debossed designs
- Works best on paper, craft foam, leather, poster board, and more
- Engraving Tip
- Used to engrave texts and designs onto materials
- Works best with paper, thin cardboard, and leather
- Scoring Wheels
- Used to create creases that make folding materials a lot easier, and it comes in two variants:
- Single Scoring Wheel – Works best on softer materials like crepe paper or light cardstock
- Double Scoring Wheel – Works best on softer materials like poster board or cardboard
- Used to create creases that make folding materials a lot easier, and it comes in two variants:
- Perforation Tools
- Used to make perforating lines that can be ripped easier later
- Works best on paper, acetate, cardstock, and more
- Deep-Point Blade
- Because of the deeper angle and more durable steel, it is used to make cuts in harder materials
- Works best on chipboard, thick cardstock, and more.
- Bonded-Fabric Blade
- Best used for cutting bonded fabric or fabric with an iron-on backer
- Washable Fabric Pen
- Best used for writing and designing instructions on fabric, and it can easily be washed later
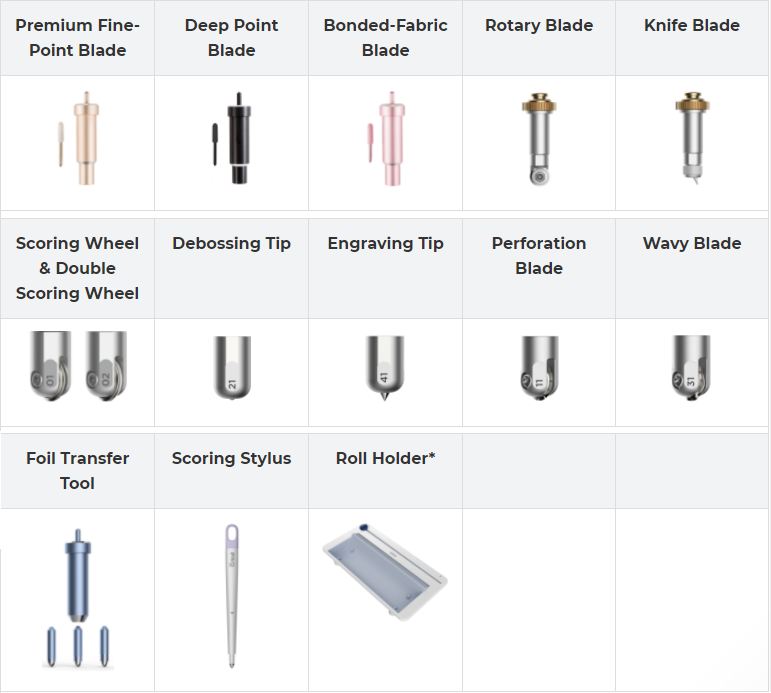
Note: Each of these tools can be bought together in a single package along with a brand-new Cricut Maker 3, but they are also be sold separately, so you don’t have to worry about buying an entire set of 13 tools just because you need the one blade.
Using the Cricut Maker 3 the First Time
So now that you’ve presumably found a place for your Cricut Maker 3, have set it up, updated its firmware, and learned all about its tools and what it can do, you can go ahead and actually start using the machine.
Use the Right Tools
Now that you know about the Cricut Maker 3’s tools, you need to remember that they were specifically built with certain purposes in mind.
That being said, while it goes without saying that you cannot use a cutting blade made for soft materials on something hard, you can’t do the exact opposite either.
The same applies to the pens as well, since certain pens are made to be used on certain materials, and don’t forget that some of them are permanent, while others are washable as well.
The bottom line is that you need to choose the right tool for the job, so if you’re drawing, use a pen, and if you’re cutting, use a (proper) blade.
The Cricut Maker 3 makes things easier and allows you to multitask to some degree thanks to its dual carriage feature, which allows you to perform two actions simultaneously.
The same thing applies to the cutting mats as well, since there are 3 different kinds made for 3 different categories of materials, and since they are consumables, it’s wise that you know which to use in different situations so that they can be used for as much as possible.
Setting Up Your First Cut
Speaking of cutting mats, the first thing that you need to do once you’re prepared to make your first cut is to place the cutting mat in the Cricut machine. Simply remove the mat cover and place it on your Cricut Maker 3.
You will then have to place the material over the cutting mat while also making sure that it perfectly adhere to the surface, and once you are done, simply load the mat and the material into the machine.
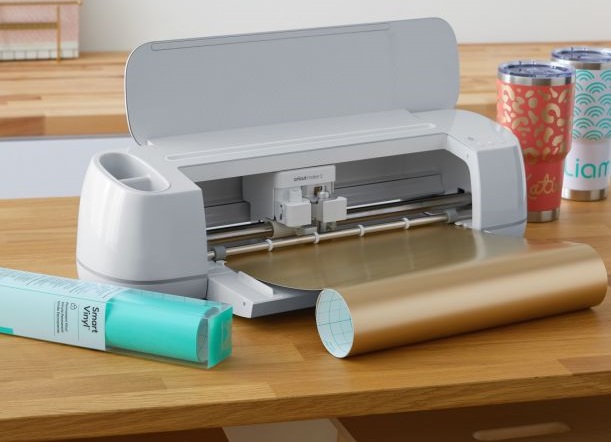
Note that you can cut down on preparation times by using Smart Materials, which work without a cutting mat, meaning that you can just load the material directly into your Cricut Maker 3 machine to get it started.
This is due to the fact that Smart Materials come already attached to a special backer that can feed through your Cricut Maker 3, which basically acts as a one-time use built-in cutting mat.
These Smart Materials come in a variety of material types, such as:
More so, the Cricut Maker 3 works best with Smart Materials, allowing up to 2x times the cutting speeds compared to their regular non-smart counterparts.
As soon as the materials are loaded, the first thing that your Cricut Maker 3 will do is check whether you inserted the right tool into the slot.
It knows this because this is one of the settings that you set up earlier when you created the design via Design Space, so if you loaded the Foil Transfer Tool instead of the Fine-Point Blade, the machine would not start the operation until you replaced it.
Weed Out Excess Material
One thing that you need to remember about the Cricut maker 3 is that it cuts your materials, but it doesn’t also get rid of the excess and leftovers, whichmeans that you’ll need to have focus, a good pair of eyes (or glasses), and a very steady hand.
Unfortunately, this is something that you will have to do manually, although Cricut did think of a few ways it can help to make things a bit easier, and it comes in the form of a device called the Cricut BrightPad.
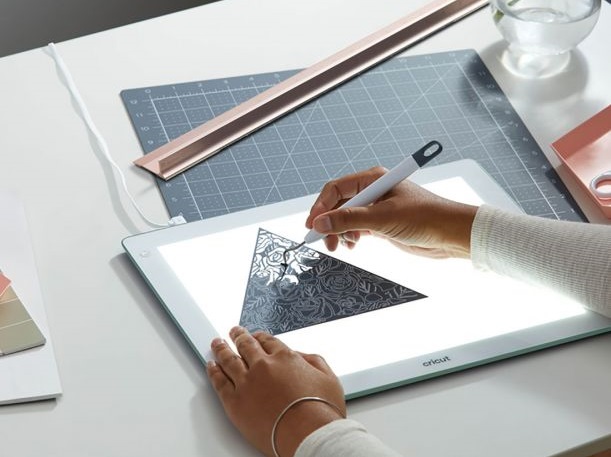
The Cricut BrightPad acts as a pad on which you can place your materials and, thanks to the light that it emits, you can see the cuts and holes more easily, making it easier to pick out the excess material.
Then again, if you don’t have the budget to buy it, you can also go ahead and place your cut material against a bright window, although sitting in that position for extended periods of time tends to become uncomfortable at some point.
Finishing Your Project
Once the materials have been cut and properly weeded out, you can go ahead and use them further in your other projects, some of which can even involve using other complementary Cricut machines.
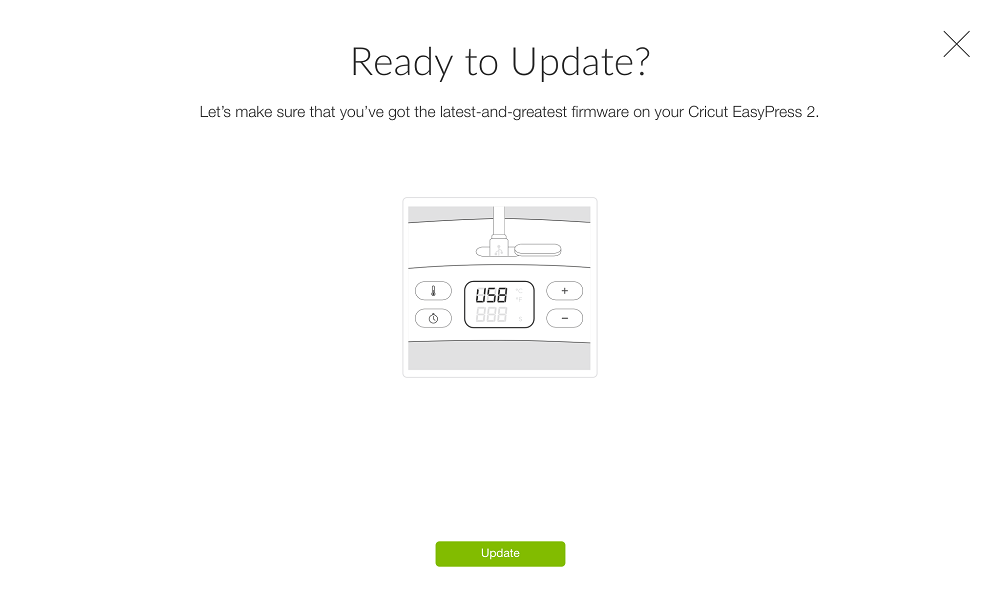
For example, don’t forget that vinyl is among the many materials that the Cricut Maker 3 can cut, and this includes HTVs (heat transferable vinyls), meaning you can use the Cricut Maker 3 to cut the HTV into shapes and designs, and then use a heat press like the Cricut EasyPress 2 to apply it to clothing and fabrics.
Combining these two tools can help you create amazing projects, such as creating custom T-shirts that you would normally design and buy off of the Internet (at an exaggeratedly high price given their quality).
Get Used to Your Cutting Materials
Since the Cricut Maker 3 can support so many materials, it can get a bit overwhelming, especially if you make the mistake of watching only crafting tutorials where they use 7 different materials to make just one Christmas card.
Not only will you have to change the machine’s settings 7 times, but you might also need to change the blades a few times as well, and for a beginner, so many tasks for just one project can seem daunting and can lead to a loss of interest very fast.
Because of that, our recommendation is that you stick to simpler projects, preferably ones that involve as few materials as possible. In fact, we recommend that the first few times you actually use the Cricut Maker 3, you just do test runs over and over on just one type of material, just so that you can get used to it.
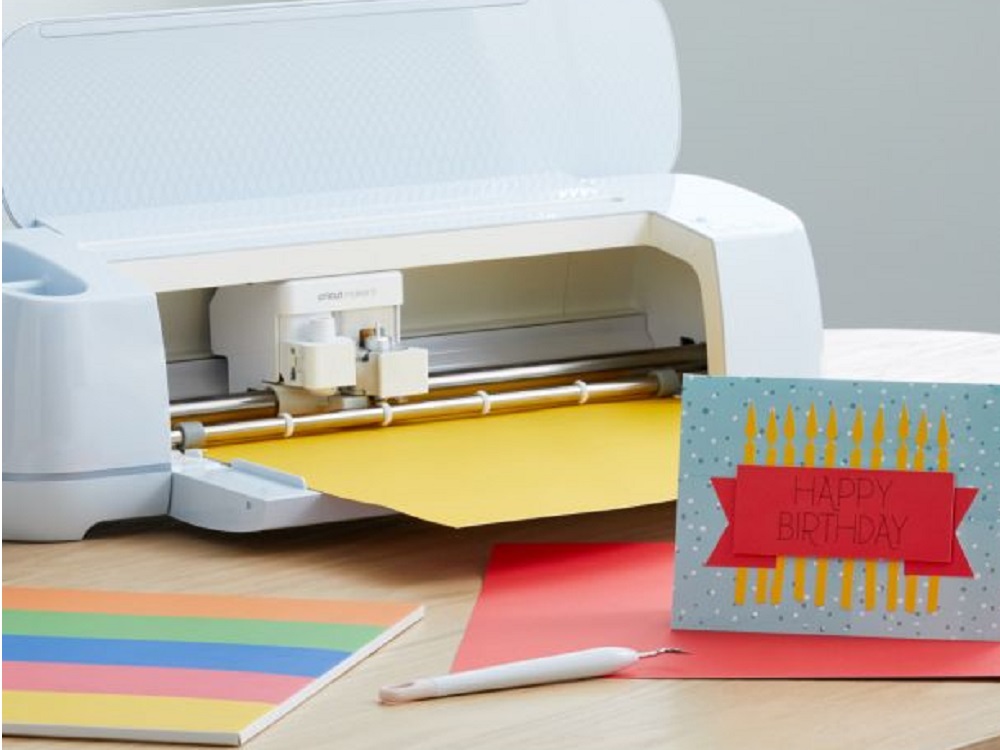
For example, you can go ahead and make greeting cards just by using one type of cardboard, and while the end result may not be as impressive as a greeting card covered in a felt pattern, you’ll still be creating something while also mastering cardboard.
FAQ: More Information About the Cricut Maker
What can the Cricut Maker 3 do?
TheCricut Maker 3 is a PC-controlled cutting machinethatcan be used on +300 different materials that range from delicate fabrics to plywood.
It is powered by a software tool called Design Space you can create and design your own projects, and it features a smart tool system that allows you to switch between 13 different tools that can cut, draw, score, deboss, engrave, and foil.
Is there a new Cricut machine coming out?
Cricut has yet to announce any new Cricut Maker model, and, as of the writing of this article, the newest Cricut Maker machine that you can get is the Cricut Maker 3.
Does the Cricut Maker 3 need a mat?
Under normal circumstances, all materials that you plan to cut using the Cricut Maker 3 will need to be placed on a cutting mat.
However, if you opt to use Smart Materials instead, they will already come adhered to the surface of a cutting mat, and the Cricut Maker 3 will go through these materials faster as well.
Which is better, Cricut Maker or Cricut Maker 3?
For all intents and purposes, the Cricut Maker 3 is superior to the Cricut Maker. Not only does it support Smart Materials, but it also has a much longer cutting length (Up to 12 ft compared to the first generation’s 2 ft).
More so, the Cricut Maker 3 works in Fast Mode by default, cutting at 2x the speed of the first generation Cricut maker.
Another noticeable step forward is that the Cricut Maker 3 supports the Roll Holder tool, while the first generation Cricut Maker doesn’t.
What is in the box of a Cricut Maker?
Even if you buy the most affordable Cricut Maker 3 package, you will still receive several other useful materials and tools besides the machine itself:
- 1 x Premium Fine-Point Blade
- 1 x Blade Housing
- Pre-installed in the B clamp
- 1 x Accessory Adapter
- Pre-installed in the A clamp
- 1 x Quick Start Guide
- 1 x Safety document
- 1 x Warranty document
- 1 x USB Cable
- 1 x Power adapter and power cord
- Enough materials for a test cut
- Bonus materials to start off some projects
What is the maximum size I can cut?
The maximum cutting size on both the Cricut Maker and the Cricut Maker 3 when using non-smart materials depends on the cutting mat that you are using:
- On a 12 in x 12 in mat (30.5 cm x 30.5 cm) you can cut materials up to 11.5 in x 11.5 in (29.2 cm x 29.2 cm)
- On a 12 in x 24 in mat (30.5 cm x 61 cm) you can cut materials up to 11.5 in x 23.5 in (29.2 cm x 59.6 cm)
What is the Adaptive Tool System?
The Adaptive Tool System that is present in every Cricut Maker machine allows it to automatically adjust the blade’s position by lifting and rotating it into the proper position whenever a new cut needs to be made.
This system was created with precision in mind, which is something that is needed when dealing with smaller and more detailed projects or when working with thicker materials.
Cut Smart technology in Cricut Explore machines have a similar system called Cut Smart technology, and it allows the machine to cut any material by passively dragging the blade across it, changing the blade’s direction based on the curves and angles of your design.
Does Cricut Maker have Fast Mode?
If you’re talking about the Cricut Maker, then the answer would be yes. The Fast Mode option allows the machine to cut and write twice as fast, although it is most viable to use when working with certain materialsettings.
However, if you’re talking about the Cricut Maker 3, then you should know that the Fast Mode feature is something that exists as a default setting. Because the Cricut Maker 3 was optimized to ensure top speed and precision (with Smart Materials), a dedicated Fast Mode was deemed unnecessary.
Do Cricut Maker machines have to be connected to the Internet?
This used to be the case in the past, especially if you used the Besign space web client that was accessible via web browser, but that’s no longer the case.
You see, with the Design Space app installed on your computer or iOS mobile device, you can now design and send projects to your machine via USB or Bluetooth without an Internet connection.
However, you won’t be able to use Design space to its full extent since you can’t sync your content, upload images to the app, or access content from the Cricut Image Library.
Can I use other brands of vinyl or iron-on without a mat?
Unfortunately, no. If you plan on using any other of the supported materials instead of Smart Materials, then using a cutting mat is mandatory.
How To Use the Cricut Maker: Closing Thoughts
This concludes our in-depth article on how you can use the Cricut Maker 3. We hope that you’ll feel like you have a better grasp on what your Cricut Maker 3 can do now that you’ve finished reading and that using it for the first time will not seem as intimidating.
Don’t forget that we’ve written a complete in-depth review on the Cricut Maker 3, and we’ve also looked at the Cricut Explore Air 2, a machine similar to the Maker, although it has a smaller frame, a more limited toolset, and it is geared more towards the common household user with smaller projects in mind.
Here are DIYS we love Cricut machines for what they are capable of, and we’d like you to let us know what other related topics you’d want to read about, and we’ll go ahead and create a comprehensive guide just like the one above.
Simply leave your submissions in the comments section below, and our writers will go over them as soon as possible!