Rose Seeds Guide: How to Grow Roses From Seeds
Updated on September 23, 2020
You know that a garden isn’t complete without a rosebed growing in some corner and brightening your day. As sweet-smelling and a delight to look at as roses are, it’s no secret that growing them isn’t the easiest of tasks. Especially if you’re planning on growing your rose bush from seeds.
A rose garden is by far the goal of every horticulturist. When you see the dancing blooms spreading cheer and fragrance three doors down, it makes it worth all the hard work you put in it. And you can go about it in two ways: use a cutting or grow the plants from seeds.
Using a cutting is the easiest and fastest way. But then again with seeds, you can create a whole new garden with as many varieties as you want.
Advantages of Growing Roses from Seeds
It’s not the easiest way to plant a rosebed, for sure. However, if you have the time, patience, and experience, the long hours will pay off and you will be pleased with the creative blossoms you carved in your garden. Here are the advantages of growing roses from seeds.
- Create new designs and mix and match the various roses species in one rose bed.
- Easy to propagate once you’ve settled on your favorite roses.
- You can grow disease-resistant roses from seeds unlike other methods of propagation.
- Seeds give you the option to pick the rose varieties that are easy to grow and maintain.
- Using a variety of seeds can be a rewarding experience when finally the blooms appear in all their glory.
- With seeds, you never know what you’ll get or how the roses will look like. Some roses will be better than you expected and you can keep growing them. Others will be a disappointment and are easy to discard.
Seed Collection
The source of the rose seeds is by far the most crucial element of the whole process of growing roses from seeds. Remember, that the seeds are like a wrapped present. When the flowers blossom, it’s like opening up your Christmas present. So you’d want to make sure your seeds are of good quality. There are many ways you can get your seeds:
- Buy them from a nursery: The quality would be good but you can’t be sure if the roses themselves would be to your liking. Also, there’s a chance you’ll get different seeds contaminating your rose collection.
- Order online: Not the best way to get your seeds. There are no guarantees that the seeds are of the best quality or that they are disease-free. This should be your last resort when you run out of other options to obtain your rose seeds.
- Collect them yourself: This is the recommended way to get your seeds. It’s a lot of work but at least you know you’re only adding the seeds of the roses that you trust to your collection.
So how would you go about collecting your rose seeds? This is an involved process so let’s tackle it in simple terms.
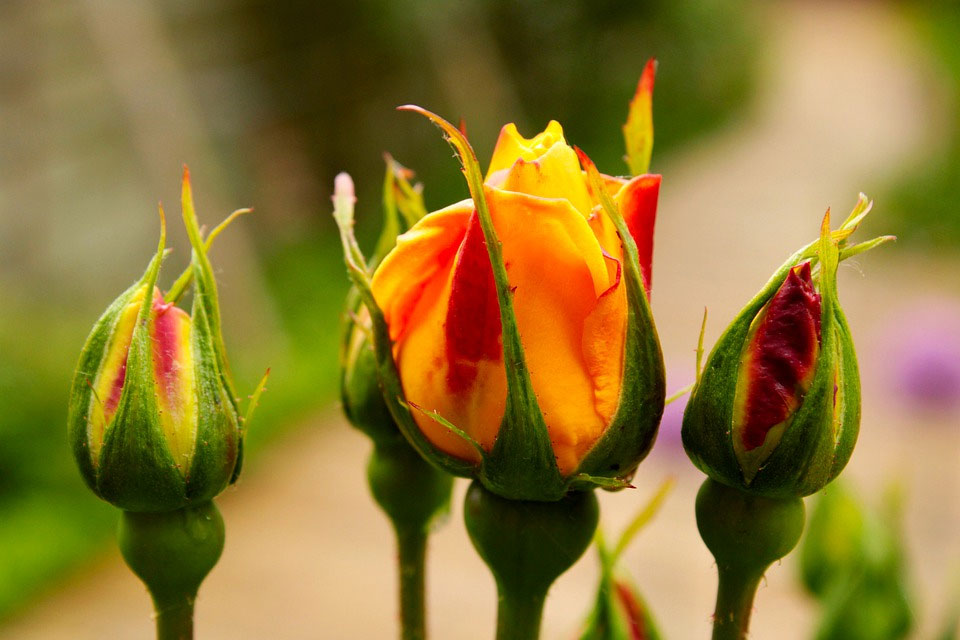
Rose seeds grow in pods called hips. These rose hips need to be fully developed before you cut them to get the seeds. They usually take about four months from the time they appear on the bush until they’re ripe and ready to collect. The best time to harvest them is in the fall using tweezers or a sharp pair of scissors.
Once you have the ripe rose hips, cut each one in half to collect the seeds. Wash the seeds in water with a few drops of bleach mixed in to get rid of any fungus or bacteria. Rinse the seed in tap water and set them aside to dry. Some horticulturalists go as far as soaking the seeds in water and hydrogen peroxide for 12 hours to remove all fungus spores that stick to the seeds.
Store the dry and clean seeds in a tight and sealed jar. Keep the jars in a dry and cool place. It’s better to classify the seeds by their species and keep them in separate jars for easy planting and mixing later.
Seed Preparation
Now that you have your quality seeds safe in labeled jars, you’re ready to create your own unique rosebed that is like no other. By mixing and matching the seeds you turn your humble garden into a first-class piece of art. But before you get there, there are a few things you need to take care of first.
Test the Seeds
You can do this step immediately after you take the seeds out of the rose hips. It’s a combination of purifying the seeds and also checking which ones are good to plant. When you collect the seeds put them in a container full of water with a teaspoon of bleach. You’ll notice that all the seeds sink to the bottom immediately. But don’t let that fool you.
After 24 hours in the water, the bad seeds will float to the top. Skim them off and get rid of them. They are either not developed enough or are infected with a fungus spore. Either way, they will waste your time and turn out to be a disappointment if they ever germinate. The good seeds will remain at the bottom of the container.
Seed Cleaning
As we mentioned, there are two ways to clean your seeds. Either with bleach and water or if you want to go the extra mile, then a few drops of peroxide will ensure that all fungus spores are killed. But that’s not all the cleaning you have to do.
When you pull the seeds out of the rose hips, some pieces of the pulp will get attached to seeds and might later cause fungal infections or breeding farms for bacteria. You can use a brush and give the seeds a good scrub to remove all the attached debris. Then wash them either with bleach or peroxide. Rinse and dry the seeds then proceed to the next part.
Cold Treatment
Gardners often gripe about the time rose seeds take to germinate. But one way to speed up that lengthy and time-consuming process is to give the rose seeds the cold treatment. In a nutshell, it means to keep the seeds in the fridge to help them sprout faster. Set the temperature to as low as 33 degrees F.
The seeds tend to germinate in cold temperatures. So sort your seeds, put them in a moist paper towel inside a sealed plastic bag, and keep them in the fridge between 4 to 6 weeks. Check on the seeds regularly because some species will germinate right there in the fridge. Make sure the towel is moist at all times and add some water if it goes dry.
Germination and Sprouting
Some rose species will take longer than 6 weeks in the fridge. Others will be ready within 4 weeks. When the seeds are ready, take them out and plant them in shallow trays. Some people use small pots. Either way is fine. Just make sure the pot or tray is no more than 3 inches deep.
For best results, make sure that the seeds of different species are planted in the same try. Don’t mix your seeds just yet. It also helps to label each tray or pot with the date of planting, rose species, and when you harvested them.
Use a mixture of sterile soil and vermiculite in equal portions. If you don’t have vermiculite, you can use perlite or peat. Now dust the seeds lightly then plant them immediately in the soil. Make sure the seeds are about a quarter-inch deep in the soil. The dusting is to make the surface of the seeds dry to avoid any fungal or mold infections.
Water the pots or trays immediately and keep the soil moist until the first leaves appear on the seedlings. If you fear that the frost isn’t gone yet, keep the pots in a sheltered place or even indoors until the weather warms up.
Planting the Seeds
Rose seeds take up to 6 weeks before the first signs of germination appear. Usually, you’d see two seed leaves pushing out of the soil. Ignore these and keep watching for the real leaves to make their presence known. When the plant has between 3 to 4 leaves, that’s your cue to transplant them to their bigger pots.
When the seedlings are a few inches tall, you can tell which are the healthy ones to transplant and which are not worth your time. This watchful diligence should remain throughout the rose’s life. You keep monitoring them for their growth rate, color, disease resistance, and the blooms they produce.
The first bloom usually comes out about one year after your grow your rose bush. When the bush outgrows its pot, just transplant it to a larger pot with the same mixture of soil and peat, perlite, or vermiculite. Your rose bush takes up to 3 years on average to reach its maturity.
Keep notes on the roses that show promise and get rid of the ones that are not to your liking. Eventually, you’ll have your own arsenal of good rose seeds to mix and match in your rose garden. That’s the secret weapon that gives you bragging rights and brings your neighbors and friends to your garden to admire and talk about your roses.
great little informative peace from begining to end