Orange Star Plants: How To Grow And Care For An Orange Star Plant
Updated on December 1, 2020
Fewer plants got a name that aptly describes their appearance and qualities as the orange star plants. In this case, the name tells you all you need to know about this hardy perennial and why you should have it in your garden. It’s an easy plant to grow and propagate and you won’t have much trouble caring for it. That said, certain issues usually crop up with the orange star plant that need your attention. In this post, we cover the orange star plants from all angles from planting and caring for it to the different methods of propagation.
All about Orange Star Plants
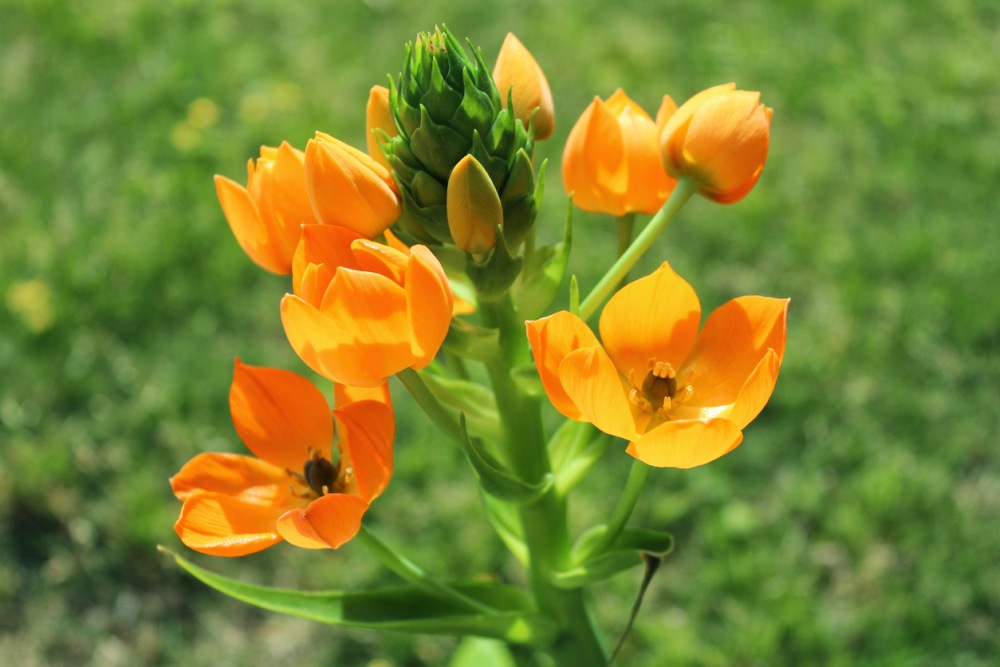
The orange star plant (Ornithogalum arabicum) is also known by other names including the star of Bethlehem. This bloomer has sturdy leaves that make it the right landscaping plant for your home even in the absence of the blooms. As bulb plants, you can grow them in a container as long as it gets enough full sun.
The most outstanding feature of the plant and the one that gave it its name are the flowers. The star-shaped blooms grow in clusters of about 12 to 15 on upright stems with each flower about one to two inches in diameter at most. Despite their small size, the blooms are very fragrant and their overpowering scent will fill your house in the summer.
Once the blooms fade in the fall, the plant tends to go into a dormant state. The sturdy leaves fall and for all intents and purposes, the orange start plant seems dead. But that couldn’t be further from the truth. In fact, the plant is just dormant. You need to repot it and in the next spring, it will come back to life with plenty of dark green leaves and orange or white flowers.
The USDA places the orange star plant on a hardiness zone between 10 and 11. This makes it ideal to grow inside your home. You can grow it in a pot or as a centerpiece on a table. Either way, it will definitely get all the attention.
How to Grow Orange Star Plants
So how would you go about planting this showboat of a plant? The complexity of planting and growing the orange start plant depends on how much horticultural experience you have. While experienced gardeners wouldn’t have a problem planting and caring for it, beginners might find it a little challenging. So let’s simplify this process for you.
- Soil is one of the key elements in the success of the orange star plants. So start with a potting mix of the best quality. It should be light, pest-free, and sterile. If the potting mix has a fertilizer in it that’s even better.
- Choose a medium-sized pot that can either be made of clay or plastic. Make sure it has plenty of drainage holes at the bottom.
- Fill the pot with soil up to 2 inches from the edge.
- Make a hole in the soil slightly bigger than the rootball of the orange star plant.
- Place the plant in the hole and fill it with soil. Press the soil firmly around the rootball to push out any air trapped there.
- Water the soil thoroughly until the excess water flows out of the bottom holes. This helps the soil settle.
- Place the pot in a sunny spot and make sure it gets 6 hours of sun every day. If it’s in a room, place it near a west or south-facing window.
Orange Star Plants Care
So far so good. Planting the orange star plant doesn’t seem any different from any other flowering plant you have planted before. The steps we detailed there are enough to give your plant a good start. Once the roots establish and the plant shows signs of growth, that’s when the care process starts. From watering to maintaining adequate temperature and light, you got your hands full.
Watering
Whether the orange star plant is growing and flowering or dormant, water is something you should pay attention to and get right. More water than it needs leads to root rot. The same applies to when the plant has shed its faded flowers and leaves. It will need less water than during the growing cycle. This is where the drainage holes in the pot come in handy. They’re the safety valve against waterlogging. Water the pot when the first inch of the topsoil goes dry in the summer. Aim the water to the center of the plant and let the water drop to the soil. Humidity is important for this plant, so place the pot in a tray of water in the summer.
Fertilizer
Just as with most flowering houseplants, the little soil in the pot is hardly enough to give the plant the nutrition it needs. Especially when it starts to flower. Flowering consumes a lot of the plant’s resources and energy, so you’ll need to supplement it with enough fertilizers to encourage a successful bloom. Just keep in mind that you don’t need to overfeed the plant. Use small doses of a well-balanced fertilizer once every week during the blooming cycle. Plant food supplements also help the orange star plant produce buds that are necessary for restarting the plant anew after it goes dormant in the winter.
Pruning
We mentioned the buds or offshoots as important for keeping the plant alive. Most often you’ll need to prune the orange star plant, especially after the flowers start to fade in the fall. This will motivate the plant to produce more offshoots right before it goes dormant. But even while the orange star is still in full bloom, you might need to prune it, removing wilted flowers, or dead or infected leaves. Sometimes you will need to trim it back to signal to the plant that it needs to grow more buds. Use clean and sterilized shears to prevent contamination.
Pests and Diseases
Like all flowering houseplants, your orange star plants fall victim to an attack by pests and bugs. It’s an unavoidable part of having this plant under your roof. Most common are mealybugs, spidery mites, and scales. But as with other plants, you can easily prevent them from inflicting more damage on the plant if you spot them early. In that case, just pick the few bugs scurrying around the leaves and flowers with your gloved hand and dispose of them safely in a bucket full of water with some washing detergent mixed in.
If the infestation is too large and the plant shows signs of stress, you can use neem oil. Coat the leaves and stalks liberally with the odorless oil to suffocate the little pests. Use a tissue to wipe off the excess oil along with the dead bugs. Don’t leave the oil on the leaves since it could lead to them withering away and dying.
As for diseases, root rot is by far the most common problem you might come across. It’s often caused by too much watering or bad drainage soil. The roots of the orange star are sensitive and can’t function in the excess water. When they rot, the plant will show signs of it. The leaves turn yellow and droop and if you don’t intervene, the leaves will drop and the plant will die. Hold off the water until the topsoil goes dry. If the problem persists, you might need to repot the plant after removing all the damaged roots.
Propagation of Orange Star Plants
Another issue you’ll have with growing and caring for the orange star is the need to propagate it. After it goes dormant, you’ll need to use either seeds or the dormant plant’s offshoots to start a new plant. Here are the two ways you can do that.
Offsets
Every mature orange star plant grows offshoots or buds around its base. These are your key to starting as many new orange star plants as you like. You’ll need to remove all the leaves when the plant goes dormant, cut a section of the plant where buds grow, and take the buds you need. This is best done in the fall, although some plants go dormant in the late summer and the offsets are ready for you to divide then. Choose the healthiest bulbs and use them to grow new plants.
To plant the bulb, prepare a pot with potting mix and push the bulb in a hole twice the height of the bulb then fill it with soil. Water the pot to keep the soil moist and put it in a warm room. In the next spring, the bulbs will sprout and grow into a full plant.
Seeds
Once the flowers lose their fragrance and start to wilt, keep a close eye on them. Soon you’ll see seeds developing in the middle of the small blooms. Wait for the seeds to ripen and turn brown in their pods before you collect them. If you wait for too long, the seeds will fall in the pot.
To plant the seeds, use the same potting mix you used to plant the bulbs. Cover it with a light layer of shredded bark, peat, or perlite. Sprinkle the seeds on the top of the soil then add a thin layer of dust. Fill the pot to the rim with aquarium gravel to prevent the seeds from flying in the wind. Water the pot gently just enough to keep the soil from being dry and place the pot outdoors in a shaded area. Come spring, the seeds will germinate and you can separate the seedlings and plant each in its own pot.
I did what you said when it goes dormant and its in a dark closet (I did this in June of this year 2021). However, didn’t realize it had to be watered a little so will do that. Thank you for all the advice it was so useful. Can I ask about another plant I have on my very hot balcony in So. California.?