German Smear Brick: How to Apply It on Your Home and Fireplace
Updated on May 5, 2022
If you’re looking for a cost-effective and stylish way to protect your home from moisture damage, then a German smear brick job may be the perfect solution for you. Find out everything you need to know about it.
This process involves applying a thick layer of mortar over your brick wall, which is a great way to add personality to your home and preserve its value over time. Plus, it’s a great way to keep your brick walls looking fresh and new.
Keep reading to find out everything there is to know about German smear, including the pros and cons and differences between this technique and whitewash, limewash, and mortar dampening.
It’s easy to hire a professional that will apply the smear on any structure you desire. But you can also take on this task yourself to save money.
In this case, you should know about the required tools and materials before taking the steps necessary for applying a German smear to a brick surface. We have also prepared some images if you’re looking for ideas and inspiration.
Table of Contents
What Is German Smear?
Also known as German schmear, German smear is a type of mortar wash used in construction for centuries. It is made of lime-based plaster and usually contains sand, clay, and straw.
German smear is applied to masonry walls in a thick coat, which is then allowed to dry. For example, you can adhere it to brick or stone surfaces. Once it is dry, the coat can be rubbed down to create a smooth surface.
If you’re looking for the meaning of schmear, it’s an informal way of pronouncing smear. Some people incorrectly refer to it as German shmear.
A Bit of History
German smear was first used in Germany in the 1500s as a finishing coat on walls and ceilings. Over time, people began to use it as a basecoat instead of a finishing coat. This allowed for more intricate designs to be created on the walls.
Its popularity reached the United States in the 1800s when people started using it to finish walls and ceilings in homes and other buildings.
German Smear vs Whitewash vs Limewash
Although they look the same to the untrained eye, there are several key differences between a German smear, whitewash, and limewash:
- Base material. German smear uses white mortar, representing a mixture of sand and cement. Meanwhile, whitewash uses water and white latex paint. Limewash only uses lime and water.
- Application technique. You must apply a German smear in a thick coat to cover the bricks and add a rough texture, even if the surface is porous. However, it’s best to apply whitewash or limewash in a thin coat; they don’t add a new texture but get absorbed by the brick surface.
- Drying time. German smear needs time to dry before rubbing it down, while whitewash and limewash do not.
German Smear vs. Mortar Dampening
People frequently compare German Smear to mortar dampening since they both use latex paint as an additive. However, that is where their similarities end. The most notable difference between these two techniques is that German smear uses three layers of mortar, whereas dampening requires only one.
Additionally, German smear requires you to moisten the surface before applying each coat; instead, it’s covered after due time has passed. On the other hand, dampening requires you to wet the entire brick surface before painting it with multiple layers of mortar. The steps are very similar, but dampening is more efficient and faster since there are fewer coats involved.
Benefits
- Durability. It’s based on a durable material that can withstand wear and tear. Plus, a German smear is long-lasting since you don’t need to reapply it as in the case of other decoration techniques.
- Resistance to moisture. It helps protect walls from water damage, making it an excellent solution for home exteriors.
- Versatile. It can be used for both indoor and outdoor applications, so you can apply a German spear to your home’s exterior, an indoor fireplace, or something else.
- Affordable. The materials are easy to find and cheap for any homeowner.
- Easy to apply. You don’t have to hire a professional since you can save money by spreading a German smear yourself. There’s little prep work involved.
- Low maintenance. You don’t have to worry about cleaning the brick surface with strong chemicals like muriatic acid after applying the white mortar mix since it won’t fall off. For example, you can safely use vinegar with water to clean a fireplace or a power washer to remove dirt from a house’s brick exterior.
- Eye-catching. The resulting surface is smooth and vibrant, which makes for a great design. You can add a German smear to your home to incorporate an old-charm, antique look.
Downsides
- Waiting time. The German smear needs 24 hours to dry between coatings, and it’s best to apply at least three coats. More drying time is recommended before applying the finishing coat. And the amount of drying time increases if you prefer a heavier texture.
- Visible imperfections. Since a German smear creates a smooth surface, any mistakes you make will be visible. That includes any defects or impurities. It shouldn’t be a problem for more people going for the distressed look but might not sit well with those preferring a cleaner, rustic appearance.
- Can’t be removed easily. If you change your mind about this look later, you will have a hard time trying to remove it from your house’s exterior or fireplace. That’s because mortar mix creates a strong bond with a masonry surface.
- Can’t be used on painted surfaces. The mortar wash doesn’t stick to bricks that have already been painted.
Requirements

Before starting a home improvement project that involves this painting technique, such as a German schmear house, be sure to prepare the following items.
Safety Gear
- Rubber gloves
- Protective eyewear
- Working clothes
Materials
- Sand or aggregate
- Cement
- Water
- Latex paint in the color of your choice
Tools
- Bucket
- Heavy-duty drill
- Trowel or brush
- Sponge
- Hose
- Mop
- Level
- Hammer
- Chisel
- Putty knife
- Wire brush
How to German Smear a Brick Surface

Here are the steps required for upgrading any brick surface using this technique:
Step 1: Safety first
Put on the safety gear before getting started: working clothes, protective eyewear, and rubber gloves.
Step 2: Prepare the mortar mix
- Add the following to the mortar mix:
- 4 parts sand or aggregate
- 1 part cement
- 1 part water
- A few rations of white latex paint in the color of your choice for added texture.
- Mix all ingredients with a heavy-duty drill to create a thick, pasty mixture.
If you have to create a heavy texture, add less water or more solid materials while considering the 70-30 ratio. For a thinner and more transparent consistency, increase the amount of water or decrease everything else.
You can practice on a small batch of spare bricks to decide which mortar mix consistency you like best. If you’re unsure about all of this, you can purchase premixed mortar from your local hardware store.
The color of the finished surface depends on the exact composition of your mix, so it’s best to experiment with different compositions until you find the one that works for you.
Step 3: Inspect and fix the brick surface
- Make sure that the bricks are unpainted. In that case, you can’t continue without removing the paint, which is a daunting task.
- The surface should be clean and free of dirt, dust, debris, mildew, grease, or soot deposits. If you’re outside, you can use a garden hose or power washer to quickly remove build-up dirt. Otherwise, you can use a clean wet sponge or a wire brush to eliminate any dust from a fireplace or other indoor structure.
- When dealing with soot deposits, be sure to use professional brick cleaning products. Or you can take the DIY approach and clean the bricks with equal parts of water and vinegar.
- Don’t concern yourself with treating hard water stains since they will be entirely covered by the time your German smear dries.
- It’s necessary to fix any cracks before applying the smear. You can do this by using a mortar mix and a trowel. Don’t worry if there are any difficult imperfections since you will handle them in the following step. Once the mortar has dried, you can start applying the German smear.
Step 4: Apply the first coat
- Pour water on the entire brick surface, including any cracks that you failed to treat in the previous step. If you’re outside, you can use a garden hose. But if you’re inside the house, then a sponge damped in water will suffice.
- Use a trowel or brush to apply the mortar mix evenly. Dab the brush in the water before you start to apply it. Cover the entire brick surface and ensure that each brick is well coated.
- Work your way from top to bottom while distributing the mortar in small sections.
- Wait 10-20 minutes or until the mortar is stiff but not dry. Use a clean wet sponge or wire brush to remove excess mortar.
- Use a dry mop or rag to wipe off any remaining water or mud, which will eventually dry up. You can also use a small amount of latex paint at this stage if you want more texture on your brick surface.
- Let this first coat dry overnight.
Step 5: Rub down the surface
- Once the mortar is dry, use a wire brush to rub down the surface until it’s smooth.
- You can also use a hammer and chisel to remove any loose pieces of brick. Be careful while doing this since it’s easy to damage the brick surface.
Step 6: Apply a new coat of mortar mix
- Repeat steps 4-5.
- Allow the brick surface to dry for a day or two.
- Apply a finishing coat by repeating steps 4-5 or by using a clear sealant to protect the surface from fading and staining.
- Enjoy your brand-new German smear brick surface.
You can also watch this YouTube video tutorial uploaded by Timber & Tea to get a better idea of what it means to do all the work without hiring a professional.
German Smear Brick: Ideas and Inspiration
If you’re looking for more ideas and inspiration on how to apply a German smear on a brick surface, here are some awesome photos we discovered on Instagram:
1. Indoor Fireplace with German Smear – Before and After Pictures
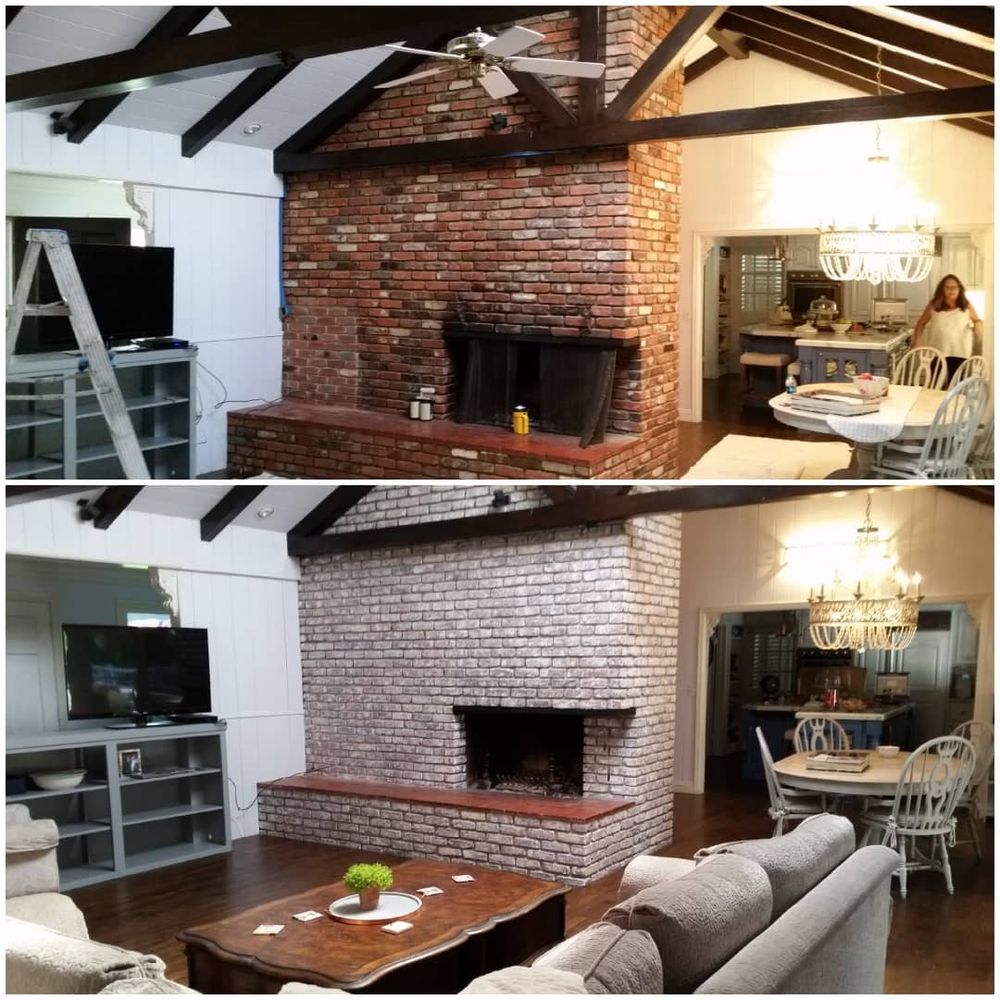
@heartfull_design shows a gorgeous indoor fireplace before and after being treated with the smear. You should be able to tell that it uses a thin coat of paint.
2. Outdoor German Smear Fireplace
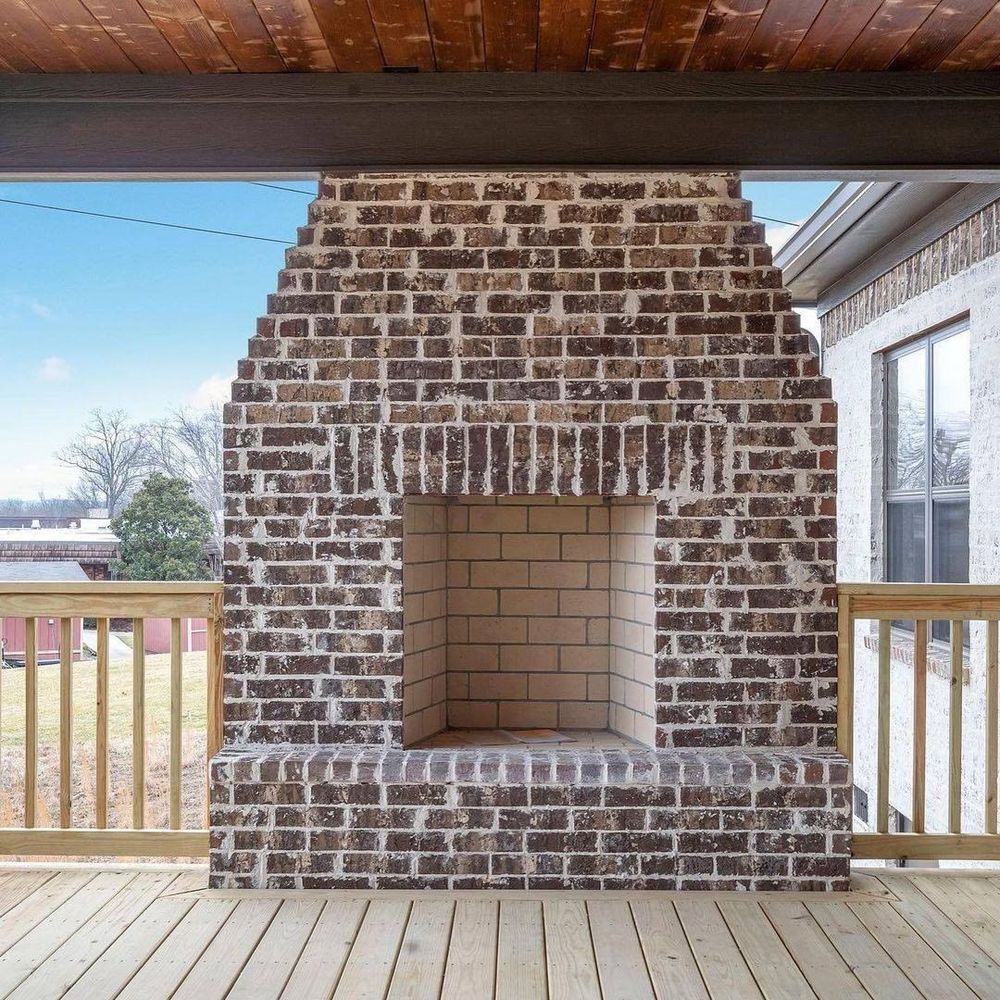
Here’s another stunning fireplace that was redesigned with a German smear. The only difference is that it’s installed outdoors. @generalshale demonstrates how to achieve a distressed look by applying this mortar wash technique.
3. German Smear House

The exterior of this house was entirely painted with a German smear, resulting in the whitewashed look. Even the exterior steps were included in the process, as shown by @pinehallbrick.
4. German Smear Brick House
@terriosullivandesigns says that a German smear was applied to the exterior of this house before adding a second floor. And the result is stunning.
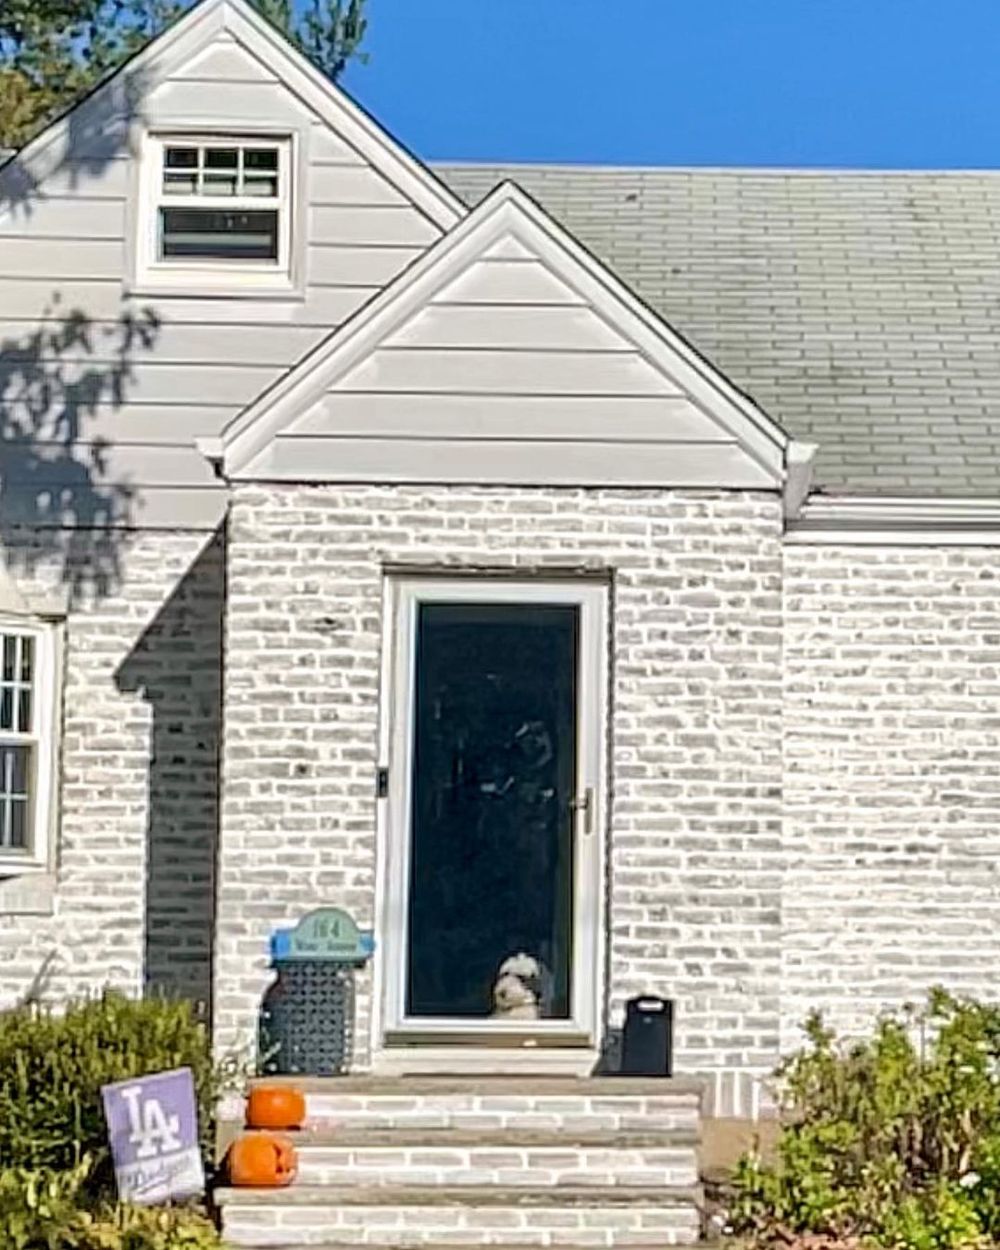
5. German Smear Exterior

In this photo published by @roseandhoneyfarmhouse, you can get a full view of a house’s exterior. The bricks were original red bricks but subsequently treated with German smear to obtain the whitewash effect. As you can see, the steps were spared to keep the red bricks.
6. German Smear Brick Fireplace
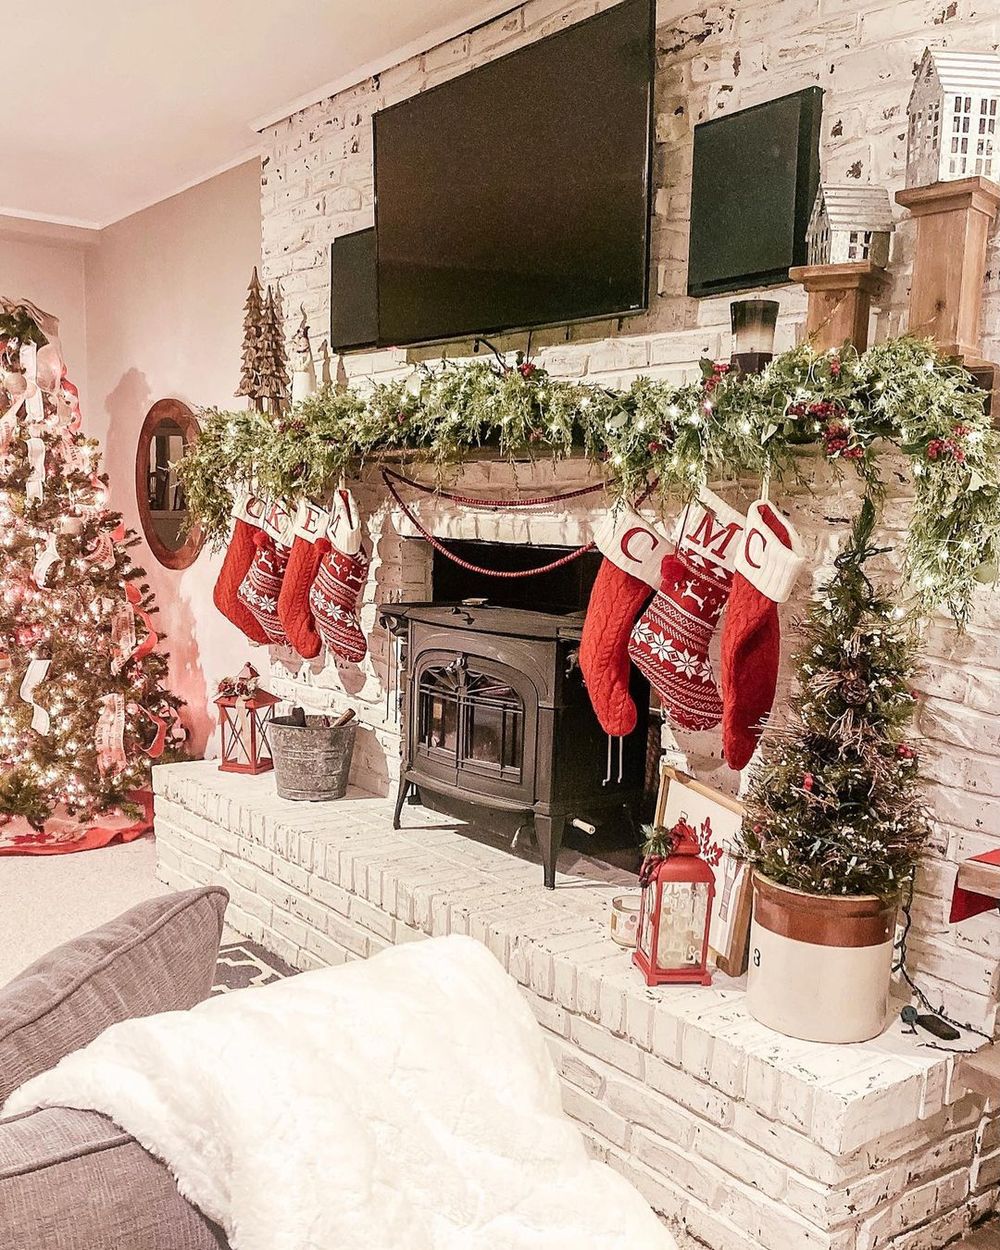
You can get the before and after shot of this German smear brick fireplace, which looks particularly amazing after decorating it for Christmas. @myfarmhouseheritage went all out for this home improvement project.
7. Kitchen Wall with German Smear
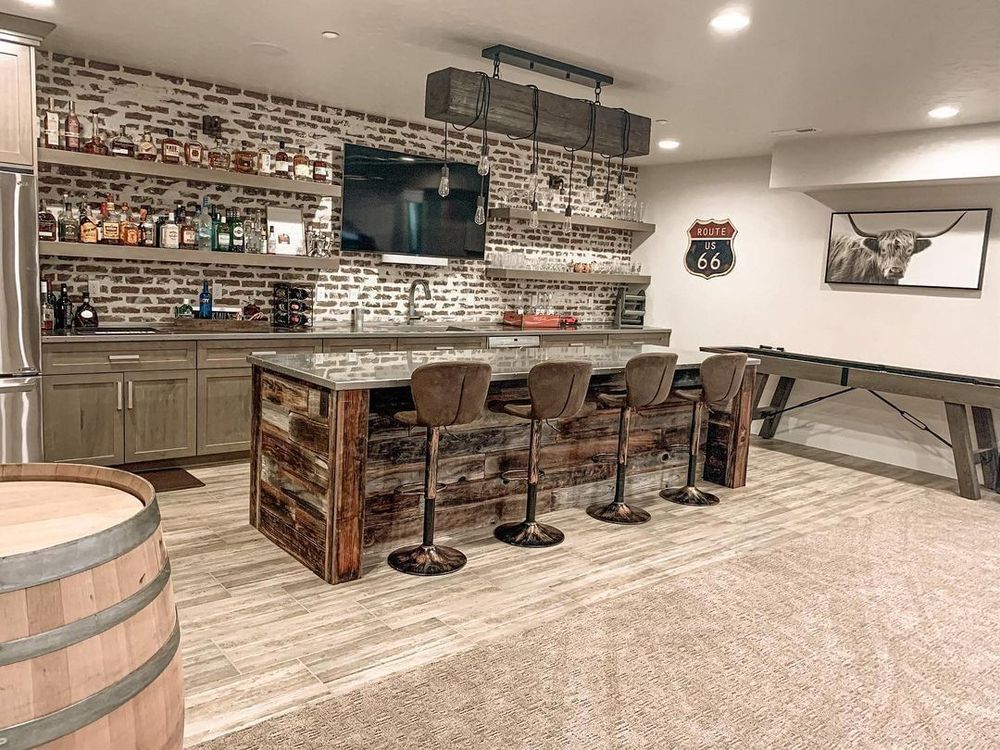
This kitchen is truly unique, thanks to the German smear back wall. It completely transforms the room and pushes you to switch to an industrial style. So, if you’re considering this idea from @generalshale, be prepared for a complete kitchen makeover.
8. German Schmear Stone Fireplace
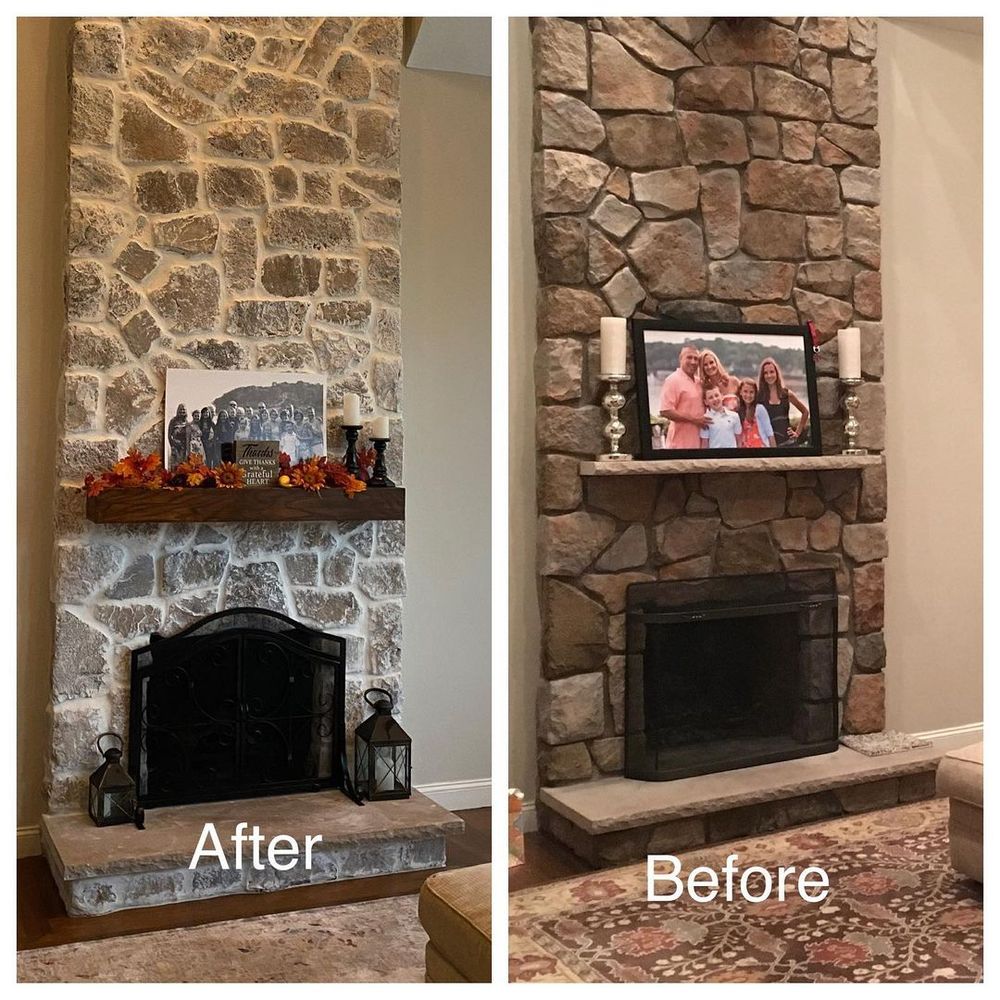
German smear can be applied to not only bricks but also stones. Just check out the before and after shots of this fabulous fireplace uploaded by @diy_neverperfect to see what we mean. The new fireplace perfectly blends with the living room and adds a more intimate feel.
9. Kitchen with Faux Brick Paneling and German Smear
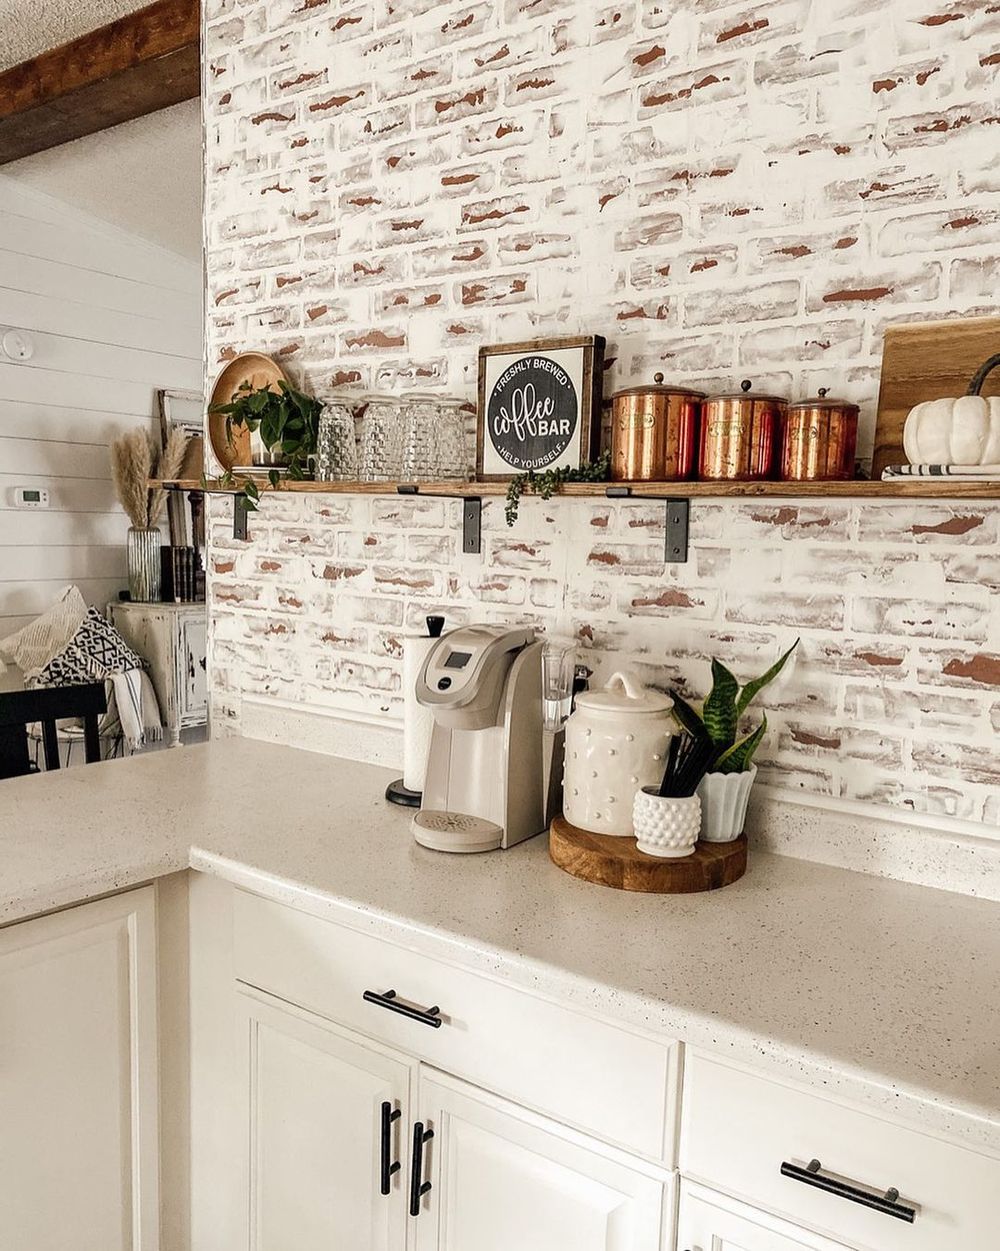
You don’t need real bricks for German smear since a faux brick paneling like the one showcased in this kitchen suffices. It’s actually easier to deal with fake bricks since the surface is already smooth, and you don’t need to rub it down. And it looks amazing as a backsplash. Just ask @southern_nest.
10. Faux Brick Interior Wall
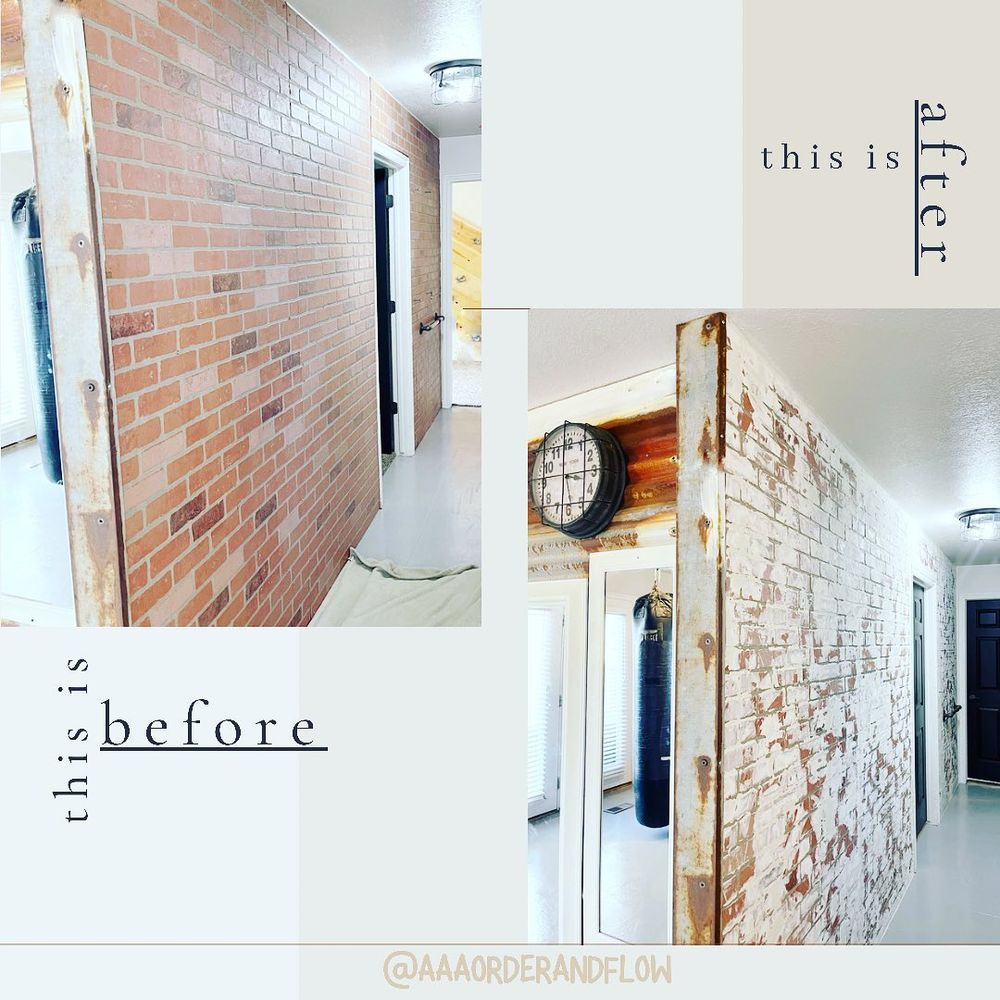
This interior wall with faux bricks was treated with a German smear to improve its look, as seen by the before and after photos published by @aaaorderandflow.
FAQ
Learn more about the German smear technique:
Is a German smear permanent?
Yes, the German smear is permanent since the binder used in the mortar is similar to concrete. It’s guaranteed to last for a long time.
Will a German prevent moisture from penetrating through my exterior walls?
Absolutely. The German smear compound used in the treatment is water-resistant. As such, you can expect that your exterior wall won’t experience any damage due to regular moisture levels, even if you live in a high-humidity area.
Can I use regular paint for my brick house?
Of course. You can use almost anything on bricks, be it paint or stencils. It depends on your preference and what look you want to go with. However, make sure that this solution will be permanent too. Otherwise, you’ll end up having to remove the surface treatment often.
Can I do the German smear job myself?
Yes, you can definitely do it yourself if you have some experience in home improvement projects. The process is relatively straightforward. Just make sure that you have all the necessary tools and materials ready before starting.
How much does it cost to sprinkle a German smear on my house?
Applying German smear to a house is cheap if you want to do it independently. An 80-pound bag of premixed mortar costs about $10. Assuming that you need to cover an area of 1,000 square feet, that means using three 80-pound bags of mortar – a total of $30.
However, if you want to hire a local contractor, expect the brick staining cost to significantly increase – anywhere between $1,500 to $3,500, depending on where you live. You can always ask for a quote from your local contractor to get an estimate.
What are the benefits of using a German smear?
Aside from the aesthetic improvement, a German smear can also provide your home with added insulation and protection against moisture damage. It’s a cost-effective way of preserving your property value over time. Plus, it’s a great way to add some personality to your home.
How does a mortar work?
A mortar is a substance formed from cement, sand, and water. When mixed with these three ingredients, it works to adhere bricks or stones together. The mortar mixture has chemical properties that are very effective at preventing moisture damage.
Is German smear just the same as standard stucco?
The German smear technique is similar to other exterior coating processes used on brick houses, such as stucco, but they differ. Stucco involves applying a thin layer of plaster over your house’s exterior wall, while German smear is a thick compound applied directly onto the surface of the brickwork without the need for a wall lining. And, unlike German smear, stucco doesn’t protect your house from moisture.
Can you German smear on red brick?
Yes. In fact, most home improvement projects involve German smearing brick that was originally red. It results in a vintage look, where you can still notice red bricks beneath the white mortar.
Can you German smear stone?
Yes, but it’s only possible if the stone wall is very thick. And, unlike brick walls, you can’t treat stones with a single coat of German smear. It requires multiple layers of mortar applied at fixed intervals to prevent them from sliding off.
Is it necessary to use a sealant after doing a German smear?
It’s not mandatory but recommended for exterior applications. The use of a sealant will help ensure that your brick’s color remains vibrant over time. In this case, make sure that you finish with rust inhibitors or exterior masonry paint.
What type of binder should I use for my home improvement project?
You can use any type of mortar mix for your home improvement project – standard Portland cement mortar, high-strength mortar, or even lime-based mortar. Just make sure that you read the product label to determine the right mix for your needs.
Is German smear bad for brick?
No, German smear is not bad for brick. In fact, it’s a very effective way of preserving your brick wall and protecting it from moisture damage. It also gives your home a unique look that you can’t achieve with other coating methods.
The only downside is that if you later change your mind about it, you will have difficulty removing the German smear; it would be easier to replace the bricks.
Why is my German Schmear cracking?
There are a number of possible reasons why your German Schmear is cracking:
- The mortar wasn’t properly mixed and applied.
- The home climate changes drastically over time.
- Your brick lacks the strength needed to hold a large amount of mortar used in a German smear application.
- You failed to add an adequate number of reinforcement bars on the exterior walls.
What should I do if my German Smear is cracking?
If you suspect that your home’s German Schmear is cracking, then it needs to be repaired immediately before more damage can take place. Have your contractor inspect your wall and locate where exactly was the problem area, so they know what type of restoration materials to use. In most cases, a new coat of mortar should do the trick.
Final Thoughts on German Smear Brick
If you’re looking to add some personality to your home, consider using the smearing technique. This historical method of staining bricks can boost your property value while providing added insulation and protection against moisture damage.
You can hire a local contractor to update your kitchen, fireplace, or the entire house. However, it’s cheaper if you plan on taking this job yourself. After all, the whole process is pretty straightforward.
What are your favorite ways to use German smear? Let us know in the comment section below.