Beadboard Ceiling 101: Pros and Cons, Installation Guide, and Best Ideas
Updated on May 4, 2022


Beadboard ceilings are popular ceiling panels typically made of wood and finished with a natural or painted color.
They can come as tongue-and-groove boards or more modernly as planks, which more closely resemble the look of real beadboard.
Find out everything you need to know if you’re thinking about upgrading your home.
As homes begin to embrace a more classic style, many homeowners are opting to replace their wooden beadboard paneling for an updated look and feel.
If you’re looking for a unique and decorative way to finish your ceiling, consider installing a beadboard ceiling. With its textured surface, a beadboard ceiling is an easy way to add visual interest to any room. And if you’re feeling adventurous, you can even install it yourself.
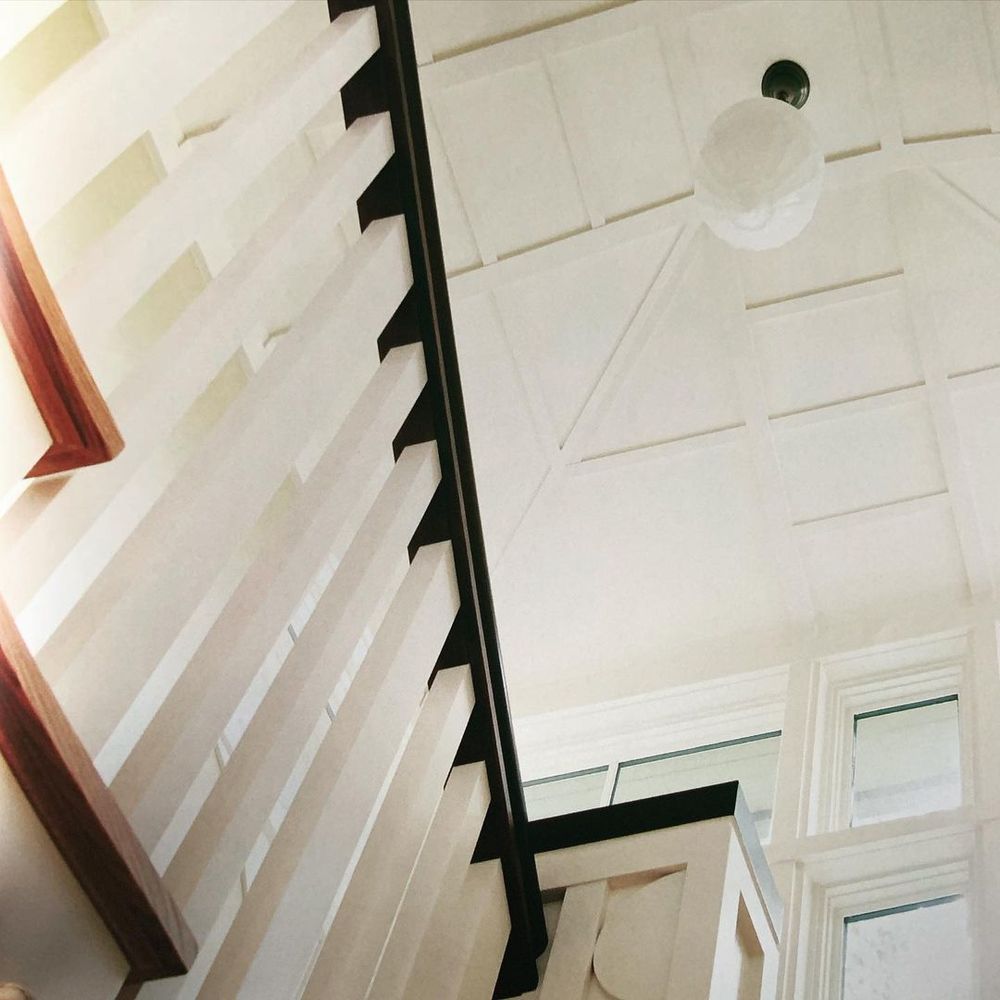
What Is a Beadboard Ceiling?
A beadboard ceiling is a type of ceiling made from panels of wood that have been grooved to create a series of ridges and troughs.
These panels are mounted to the ceiling frame in a staggered pattern, with the ridges of one panel fitting into the troughs of the next. This creates a decorative, textured ceiling that can add visual interest to any room.
Beadboard ceilings are most commonly made from pine or cedar, although you can use other types of wood, too. The panels are usually painted or stained, which allows them to match any decor.
Furthermore, beadboard ceilings are moisture-resistant, which makes them ideal for bathrooms and other areas where water may be present.
History
The use of beadboard ceilings dates back hundreds of years. They were originally used in medieval Europe as an efficient way to make use of less-than-perfect lumber while still creating decorative surfaces.
As time went on, they lost popularity until hitting their peak in Victorian homes during the early 20th century. Today, their design has evolved with the times but still retains all of its original charm.
Today
Currently, beadboard ceilings are most commonly seen in older homes, but they are starting to regain popularity in modern homes as well.
Their textured surface and ability to match any decor make them a popular choice for many homeowners.
You can use beadboard ceilings in any room of the house, and are especially popular in bathrooms, kitchens, and children’s rooms.
Beadboard Paneling Styles
Beadboard ceilings come in various styles, including a modern, traditional, farmhouse, and even DIY plank versions. Here’s what you need to know about each:
Modern or Ceiling Plank Wall Style
This type of beadboard has a smooth surface and is made from composite materials such as MDF (Medium Density Fiberboards) and Polystyrene.
These boards typically come in planks measuring 2-feet x 4-feet and in thicknesses ranging from ¾ inch to 1 ½ inch.
Traditional
Traditional beadboards are a little more expensive but also of higher quality. The boards are made from natural wood and have a tongue-and-groove feature on the long sides to fit snugly together.
The traditional beadboard gives a warm and inviting feel to any room. Plus, you can paint or stain it any color you like.
Farmhouse
This type of board is built to last and used for home renovation projects, such as kitchens or bathrooms. The boards are made from rich wood like oak, maple, or hickory.
And you can paint the beads in any color you choose too. However, they’re more often stained in natural wood colors.
DIY
If you’re looking to save money on your next remodeling project, consider using beadboard panels that you install yourself (DIY).
Installing beadboard is actually quite simple and does not require special tools or skills.
Numerous kits are available at your local hardware store with installation instructions and all the necessary materials you need to get started.
Beadboard Ceiling Types

You can find three types of beadboard ceilings on the market:
- The V-groove type of beadboard has a deep, two-sided groove cut into the board’s surface. You have to install it with the grooves facing downwards so that the beads form a V-shape when viewed from below.
- Wainscot is a beadboard type where the boards have a beaded profile on one edge and are flat on the other. It’s necessary to install it with the beaded edge facing downwards so that the beads form a wainscot pattern when viewed from below.
- The Traditional type of beadboard has no grooves or beading on the board. You must install it with the flat surface downwards so that it lays flush against the substrate.
The Pros and Cons of Beadboard Ceilings
There are several advantages and disadvantages to installing a beadboard ceiling. Here’s what you need to know:
Pros
- Textured surface, available in a variety of styles and finishes.
- Excellent as a decorative finish.
- Vinyl beadboard ceilings are moisture resistant, suitable for bathrooms or areas with high humidity or water use.
- Widely available at local hardware stores, so DIYers have easy access to supplies.
Cons
- Difficult to find in pre-finished form.
- May not be suitable for every room. For instance, you need exterior-grade fiberboard or PVC beadboards for bathrooms and porches or other outdoor areas.
- Requires a little bit of DIY experience for installation.
- The panels will start showing wear and tear differently over time, even though they may look identical upon installation.
Beadboard Ceiling Specifications
Beadboard ceilings are available in a variety of sizes, depending on the type of wood that is used. For example, pine and cedar panels are typically available in 4 x 8-inch or 4 x 10-inch sheets, while other types of wood may be available in different sizes.
The panels are also available in a variety of thicknesses, depending on the desired look and level of moisture resistance.
Installation of beadboard ceilings is relatively simple and can be done by most do-it-yourselfers. You can attach the panels to the ceiling frame with nails or screws, and trim them to fit any room.
Hollow building materials such as particleboard, OSB (oriented strand board), synthetic underlayment products, and fiber drywall panels are not recommended to use as a substrate for installing a beadboard ceiling.
How to Install a Beadboard Ceiling

Follow these steps to quickly install a beadboard ceiling in any room of your home:
- Determine the placement of the first board by measuring and marking it. Be sure to keep the first board at least 12″ away from any wall and work room centers.
- Attach the vertical furring strips directly onto the ceiling joists so that there is a gap of 1/16 inch between them and the ceiling. Keep these strips approximately every 24 inches.
- Nail down the horizontal furring strip on top of the vertical ones, leaving an equal space of 1/8 inch between each board. Use nails long enough to penetrate the joists and strong enough to support your weight plus additional loads. Do not drive nails too deep into the wood, as this will cause splitting and nail pops.
- Lay down your beadboard with its groove facing up. Make sure that each board is butted against the furring strip and nail it in place.
- Apply a thin bead of construction adhesive to the furring strip before nailing on the next course of beadboard.
- Install trim boards around the room’s perimeter to cover up the gaps between the walls and ceiling.
- Fill any holes or blemishes with spackling compound and then sand smooth. Touch up with paint as needed.
For more information on beadboard ceilings and other types of wood paneling for your ceiling, contact a local home improvement center or contractor today.
Maintenance Tips
It’s vital to perform regular maintenance to keep your beadboard ceiling looking its best. Follow these tips:
- Nails tend to pop loose over time, making the boards wiggle. Eventually, it leads to the seams opening up between boards and cracks forming in your ceiling. So you should regularly check this and tighten any loose nails with a nail set and hammer.
- Spray down dirty areas with a cleaner specifically designed for wood paneling, such as Johnson Wood Rich Liquid. You won’t need to scrub very hard or use a lot of the cleaner – a light misting is all that’s necessary. Wipe the surface clean with a soft cloth and allow it to dry thoroughly before returning any furniture or appliances to that area.
- Use a ladder or step stool when cleaning your beadboard ceiling so that you don’t have to exert too much weight on it while working from above.
- If you have a popcorn ceiling, you should avoid getting moisture on the beadboard ceiling as it can cause the wood to swell and warp. Keep an eye out for leaks and drips and repair them as soon as possible.
- Be sure to caulk all seams and openings to prevent moisture from entering the ceiling.
- If you need to repaint your ceiling, use a light color to not overwhelm the natural beauty of the wood.
Beadboard Ceiling Ideas
If you need more inspiration for installing a beadboard ceiling in any room of your house, check out the following ideas.
1. White Beadboard Paneling
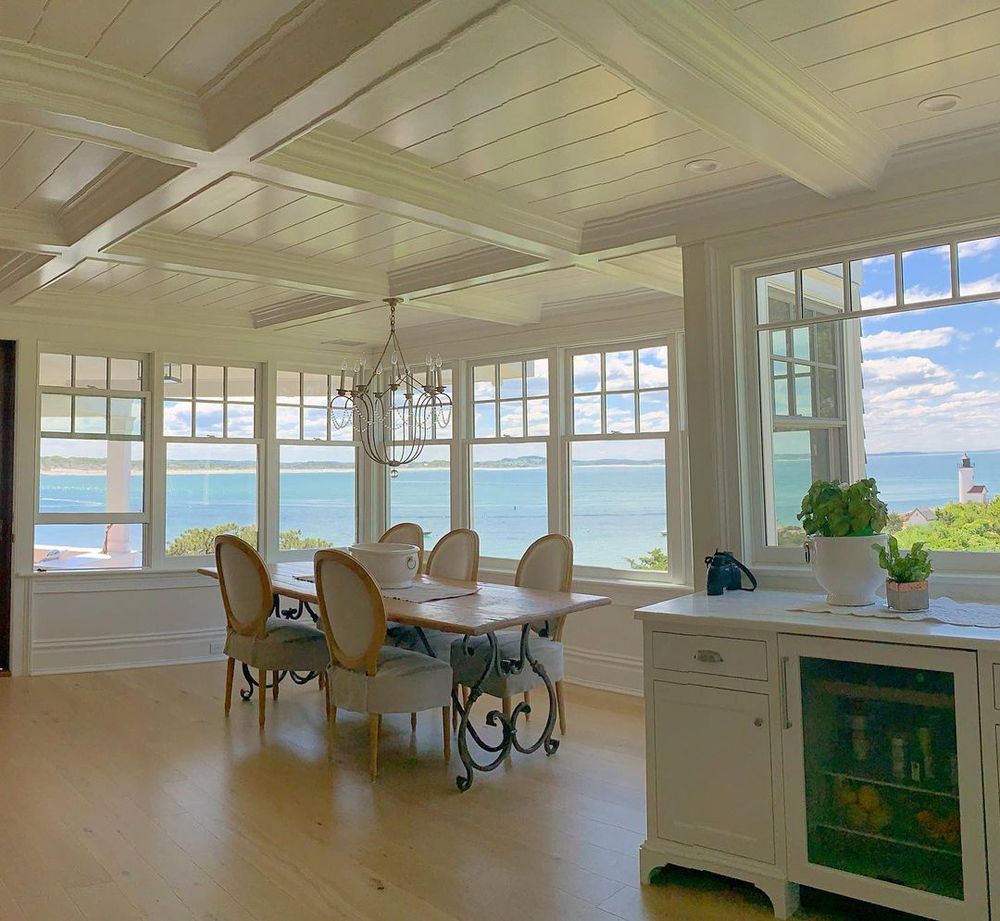
A living room with an ocean view would be incomplete without white beadboard paneling. Not only does it provide a nautical feel, but it also helps to brighten up the space. We found this excellent example on Instagram, courtesy of @stoneridgecottage.
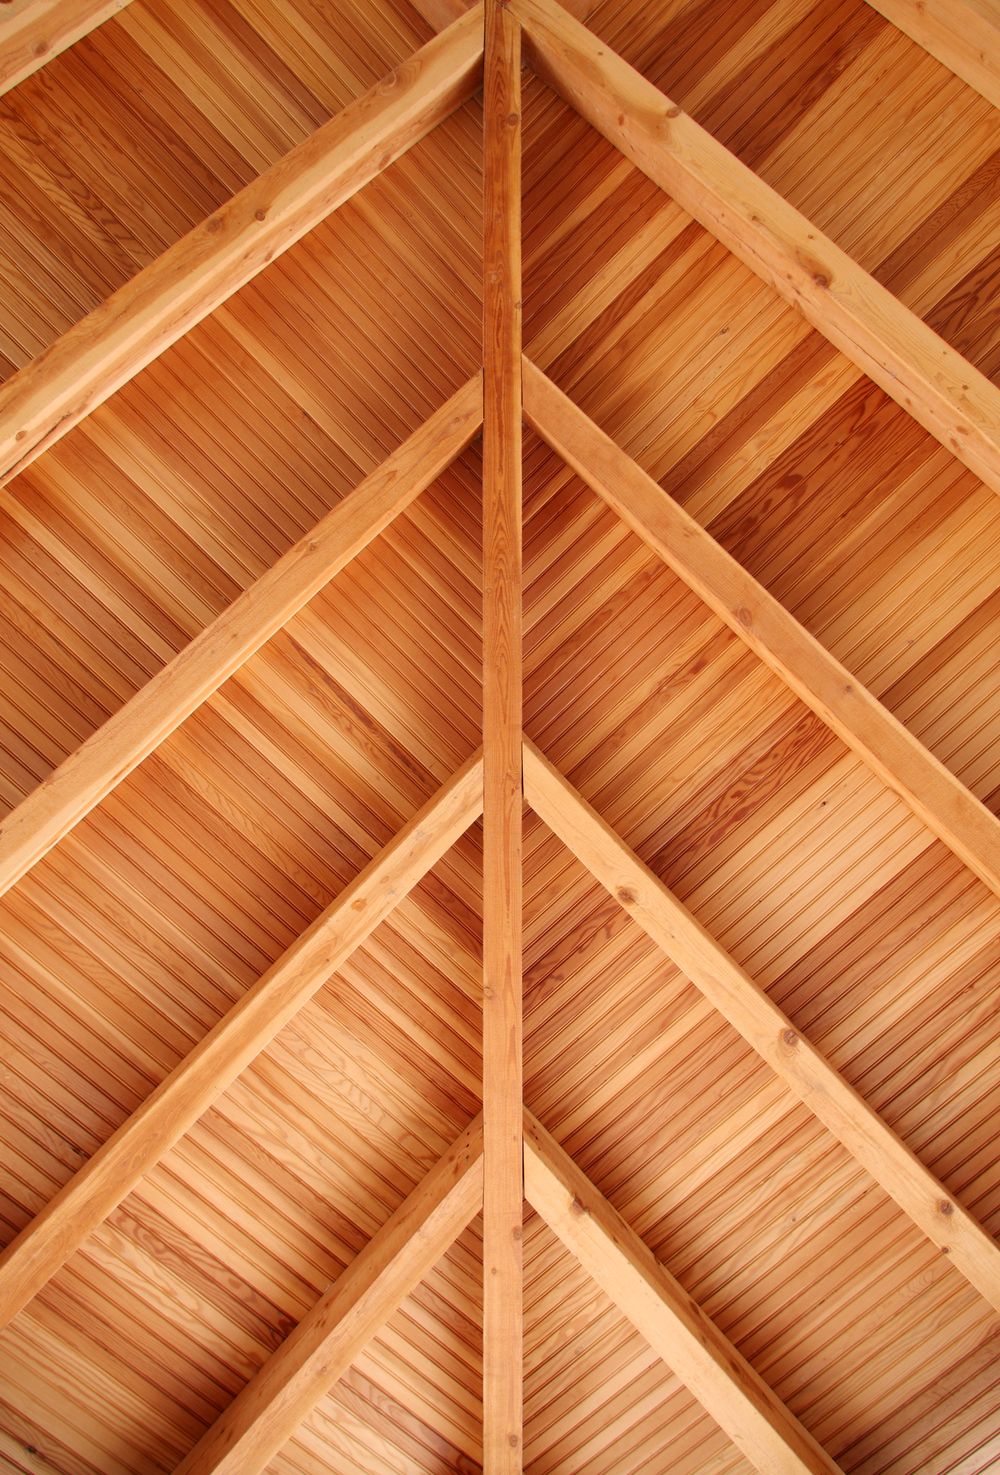
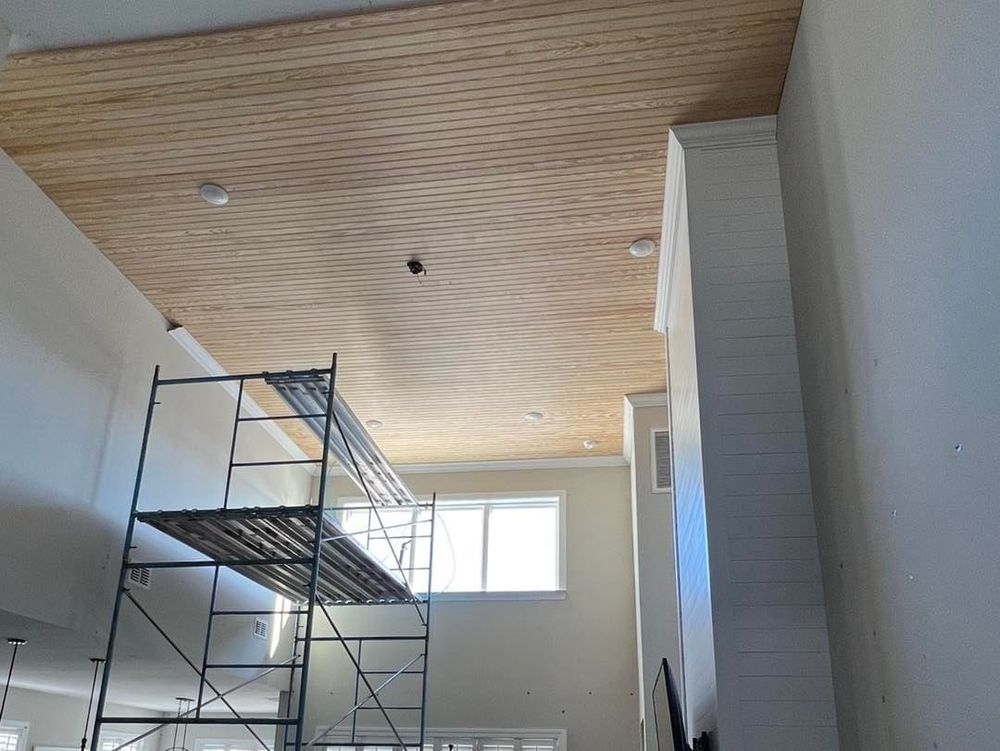
2. Natural Wood Ceiling Planks
This rustic look is the perfect choice for a den or man cave. If you’re lucky enough to have natural wood beams in your home, you can use them as the focal point for your beadboard ceiling planks.
Just be sure to stain or seal them so that they don’t deteriorate over time. Thank @j_claire_edwards for this gorgeous idea!
3. A Vintage Cabin with Beadboard Walls
As you can see, this vintage cabin has beadboard walls that are just as stunning as any other type of walling material.
We love the way it adds a touch of whimsy to an otherwise rustic space. If you’re looking for a unique idea, this might be the way to go! Visit @whitecloverkindred for more info!
4. Beadboard Ceiling Panels
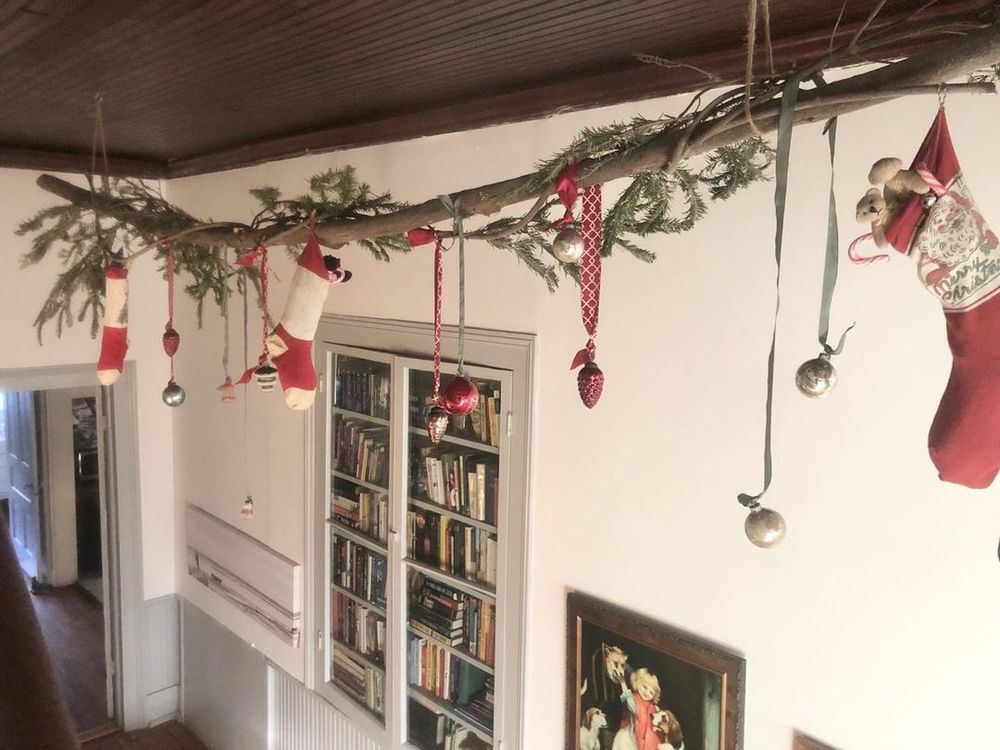
Beadboard ceiling panels are a great way to give a new look to an old room. We love the contrast of the dark wood beadboard ceiling against white walls, shown in this picture, which is enhanced by the Christmas decorations.
Check out @lucasfarmhouse for more high-end inspiration!
5. Beadboard Porch Ceiling
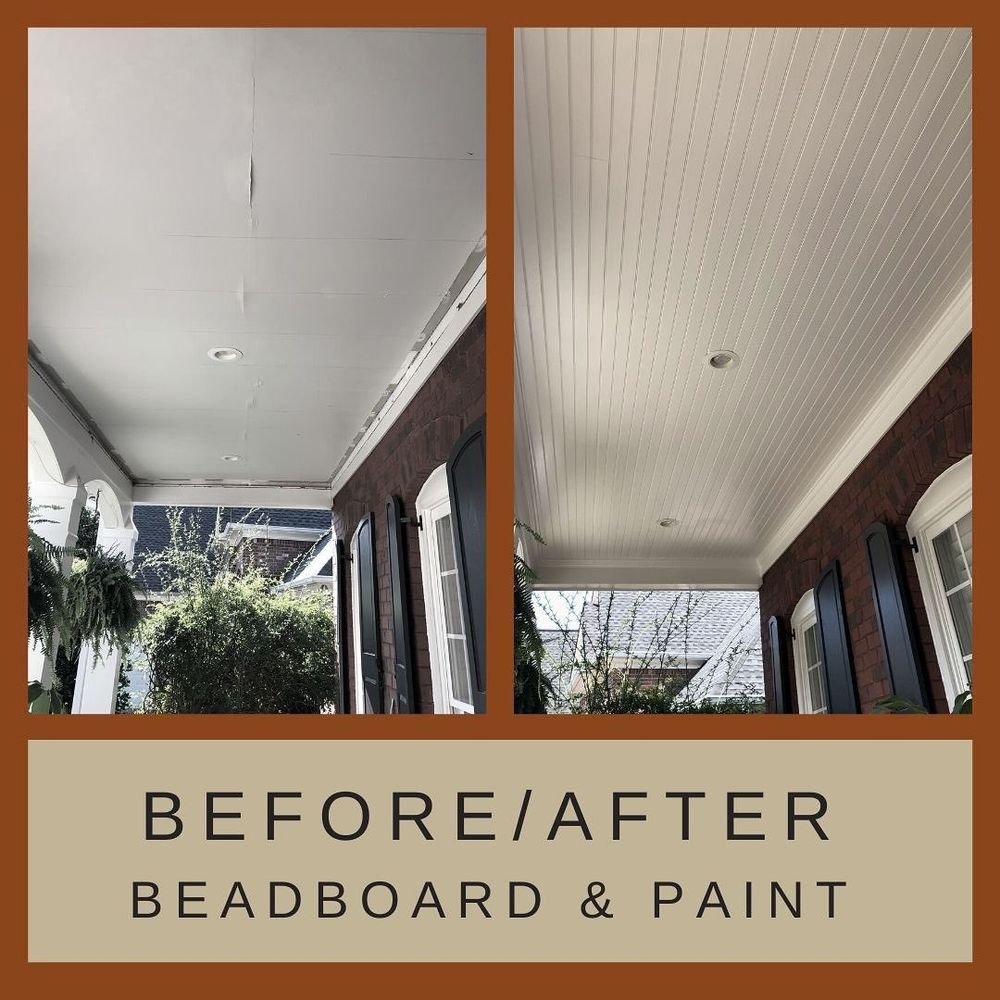
This beadboard porch ceiling is the perfect way to add some extra charm to your entryway. The white beadboard panels match the windows but contrast the dark shingles and window blinds.
A porch like this is a great place to relax in the summertime. Thanks for the photo, @bertinspaintingservices!
6. White Wainscoting Ceiling
A white wainscoting ceiling adds elegance to your bedroom or hallway. We love the way the panels turn the light fixture into the room’s focal point.
For more inspiration, take a look at this photo from @triangleenterprises!
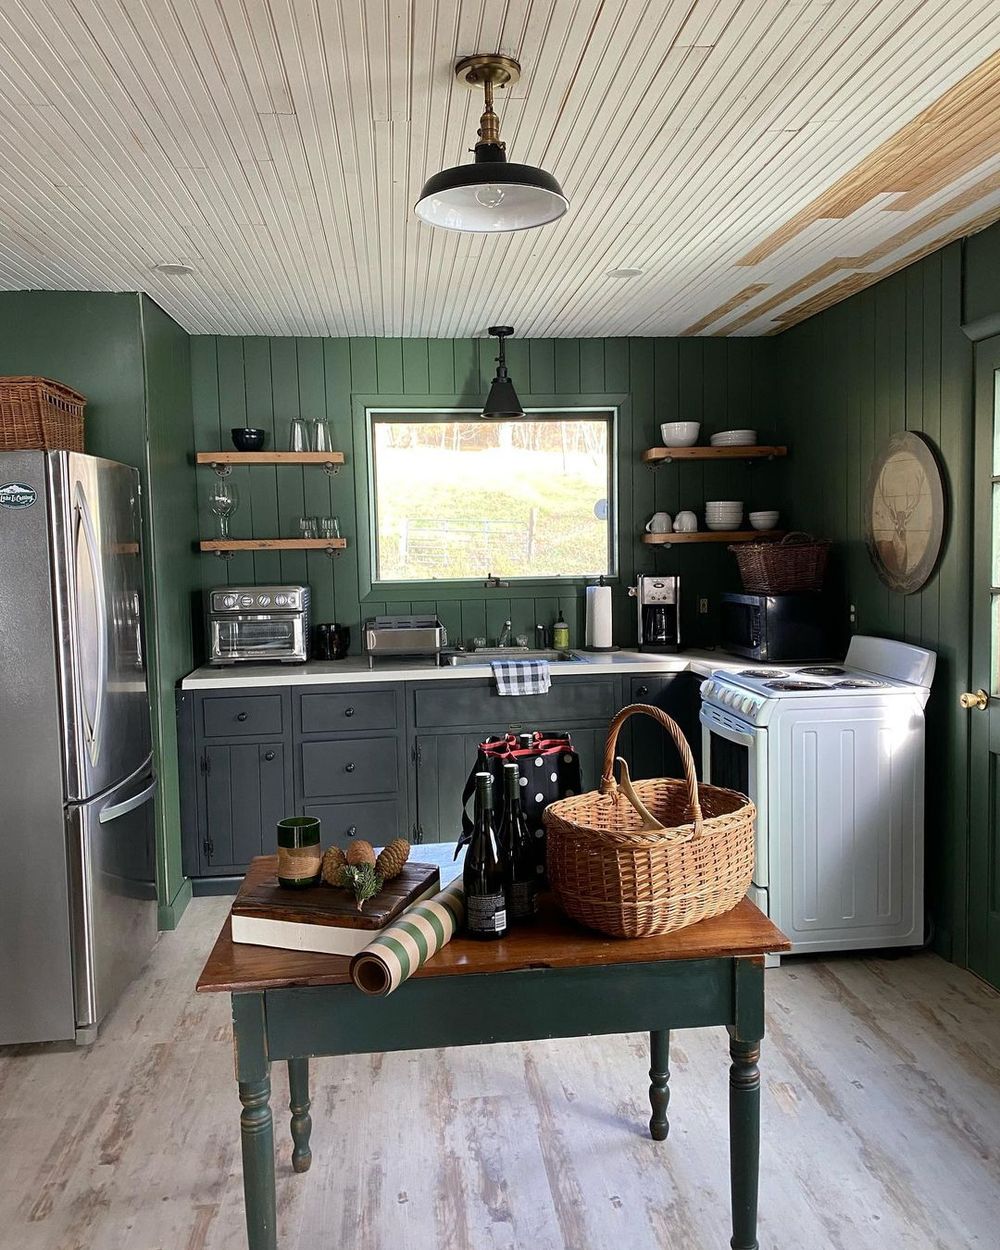
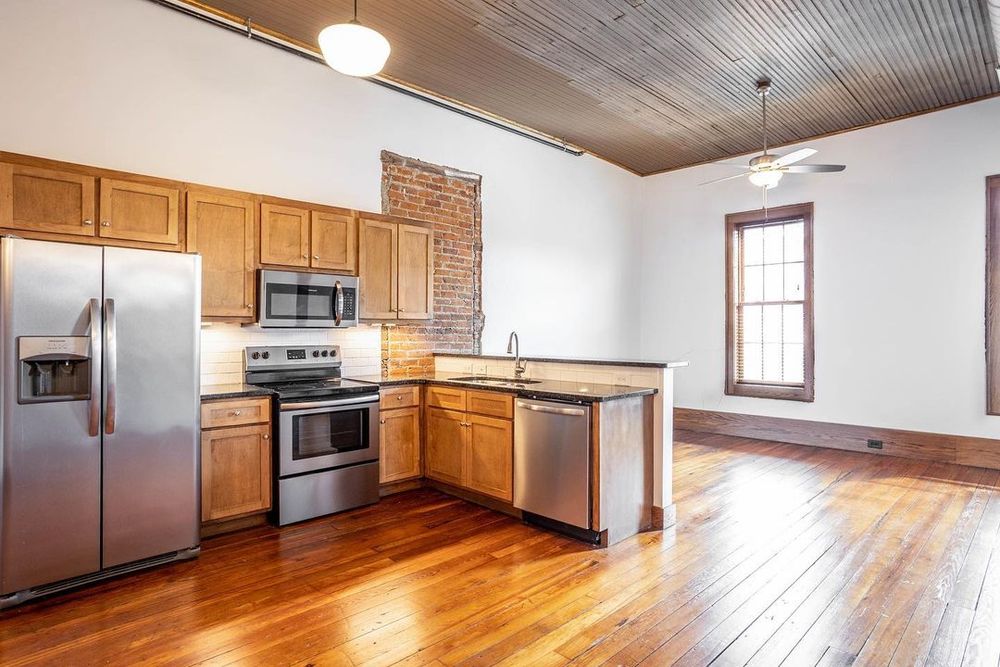
7. Beadboard Kitchen
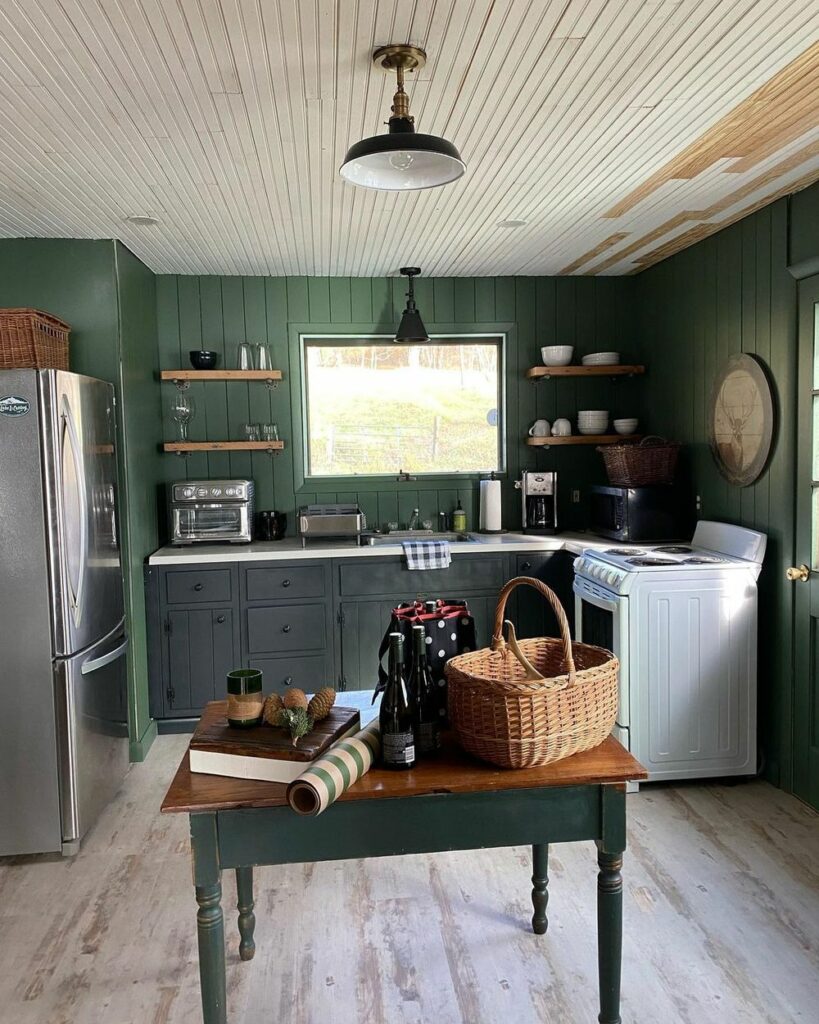
Don’t forget your kitchen! Beadboard ceiling panels are just as beautiful in the kitchen as anywhere else. We love the white wood panels against the dark cabinets and white granite countertops, shown off to perfection by @lakebomoreno.
8. Wood Beadboard
A natural wood beadboard ceiling adds a touch of class without being too overpowering. It’s perfect for adding sophistication to an otherwise casual space, like this living room from @thequartersbykatieann.
9. Ceiling Boards in the Bathroom
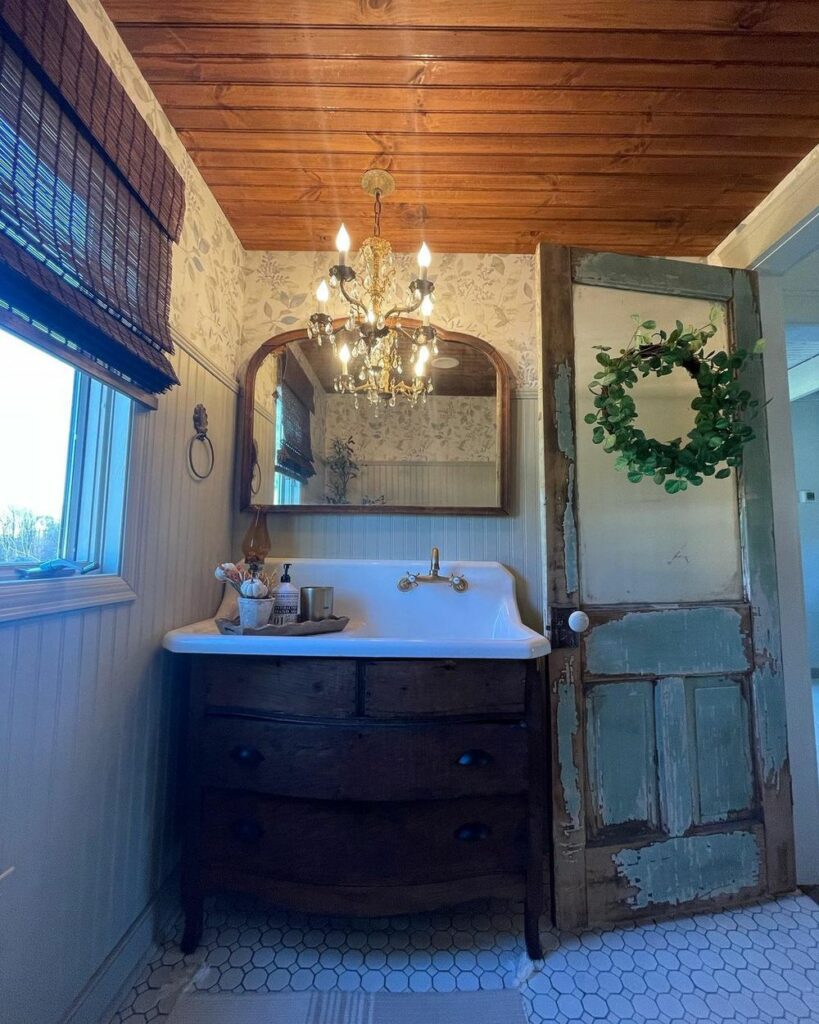
You can use ceiling boards in the bathroom as long as they are made from a water-resistant material like PVC. In this photo, we love how the wood stain of the beadboard ceiling and walls matches the trim on the vanity mirror.
This creates a cohesive look throughout the space. Photo by @fisherconstructionexcavation on Instagram.
10. Tongue and Groove Beadboard

Adding a tongue and groove beadboard on the ceiling is a great way to make a statement in any room, especially the kitchen. You can either go all out and cover the entire ceiling or just do a section – the choice is up to you! We love this idea from Instagram user @kentuckylumber!
FAQ
Learn more information about beadboard ceilings!
What’s the difference between a beadboard ceiling and wood paneling walls?
The main difference between a beadboard ceiling and wood paneling walls is that the panels for a ceiling are much thinner than those for walls. It makes installing a beadboard ceiling easier and doesn’t require any special tools or skills.
Does a beadboard ceiling affect home value?
Yes. Adding a beadboard ceiling will immediately enhance the overall look of your house and make it feel more luxurious. It can lead to increased property value!
Can I use natural wood in my kitchen for my beaded ceiling?
Yes, as long as the material you choose is water-resistant. This ensures it will stay protected even if your cabinets leak or if there is a problem with any of your appliances above the counter, like a dishwasher or refrigerator.
Can I paint a beadboard ceiling?
Yes. If you’re feeling ambitious, you can give it a coat of chalkboard paint and turn it into a chalkboard wall! Paint is an easy way to change up the color of your beadboard ceiling without having to replace it entirely.
Do you have to put drywall behind the beadboard?
No, you do not need to add drywall behind the beadboard. This is because the tongue and groove panels fit very tight together and give you a seamless look that doesn’t require any other materials!
What kind of tools will I need for installing beadboard?
You will only need standard hand tools for this project, including a utility knife or saw, hammer, measuring tape, chalk line tool, pencils, drill with screwdriver bits, and ladder.
Can I have beadboard on just half my ceiling?
Yes. You can easily install beadboard on only half your ceiling if you prefer. We recommend having seams between each panel to give it a continuous look when viewed from below!
Do you paint beadboard before or after installing?
You can paint the beadboard before or after installing it, but you need to make sure that the surface is immaculate and dry. Make sure there are no strippers or chemicals on it since these will cause your primer or paint not to adhere!
Can I install beadboard over my existing ceiling?
Yes. Beadboard is excellent for covering up an unattractive popcorn ceiling without requiring any removal of the old texture! If you want an even more seamless look, add a coat of whitewash to your existing ceiling for a uniform color.
What kind of paint should I use for painting beadboard?
We recommend using oil-based paints because they cover better and last longer than the water-based versions. They also give off fewer fumes, so you don’t have to worry about any adverse effects while working.
Final Thoughts on Beadboard Ceilings
Beadboard ceilings are a great way to add character and style to any room in your home. They’re versatile, easy to install, and can be painted to match any color scheme. Plus, they’re a fraction of the cost of installing a traditional plaster or drywall ceiling!
If you’re thinking about adding a beadboard ceiling to your home as a DIY home improvement project, be sure to check out our tips for the installation process. However, if you feel that it’s too much for you to handle, don’t hesitate to hire a local contractor!
Which beadboard ceiling idea do you like best? Share your thoughts with us in the comment section below!