The 10 Best DIY 3D Printer Kits to Buy in 2023
Perhaps one of the best perks of having a 3D printer is achieving the ‘maker’ status. However, unboxing a 3D printer, setting it on a desk, and starting to create 3D printed objects is barely enough for some of the more ambitious makers who prefer crafting their own 3D printer.
With DIY 3D printer kits, not only this scenario comes to life, but it also brings other great benefits such as reduced costs, the fact that you can grow more accustomed to your printer and its internal/external mechanisms, and that you can take pride that you’ve managed to put together one of the most intriguing pieces of machinery.

Note that some of the DIY 3D printers included in this guide are RepRap-inspired 3D printer kits, while some of them are dedicated projects that come with specially-designed assembly kits. For that reason, it’s easy to see how some printers in our guide can be acquired at a bargain price, while others are on the more expensive side of the price spectrum.
Furthermore, these machines will also have various features and specifications, ranging from build surface to automatic bed leveling, power panic mode, filament sensors, and material compatibility.
We’ve analyzed a series of parameters regarding these DIY 3D printer kits, including print quality, print speed, intuitiveness, price, and how long it takes for you to assembly the kit and get the 3D printer started. That way you should know exactly what you’re getting into before actually getting your hands on the product itself.
We won’t keep you waiting, though. If you’re here to check out a list consisting of some of the best DIY 3D printer kits you can find on the market, then that’s exactly what we’re going to give you.

The Best DIY 3D Printer Kits In 2021
| 3D Printer Kit Model and Brand | Build Volume (mm) | Price |
|---|---|---|
| Prusa Mini+ | 180 x 180 x 180 | $399 |
| Creality Ender 3 V2 | 220 x 220 x 250 | $279 |
| Creality Ender 5 | 220 x 220 x 300 | $349 |
| FLsun QQ-S | 255 x 255 x 360 | $369 |
| Tronxy X5SA Pro | 330 x 330 x 400 | $399 |
| Anycubic Vyper | 245 x 245 x 260 | $429 |
| Creality CR-10 / V3 | 300 x 300 x 400 | $369 / $459 |
| Creality Ender 3 | 220 x 220 x 250 | $189 |
| Prusa i3 MK3S+ | 250 x 210 x 210 | $749 / $999 |
| Peopoly Moai | 130 x 130 x 180 | $1,295 |
What Are The Best DIY 3D Printer Kits?
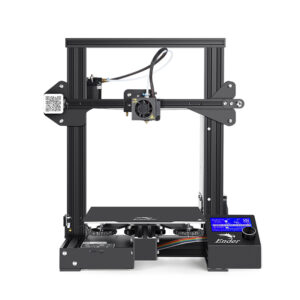
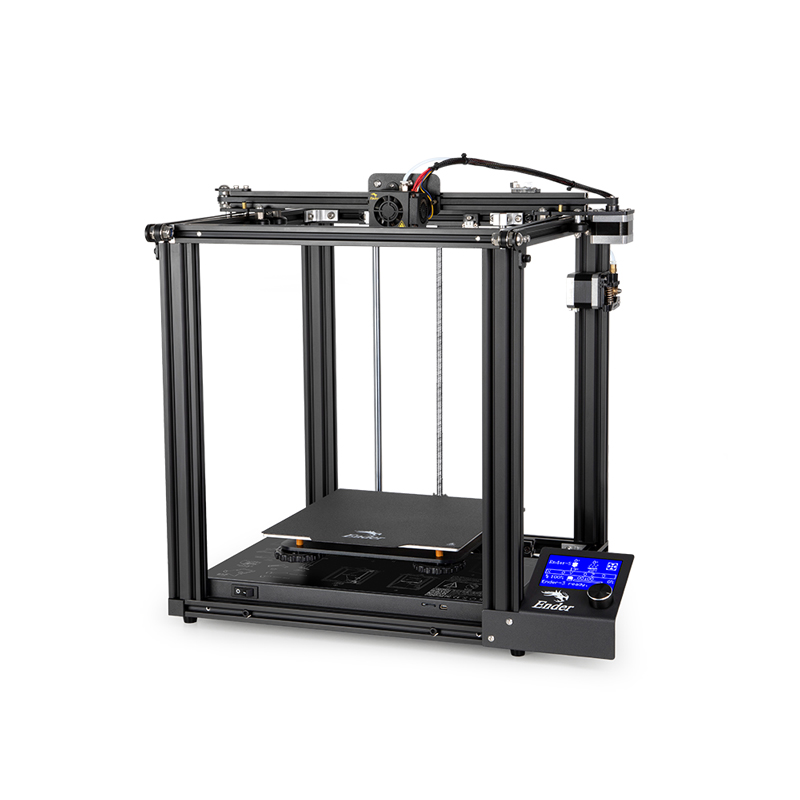
1. Creality Ender 3 V2
The Creality Ender 3 V2 is a better and improved version of the original Creality Ender 3, which is already popular as being a true workhorse of a 3D printer, and an extremely affordable one, as well. In fact, the Creality Ender 3 is still the best-selling 3D printer worldwide thanks to its ridiculously affordable price and overall reliability.
Considering the fact that Creality Ender 3 V2 is an upgraded (so theoretically better) version of the original Ender (the V1), let’s see how well it fares as a contender in the ‘best DIY 3D printer’ ranking.
First of all, it’s one of the cheapest FDM 3D printers on the market. The printer’s reduced cost is also the main reason why this machine is not exactly flawless in every way, but it’s a fair trade-off.
Despite it having its flaws, Creality Ender 3 V2 is extremely upgradeable, so if you take your time to familiarize yourself with the unit and its capabilities, as well as its limitations, you may be able to upgrade it by yourself and make it more suitable for your requirements.
The short version of this DIY 3D printer’s presentation is that it’s a cheap 3D DIY printer kit that boasts a more than decent build volume (print volume), is able to produce high-quality 3D printed objects, and is incredibly easy to assemble and upgrade.
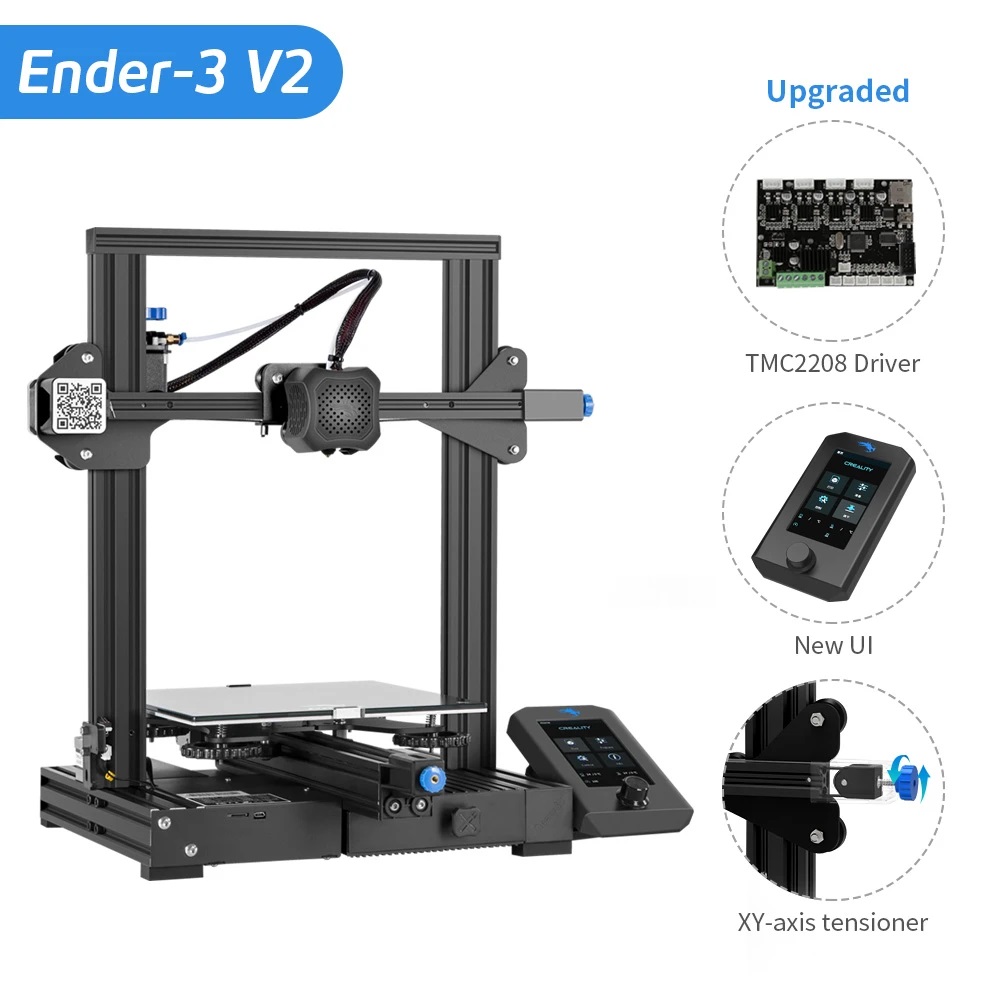
Now if you want the long version, just keep on reading. As we’ve mentioned, the Creality Ender 3 V2 features various improvements over its predecessor, the Creality Ender V1. It provides you with almost the same printing experience, but some aspects of it have definitely been tweaked.
Some of the most important upgrades that this unit has in store for us are the brand new 32-bit motherboard, a sleeker design, smoother appearance, as well as silent stepper motor drives. If you had the chance of working with a Creality Ender 3, you probably know that it wasn’t one of the quietest 3D printers on the market.
Much like its predecessor, Creality Ender 3 V2 also has an integrated all-metal body structure so that you can enjoy the sturdiness and reliability of this 3D printer through the accurate prints you’re going to create.
As far as assembling the unit goes, you’ll definitely have fun putting this 3D printer together, seeing as the process is quite intuitive and you’ll get a chance to grow accustomed to the unit as a whole, but also to each of its components. The entire process shouldn’t take you more than an hour.
This DIY 3D printer kit is equipped with a Carborundum glass platform, which enables the heated bed to reach its optimal temperature quickly and provides you with better adhesion for the objects you print without any annoying warping. Furthermore, the same glass platform will even ensure that your model will be smooth, even on its first layer.
As we’ve mentioned above, the Creality Ender 3 V2 has been upgraded so that now it has a new 32-bit motherboard. This mainboard has been self-developed by Creality and is not only faster than its predecessor, but it’s also more silent, has better motion stability, and is less likely to be affected by interference.
The older Creality Ender 3 had an extrusion clamp that needed to be pressed in order to feed the filament and secure it within the extruder. Performing this seemingly simple operation often lead to the clamp being broken, which would render the machine completely unusable until replacement parts arrived.
However, the Ender 3 V2 comes with a rotary knob that’s planted directly on the extruder. That way you don’t have to feed the filament and press the extruder clamp anymore; instead, you just feed the end of the filament to the extruder and rotate the knob until the filament gets in there.
Unlike its predecessor, this 3D printer DIY kit boasts a useful toolbox just beneath the heated bed so that you could organize your tools in a more effective manner. The toolbox wasn’t available on the Creality Ender 3 V1, and customers kept complaining about losing small tools and parts while working on the printer.
As a result, Creality listened to the customers’ feedback and installed a nifty toolbox just beneath the hotbed. This is also a good moment to tell you that Creality takes the feedback of its customers seriously and often times this is best reflected in the upgraded models of certain printers.
Ender 3 V2 comes with a screen that you can use to control the printer. Despite the fact that the screen looks like it could be touch-operated, it isn’t; in fact, it has a scroll wheel that lets you operate through the printer’s UI (User Interface).
For some reason, Creality allows you to detach the screen from its mount by sliding the two metal pins upwards and out of their sockets. The display cable that’s attached to the screen is fairly short, so you won’t be able to move the screen far away from the printer.
On the other hand, this could be an upgrade that would facilitate adapting the 3D printer to fit within an enclosure. It’s a commonly known fact that electric components such as the PSU and the screen shouldn’t be inside the enclosure while you’re printing, so the removable screen may be Creality’s crack at letting you move the display without having to find a workaround.
One of the features of Ender 3 V2 that is definitely worth mentioning is the power panic. What the power panic essentially does is that it can recover your print if the printer stops during a power outage without breaking a sweat.
After the power comes back and you power the printer back on, you just hit the Resume Print button and let Ender 3 V2 take care of everything. This is extremely useful especially if you work on long (20+ hours) projects and you’re afraid they’ll be ruined if the power goes out.
I guess the alternative would be buying a UPS, but Ender 3 V2’s power panic means that you no longer have to. We’ve previously mentioned that the Ender 3 V2 is extremely easy to upgrade, and that’s mainly thanks to the additional ports that you can find on its mainboard.
If you’re into upgrading the 3D printer yourself (hey, you did buy a DIY 3D printer kit, didn’t you?), the first and most important upgrades you’ll want to buy and install on the Ender 3 V2 are a filament run-out sensor and automatic bed leveling.
The filament run-out sensor could save you from a lot of headaches, seeing as it can pause a print automatically if it detects that you’ve run out of filament and resume it once you’ve fed filament to the extruder head.
It’s quite obvious what the automatic bed leveling upgrade could help you achieve. One of the greatest foes of a maker is having to level the printer bed manually, as it usually takes a lot of trial and error. However, with an automatic bed leveling add-on, such as the BLTouch, everything should be a lot easier, considering that the 3D printer should level the bed automatically.
Unfortunately, the build surface is among the features from the original Ender that haven’t been improved on the V2. Thus, if you’ve been postponing buying a Creality Ender 3 because of its build size, then the Ender 3 V2 will do you no good and you may want to keep looking. The Ender 3 V2 still has a build volume of 220 x 220 x 250 mm, much like the older model.
If you’re still on the fence about whether you want to go with the Ender 3 V2 or not, then perhaps this extensive list of specifications could help you make up your mind:
- Technology: Fused Deposition Modeling (FDM)
- Build Volume:220 x 220 x 250 mm
- Supported Materials: PLA, TPU, PETG
- Connectivity: Online and offline with SD card
- Filament Diameter: 1.75 mm
- Layer Thickness: Between 0.1 and 0.4 mm
- Print Precision: +- 0.1 mm
- Hot Bed Temperature:Up to 100 degrees Celsius
- Hotend Temperature: Up to 260 degrees Celsius
- Software: Simplify3D, Cura
- Dimensions: 475 x 470 x 620 mm
- Weight: 7.8 kg
- Power Input: AC 115V/230V
- Power Output: DC 24V 270W
As you can see, the Ender 3 V2 is a cheap DIY 3D printer kit that comes with a lot of useful features. However, by default the machine could be far from being a perfect fit for your needs, so you may need to upgrade it, either by replacing some of its components or adding brand new ones.
To wrap it up, Creality Ender 3 V2 is a reliable DIY 3D printer kit that should provide you with more than decent results in terms of reliability, print quality, and repeatability considering its ridiculously low price range. However, if you feel like it’s too limited for your needs, you may want to keep looking.
View price on Amazon2. Creality Ender 3
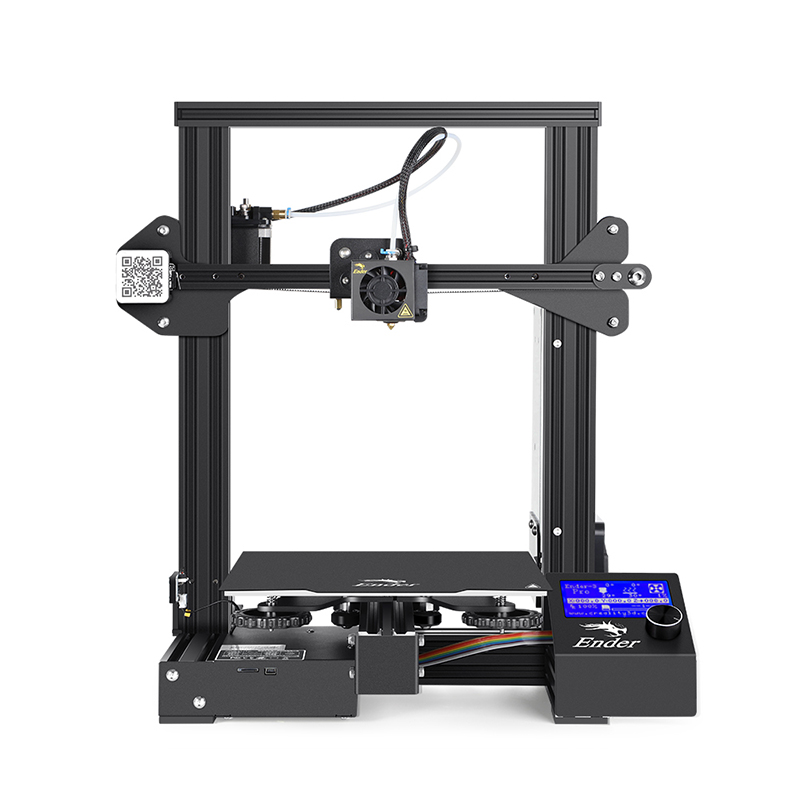
The Creality Ender 3 is currently the best-selling DIY 3D printer kit in the whole world. The reason why so many people decide to go, or better yet start with this machine is obviously its ridiculously low price, seeing as you can buy the Creality Ender 3 for under $200.
However, there are plenty of other reasons why Creality Ender 3 is one of the most sought-after DIY 3D printers on the market at the time being. First of all, it’s built on an extremely versatile platform. This essentially means that you’ll be able to upgrade your Ender 3 in a broad variety of ways.
Furthermore, it’s not exactly rocket science to assemble it, so you won’t spend a lot of time slouched over your work desk trying to figure out which component goes where. The assembly manual could be a bit more intuitive, but for its price range, it delivers just the right amount of information to get you started.
The assembly manual is actually a 12-step printed sheet that’s included in the package. There’s also an online instructional video you could check if you get stuck somewhere along the way. However, neither the manual nor the video show any in-depth procedure.
The simplicity behind assembling the Creality Ender 3 stems from the fact that several parts are already assembled, so you won’t need to wrap your head around needlessly complicated mechanisms or understand the physics principles that make the Creality Ender 3 tick.
You just need a trustworthy screwdriver, a bunch of hex keys, and probably some zip ties if you’re obsessed with cable management and want everything to look flawless. That being said, it shouldn’t take you more than 2-4 hours to get everything done.
Now that we’ve got the assembly process out of the way, let’s talk about what makes Creality Ender 3 great in terms of 3D printing. First of all, it has a generous build volume of 220 x 220 x 250 mm, which gives you plenty of elbow room to create a wide variety of projects.
Surely you could probably find other 3D printers with a larger build volume, but at this price range, the Creality Ender 3 is the best you could get. Keep in mind that despite its ridiculously low price, the Creality Ender 3 is comparable even to some high-end models if you calibrate it accordingly.
Aside from its build volume, other features that make the Creality Ender 3 stand out are its BuildTak-like heated build plate, tight filament pathway, and power recovery mode. The tight filament pathway is a great addition if you’re thinking about printing with more pretentious materials such as flexible ones.
The Ender 3 is built on an open-source platform, so that community members can easily create mods that could be adapted to the actual unit in a jiffy. In fact, if you look up Ender 3 mods you’ll probably get hundreds of awesome projects you could replicate in the results list.
Creality used an industrial-grade circuit board when putting the Ender 3 together so that you can print for hours and hours without worrying about overheating or circuitry-related problems.
Furthermore, as we’ve mentioned above, there’s a power recovery option (power panic) that could help you avoid catastrophic failures in case power goes out while you’re in the middle of a long print (for instance one that takes more than 20 hours to complete).
You don’t need to activate it or configure it beforehand: the recovery option is enabled by default and in case your power goes out in the middle of your print, the power panic will fully recover your print once the power gets restored. You’ll only have to confirm that you want the Ender 3 to resume the print and that’s it.
Unfortunately, one similar feature is entirely lackluster on the Creality Ender 3. We’re talking, of course, about the filament run-out sensor that can detect whether or not you still have filament in your extruder, pause the printing process if no filament is detected, and resume it whenever you load a new spool.
You could still purchase a filament sensor upgrade and attach it to the printer, but it would’ve been nice to have this feature available from the get-go. On the other hand, Creality had to cut some corners to keep the prices low, and unfortunately, the filament sensor was one of the things that got the ax in the process.
The Creality Ender 3 has a V-Slot+ precision pulley that ensures it will work more smoothly, and as a result, deliver better results in terms of stability and print quality. After all, a printer that’s not stable is more prone to layer shifts that may ruin the finish of the surface of the print.
The same system we’ve described above can also increase the machine’s resistance to frequent wear-and-tear and lower the noise that the machine generates during the printing process. That way you could even leave the printer running overnight without worrying about the noise too much. Just to be clear, it won’t be silent; it just won’t blare in your ears every time the extruder moves suddenly.
The MK8 extrusion mechanism that’s being used within the Creality Ender 3 is a patented system that reportedly reduces the risk of clogging and subsequently increases the machine’s compatibility with various types of filaments on the market.
The Y-rail mounting groove has been CNC machined to ensure that the positioning of the motor is 100% accurate. Furthermore, the bed comes with large rotary knobs that make it extremely easy and intuitive to level the bed.
We forgot to mention, but you probably figured this one already; the Creality Ender 3 doesn’t have automatic bed leveling, so that’s why the large rotary knobs are right there where they are. You just twist them until the bed is leveled and your prints are no longer warped or refuse to stick.
Creality Ender 3’s heated bed can reach a 110 degrees Celsius temperature in just about 5 minutes, which is quite impressive. If you plan on printing with PLA, 60 degrees Celsius is the most you’ll ever need, so the extra 50 degrees are definitely a nice touch.
If you plan on printing with more pretentious materials, though, you’ll need to buy an enclosure, since filaments such as ABS or nylon are quite sensitive when it comes to sudden temperature shifts or drafts of air, not to mention the fumes they emanate.
Need more awesome features? Then you should definitely take a look at the Creality Ender 3 V2 we’ve placed at the top of our guide. You couldn’t have missed it, but if you have, then you can take a quick peek at the main differences between the Ender 3 and Ender 3 V2 models.
Spoiler alert: they both have the same build volume, so if you’re a bit disappointed in that, you won’t have it better if you go for the upgraded V2 model.
| Printer | Ender 3 | Ender 3 V2 |
|---|---|---|
| Technology | FDM (Fused Deposition Modeling) | FDM (Fused Deposition Modeling) |
| Build Volume | 220 x 220 x 250 mm | 220 x 220 x 250 mm |
| Printer Dimensions | 440 x 410 x 465 mm | 475 x 470 x 620 mm |
| Weight | 8kg | 9.6KG |
| Supported Materials | PLA/ABS/TPU | PLA/ABS/TPU/PETG |
| Power Input | AC 100-265V 50-60Hz | AC 115V/230V |
| Power Output | DC 24V 15A 360W | DC 24V 270W |
| Precision | ±0.1mm | ±0.1mm |
| Filament Run-Out Sensor | No | No |
| Toolbox | No | Yes |
| Power Panic (Print Recovery) | No | Yes |
| Printing Platform | Platform stickers | Carborundum Glass Platform |
| Layer Thickness | 0.1-0.4mm | 0.1-0.4mm |
| Screen | Normal Interface | New UI Interface |
As you can see, there are a bunch of key differences between the two machines, but Creality didn’t take it that far as to do a full overhaul of the machine for the V2. And why should they? The Ender 3 still basks in the glory of being the best-selling 3D printer.
View price on Amazon3. Creality Ender 5
You know how we talked about not having enough build volume on the Ender and Ender V2? Well, the Creality Ender 5 took care of that (partially) by providing you with an extra 50 mm for the Z-axis.
So you won’t be able to create wider or longer objects than while using the Ender 3 or Ender 3 V2, but you’ll definitely be able to create objects that are 5 cm taller (such as vases, supports, monuments, extenders, rods, wands, 3D printed swords, you get the point).
This 3D printer also follows closely the footsteps of the previous two Ender models in our guide, but it costs roughly $100 more than the Ender V2. However, aside from a slightly larger build volume, the Creality Ender 5 also packs a series of improvements that totally justify the price increase.
First of all, the Creality Ender 5 boasts a stronger structure and you can tell that mere minutes after unboxing the 3D printer kit. Instead of sticking with the traditional rectangular frame that seems to work wonders for a lot of printers, this unit went with a full cube platform.
This translates into an impressive boost in stability and sturdiness so that your prints won’t be affected by stability issues such as vibrations or movements caused by external factors. As a result, you’ll get more accurate prints with improved surface finishes and increased overall quality.
The Ender 5 boasts a double Y-axis control system that has a synchronous operation and stable output. This can reduce vibrations that may result as an unwanted byproduct of running low prints.
Furthermore, this 3D printer has a minimum layer height of 50 microns, which is definitely impressive for a 3D printer in this price range ($300-400). The general consensus is that the Creality Ender 5 can produce smooth prints without compromising on quality or speed.
The PSU is included in the same enclosure as the motherboard, which we’re not exactly sure is a great idea (seeing as the PSU can get quite hot and heat + motherboards = not fun), but it’s definitely convenient as you won’t have to spend a lot of time on cable management.
We didn’t mention this, but the Creality Ender 5 also comes as a DIY 3D printer kit, so you’ll have to assemble it before you can use it to create intricate 3D printed projects. However, as you’ve grown accustomed by now, you won’t have to spend a lot of time building, as the package comes with several components already assembled.
Additionally, within the package, you’ll also find assembly instructions, and if those aren’t enough (they’re not exactly the most in-depth instructions), you could check an online video flashing you through the steps of assembling the unit (the video is fast-forwarded, but offers rather clear instructions).
The Creality Ender 5 comes with a modular design, which not only means that you won’t waste a lot of time putting the printer together, but you’ll also be able to apply various upgrades to it if you’ll one day feel like it.
So what if you’re not an expert maker and you don’t know where to start when it comes to upgrading your Creality Ender 5? Just look up “Creality Ender 5 mods” or “Creality Ender 5 upgrades” online and you’ll see what we mean; there are literally tens or even hundreds of awesome projects.
One thing we just couldn’t wrap our heads around is why doesn’t the Ender 5 model come with automatic mesh bed leveling. Technically leveling the bed shouldn’t be a complicated process, but trust us when we say that it can take a lot of time.
Leveling the bed takes a lot of time mostly because you’ll have to level it, then print something to check if you did it right, then re-do it if necessary, then print something again, and so on until you get it right. We can all agree that including automatic bed leveling would’ve been a game-changer for Ender 5, especially considering that it costs more than the Ender 3 models.
Leveling the bed on this unit can be done exactly as with the Ender 3 and Ender 3 V2 models; there are rotary knobs beneath the bed and you’ll have to rotate them until the heat bed reaches the optimal level. Sounds easy, but trust us that you won’t think that anymore when you’re re-leveling for the 10th time and you’re still off by a few microns.
Now for the other thing that got us scratching our heads: there’s still no filament run-out sensor. Therefore, if you leave your printer working on a rather large print, and you run out of filament, your Ender 5 will keep on printing with no filament coming out of the extruder.
This basically means that you’ll have to scrap your print and start over unless you install such a sensor. Luckily for you, this filament sensor doesn’t cost a lot and it’s not exactly difficult to install either, but that baffles us even more that Creality chose not to install one in the first place.
Much like the Ender 3 and Ender V2, the Creality Ender 5 comes with a power supply protection device that can recover your prints in the event that the power goes out and you’re just in the middle of a large (20+ hours) print.
You just power the printer back on and confirm that you want to resume the print from the point where it was dropped. You’ll definitely be glad that you chose a printer that has a power panic feature.
Creality Ender 5 comes with a magnetic printing surface that lets you attach and remove printing sheets to it in a quick, effortless manner. After the printing process comes to an end, you just have to detach the platform and bend it slightly; your printed object should pop right off it, and you won’t have to use additional tools such as cold spray or spatulas.
The Ender 5 comes with online connectivity so that you can transfer print files to it without being in its proximity. However, if you’re a fan of the card approach, you’ll be glad to learn that Ender 5 also supports TF cards.
Last, but not least, it’s worth mentioning that this unit boasts a display and control screen that’s tilted at 45 degrees so that you won’t have to crouch next to your printer or lean over it when you interact with the screen.
Much like some of the older models, the design of the screen features a knob you can rotate and press in order to interact with the printer. It’s a bit sensitive for our tastes which means that you could accidentally miss the option you want to select, but it gets the job done eventually.
If you’re still not decided about whether you should choose Ender 5 as your DIY FDM 3D printer kit, you can check a list of its main specifications below that could help you make up your mind about it easier:
- Technology: FDM (Fused Deposition Modeling)
- Build Volume: 220 x 220 x 300 mm
- Connectivity: Online or TF card offline
- Layer Height: Between 0.1 and 0.4 mm
- Supported Filament Diameter: 1.75 mm
- Supported Materials: PLA, ABS, Woodfill, PETG
- Printer Dimensions: 552 x 485 x 510mm
- Printer Weight: 11.8KG
- Nozzle Diameter: 0.4 mm (can be changed to 0.2 or 0.3 mm)
- Printing Accuracy: ±0.1mm
- Travel Speed: ≤180 mm per second
- Normal Printing Speed: between 40 and 80 mm per second
- Hotend Temperature: up to 260 degrees Celsius
- Heatbed Temperature: up to 135 degrees Celsius
- Power Input: 110/220V 50/60HZ
- Power Output: DC24V
- Machine Power: 350W
- Supported File Formats: STL, OBJ, AMF
As you can see, Ender 5 provides you with a bunch of upgrades compared to the Ender 3 family of 3D printers. However, one of the most important upgrades is still the increased build volume, considering that you still won’t have a filament runout sensor on the Ender 5, nor automatic bed leveling. On the bright side, you get better stability, more sturdiness, and a built-in motherboard power supply.
To wrap it up, if you feel like the Ender 3 or Ender 3 V2 almost meet your requirements but don’t quite hit the sweet spot, you may want to check Ender 5 out. It has a more sturdy cube-shaped build, comes with a larger build volume, and comes with various other improvements.
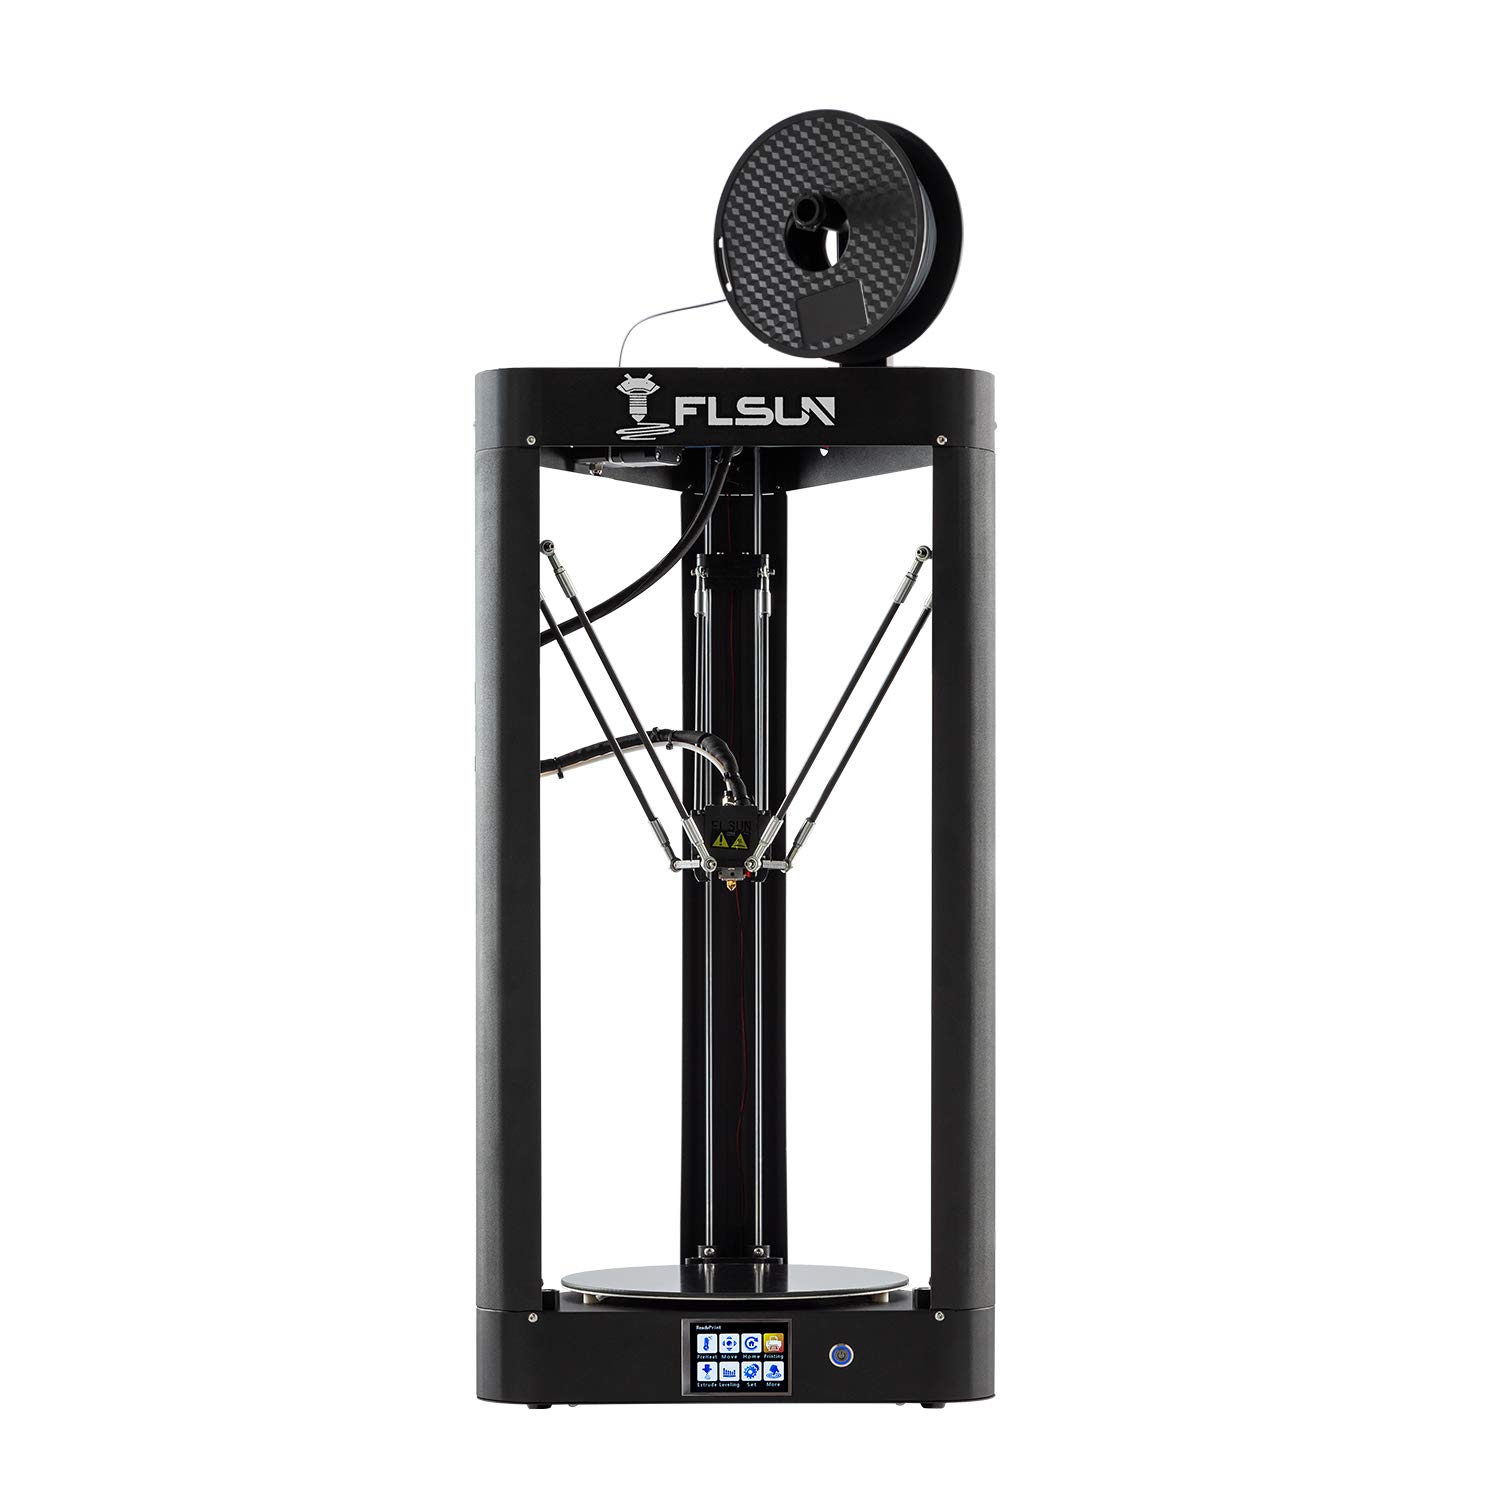
View price on Amazon4. FLSUN QQ-S
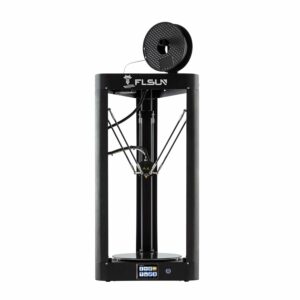
When it comes to build volumes, FLSUN QQ-S is like a breath of fresh air, seeing as it boasts a generous 255 x 255 x 360 mm print volume, which should be more than enough to accommodate even some of the larger prints in your portfolio.
It’s worth mentioning that the FLSUN QQ-S comes 90% pre-assembled, so if the reason why you’re heading towards a DIY 3D printer kit is to lose yourself in the process of assembling it you might get disappointed after getting this unit out of the box.
Even so, it should still take you roughly an hour to put the FLSUN QQ-S together, so not everything’s lost in terms of assembly. Now here’s what’s making the FLSUN QQ-S truly unique: it’s probably the first delta 3D printer we’ve tested so far.
If you took a look at the photo of the printer we’ve used above, you may have thought that this one is definitely not like the others and you’d be right about it! Now let us tell you exactly why you were right.
With standard 3D printers, the extruder only moves on the Z-axis and the X-axis, as the bed is actually the one doing all the movement on the Y-axis. However, with delta 3D printers such as the FLSUN QQ-S things are wildly different.
This type of 3D printer doesn’t move the bed at all, as the print head does all the movements. However, you need to make sure that the printer is leveled properly before you start the printing process, as miss-leveling could lead to ruined prints right from the get-go.
The FLSUN QQ-S boasts an amazing upgraded lattice glass print bed, which provides you with better adhesion, less warping, and a lot quicker bed heating (this unit can reach a 110 degrees Celsius heat bed temperature in just under 5 minutes).
All these awesome features make it possible to print not only with generic materials such as PLA or PETG but also ones that are more pretentious (such as ABS or nylon) and can (and do) warp if there’s even a slight inconvenience in terms of temperature.
As opposed to some of the other 3D printers in our guide, FLSUN QQ-S packs a titan extruder, which means that it can print flexible or wood fill filaments just as well as it can handle generic filaments such as PLA, PVA, HIPS, and ABS.
This machine is also incredibly good in terms of accuracy, seeing as it can print at up to 50 microns. Not only that, but you’ll also be able to print at up to 300 mm per second, which is truly impressive considering the low price range of the machine.
FLSUN QQ-S boasts a lattice platform and has a composite coating, both of which can ensure that the platform will heat up quickly, provide your prints with strong levels of adhesion during the printing process, and not lastly, make your prints less likely to suffer from warping.
Furthermore, if you’re familiar with 3D printing you probably already know that one of the nemeses of makers is removing prints from the heated bed without damaging either the bed or the print itself.
Most 3D printers have embraced flexible magnetic sheets that go on top of the heated bed, and you can detach prints quite easily from them by simply removing and bending them slightly. Once you do so, the prints pop right off of the sheet and you don’t need to use any additional tools such as scrapers or cold spray.
Well, you’ll be glad to know that the FLSUN QQ-S doesn’t have you do all of that, so you won’t even have to remove the print surface and bend it, let alone use any additional tools such as the scraper or the cold spray. Once the print is over, you just have to wait for the bed to cool and the print will come off easily.
One thing that the FLSUN QQ-S lacks is automatic bed leveling (a bed leveling sensor), so you’ll have to make sure that the bed is leveled before you start printing. This is of utmost importance considering that the bed doesn’t move at all as with traditional 3D printers.
If you don’t know how to level your printer’s bed or you’d rather have it adjusted automatically you could either invest in a bed leveling sensor or just go for the upgraded edition of this printer, the FLSUN QQ-S Pro.
The FLSUN QQ-S Pro has automatic bed leveling that’s handled by an auto-leveling sensor that measures no fewer than 21 points across the entire printing plate. Thanks to the fact that it’s a delta 3D printer and has a non-movable bed, you don’t have to worry about constantly adjusting the level; you just do it once and then forget about it.
Compared to the original QQ (yes, the QQ-S is an upgrade itself), this device has a new and improved 32-bit motherboard that can improve the stepper response greatly. Not only that, but the motherboard also ensures that you’ll benefit from greater positioning accuracy, which translates into better print quality.
In terms of power, the FLSUN QQ-S comes with a 24V, 15A PSU that is equipped with the MOSFET module. This module ensures that the printer can keep the bed heated at its maximum temperature (i.e., 110 degrees Celsius) for up to 48 hours with absolutely no issue.
One of the most overlooked (but nevertheless awesome) features of the FLSUN QQ-S is its Wi-Fi connectivity. Not only it will save you from running endless bundles of wires between walls, computers, routers, and your 3D printer, but it will also let you control your printer remotely.
All you need is a smartphone and an Internet connection to be able to check on your printer’s status, monitor printing, and even tweak some of its parameters in real-time, without having to be in the printer’s proximity.
We’ve already mentioned that this printer has a generous build volume of 255 x 255 x 360 mm, which means that you can print long, wide, and especially tall objects. As you may know, printing large objects usually takes a lot of time, and the more time a print takes, the more it becomes prone to various issues that could make it fail.
One of the most common issues with 3D printers is the event of a power outage. If you’re almost done with a large print (for instance more than 20 hours) and your power fails, most of the time you’d have to start over, which can get really frustrating.
However, FLSUN QQ-S has a power panic feature that can automatically pause the print in the event of a power outage, and then resume it once the power’s back on. That way you won’t have to lose time, patience, and resources (filament) with failed prints.
Last, but not least, among the many talents of the FLSUN QQ-S you can find low noise levels. We didn’t actually measure it, but this device is indeed less noisy, at least it’s a lot more silent than traditional (non-delta) 3D printers. According to the manufacturer, the FLSUN QQ-S works at below 50 dB, which is quite impressive.
Check out the extensive list of FLSUN QQ-S’s specifications below if you’re still on the fence about whether or not you should buy this DIY 3D printer kit.
- Technology: FDM
- Build Volume: 255 x 255 x 360 mm (10 x 10 x 14.1 inches)
- Print Speed: between 10 and 300 mm per second
- Nozzle Diameter: 0.4 mm standard (you can replace it with 0.3 mm and 0.2 mm nozzles)
- Maximum Hotend Temperature: 270 degrees Celsius
- Maximum Heated Bed Temperature: 110 degrees Celsius
- Layer Height: between 0.05 and 0.4 mm
- Leveling: manual, but can be upgraded to one-click automatic leveling with auto level sensor
- Supported Materials: PLA, PETG, ABS, HIPS, woodfill, PVA, flexible
- Filament Diameter: 1.75 mm
- Connectivity: SD card, USB, Wi-Fi
- Display: 3.2-inch full-color touchscreen
- Supported Software: Cura
- Supported Formats: GCODE, STL, OBJ
- Input Power: 110/220V *
- Output Power: 24V
* We need to make an important mention: while you’re assembling the FLSUN QQ-S, make sure to change the PSU voltage accordingly. You can find the switch for changing the voltage after you remove the bottom cover. Failing to do so may not only break the printer, but it will also void your warranty.
All things considered, if you’re new to the marvelous world of 3D printers and simply don’t know where to begin, the FLSUN QQ-S is definitely one of the best starting points. It doesn’t provide you with as much assembling as some of the other products on our list, but it can definitely give you high-quality prints and endless hours of fun.
If you’re not exactly convinced by the capabilities of FLSUN QQ-S, you could easily turn to its upgraded version, the FLSUN QQ-S Pro, as it features a lot of improved features compared to its predecessors.
However, if you’re a true fan of DIY 3D printer projects, you could also purchase upgrades (such as an automatic bed leveling sensor, a filament runout sensor, or a power panic module) and apply them manually to the FLSUN QQ-S.
After all, this printer doesn’t take much time to be assembled, so you might at least want to spend some time tinkering with updates if you’re not completely on board with the unit’s default specifications and/or features.
View price on Amazon5. Tronxy X5SA Pro
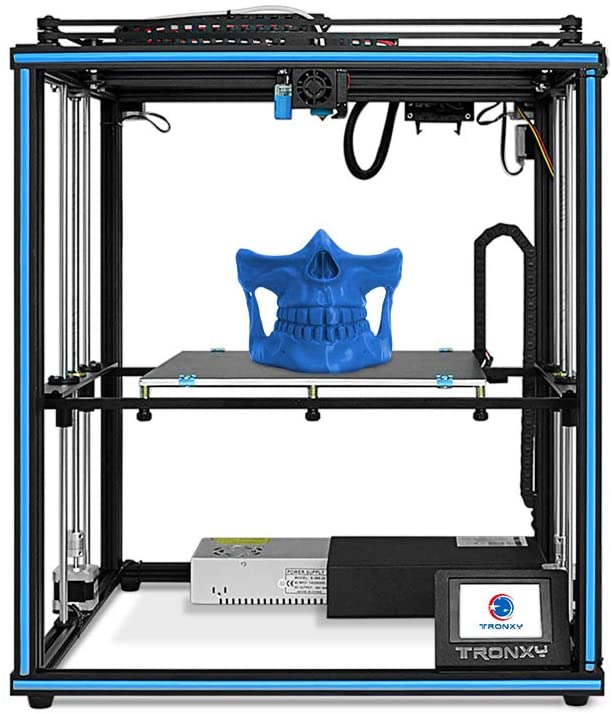
Tronxy X5SA Pro is a truly DIY 3D printer kit, seeing as you will actually have to put this machine together completely and debug it before you use it. By comparison, some other 3D printers in our guide require assembly, but most of their parts are already pre-assembled.
Thus, the only reason why you’d need to assemble them would be saving space with shipping, not actually put the machine together part by part so that you can learn a thing or two during the process and familiarize yourself with the components.
If you expect a DIY project that will have you fasten even the tiniest of screws and nuts, the Tronxy X5SA Pro is what you’ve been looking for, as it will surely provide you with this type of experience.
The actual printer size is 580 x 645 x 660 mm and its build volume of 330 x 330 x 400 mm is generous enough to accommodate even some of your largest prints, whether it’s busts, statues, monuments or vases we’re talking about.
Much like some other printers in our guide here, Tronxy X5SA Pro boasts a titan extruder, which means that you can print a broad variety of filaments with this machine, including but not limited to PLA, PETG, ABS, wood fill, TPU, and even flexible ones.
It’s worth mentioning that the machine sports a cubic design, as opposed to the traditional square frame one, which translates into far greater stability, fewer vibrations, and perhaps most importantly, high-quality prints that are no longer affected by movement issues such as vibrations or sudden shifts caused by external factors.
Tronxy X5SA Pro packs a linear guide rail design inspired by heavy machinery you can usually find in the steel (or any other heavy metal) processing industry. This rail design helps the machine achieve an incredible level of precision, great stability, friction reduction, all of which ultimately boost the lifespan of the unit and its components.
The double-axis external guide rail helps you achieve smooth sliding, high precision, fast prints, and low noise. Noise is actually one of the most overlooked aspects when buying a new 3D printer, but the irony is that most customers complain about it, so it makes sense why you’d want a 3D printer that’s been upgraded to be more silent than other models on the market.
The slider component has an eccentric wheel system that can adjust the tightness of the guide rail, as well as its smoothness without breaking a sweat, ensuring that the component will slide smoothly, precisely, and silently.
Tronxy X5SA Pro’s entire dual-axis guide rail is also highly dust-proof, seeing as the slider is cast on the shape of the rollers and that there are dustproof oil seals are installed on both of its sides.
As opposed to some of the other DIY 3D printer kits we’ve included in this guide, Tronxy X5SA Pro integrates 30 pin wiring. That way, during the assembly process you won’t have to waste time figuring out the most effective way to perform cable management.
Furthermore, the machine will also have a cleaner aspect, so you won’t have to worry about loose wires getting stuck in the motors or being snagged by the extrusion head while it moves, either.
One useful tool that many DIY 3D printer kits seem to lack is the auto level sensor that could grant you the ability to level the work surface (printing bed) of your device automatically, without having to interact with cogs, levers, buttons, and rotary knobs.
You’ll be glad to learn that the Tronxy X5SA Pro boasts automatic bed leveling so that you won’t have to waste a lot of time making sure that your printer’s work surface is set at the optimal level. You just run your prints and stop worrying about leveling.
Speaking about sensors, there’s yet another one that’s worth mentioning, and that’s the filament runout sensor, which the Tronxy X5SA Pro also has. As a result, if there’s no filament detected in the extruder, the printer will sound a beeping alarm and automatically pause the print.
After you load the new filament strand into the extruder, you’ll need to tap the appropriate button on the 3.5-inch color touchscreen to confirm that you want to resume the printing from the precise place where it was paused.
An equally important feature that could also help you save a lot of time, energy, and potentially wasted material is the power panic. This is one of Tronxy X5SA Pro’s most crucial features and it helps you recover prints that were halted as a result of a power outage.
The printer automatically pauses the print that has stopped due to a power outage and asks if you want to recover it when the power comes back on. As before, you’ll have to confirm that you want to resume the print, and the process should resume without a fault.
Now after you finish a print, it’s well known that you have to remove it from the heated surface, which can be a pain depending on the model of the printer you’re using as well as its specifications. You’ll be glad to know that Tronxy X5SA Pro doesn’t make things difficult for you in that regard.
To be more specific, the printing platform is actually a flexible removable sheet that you can easily detach from the heated bed and then bend it slightly in order to remove your print from the surface. Before you actually remove the print sheet it would be wise to check if it’s not still scalding hot.
The mainboard of the printer has an ARM 32 architecture, and has a speed of 8 MHz. But we’ll find out more of that in the comprehensive specifications section at the end of our presentation.
Tronxy X5SA Pro’s versatility is well complemented by the fact that it provides you with dual connectivity (online and offline). Therefore, if you’re a fan of the old-school 3D printing systems, you could very well plug an SD card with your print files, but if you’re more on the modern side of things, you can also use the unit’s online printing capabilities.
Not exactly sure that Tronxy X5SA Pro is your cup of tea? Perhaps this extensive list comprising this unit’s specifications will help you change your mind if you’re still on the fence:
- Technology: FDM
- Printer Dimensions: 580 x 645 x 660 mm
- Build Volume: 330 x 330 x 400 mm
- X/Y Accuracy: 0.00625 mm
- Z Accuracy: 0.00125 mm
- Print Speed: between 20 and 100 mm per second (60 mm per second suggested)
- Nozzle Size: 0.4 mm (standard size)
- Supported Materials: PLA, PETG, ABS, woodfill, PC (polycarbonate), TPU, HIPS, ABS, nylon, flexible
- Filament Size: 1.75 mm
- Display: 3.5-inch color touchscreen
- Maximum Hot Bed Temperature: 100 degrees Celsius
- Maximum Hotend Temperature: 275 degrees Celsius
- Recommended Ambient Temperature: between 8 and 40 degrees Celsius
- Recommended Environmental Humidity: between 20% and 80%
- Connectivity: USB, SD card
- Additional Features: power panic, filament runout sensor, automatic bed leveling
- Power Input: 110V/240V *
- Power Output: DC 24V 360W
- Supported Software: Cura, TRONXY, Repetier-Host
- Supported File Formats: STL, OBJ, GCODE, AMF, DAE
* During the assembly process, you should make sure that you’ve selected the correct voltage according to your electrical setup. Otherwise, you may not only damage the machine, but you’ll also void the warranty, so you won’t be eligible for a refund.
All things considered, if you’re really passionate about building your 3D printer in the true sense and you’d also like to have a large build volume, then Tronxy X5SA Pro is definitely worth checking out. It provides you with a lot of features, boasts a generous build volume, lets you build it piece by piece, and is very affordable considering what it can do.
View price on Amazon6. Anycubic Vyper
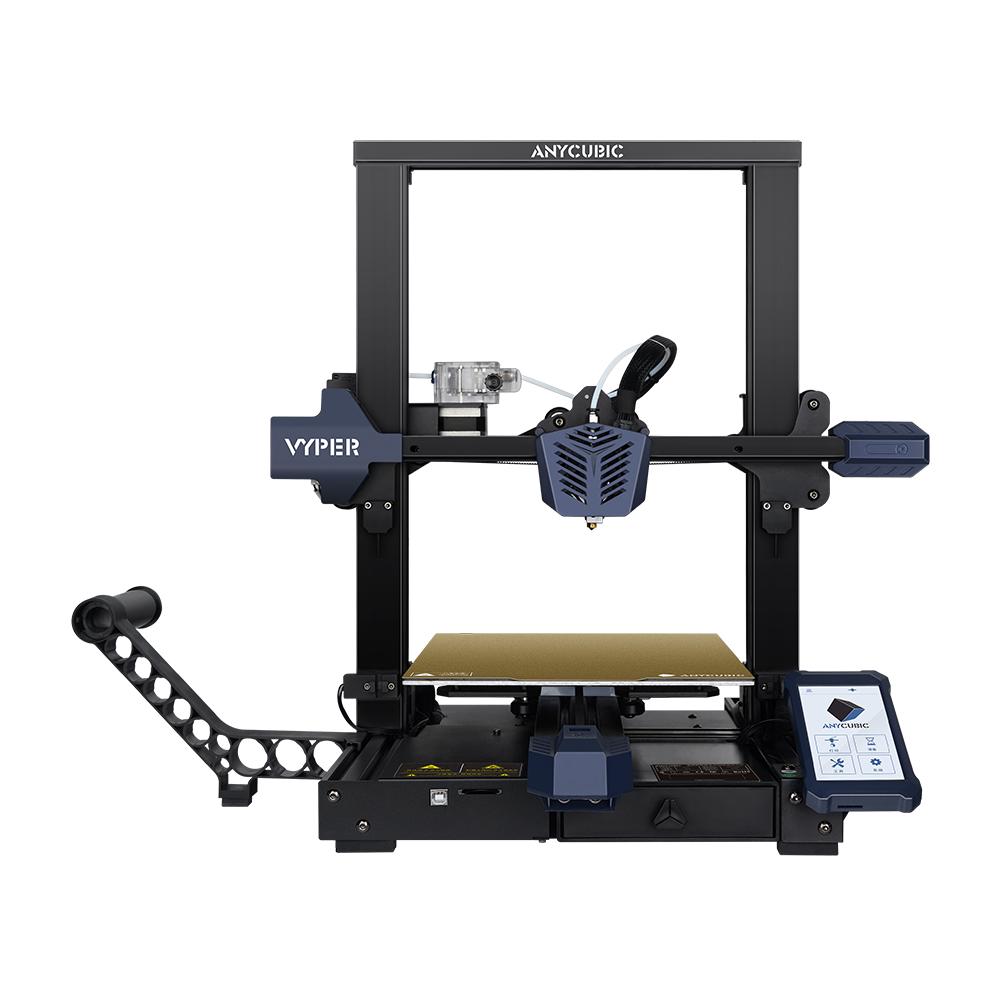
Anycubic Vyper is an awesome DIY 3D printer kit that you could grab for a very low price. Granted, it doesn’t have as huge a build volume as the previous two other 3D printers in our guide, but you’ll soon learn that it makes it up for that through various other features.
That doesn’t involve by any means that the Anycubic Vyper is a small 3D printer. No, in fact, its 245 x 245 x 245 cubic build volume should be more than enough to satisfy the volume requirements of various makers.
Alright, so let’s start at the beginning. One of the first things you’ll notice about the Anycubic Vyper is that it is, in fact, cubic. This 3D printer is built on a cubic frame, one that will greatly improve its stability (compared to other non-cubic printers) and eliminate movement-related issues with prints such as warping, layer shifting, or non-adhesion.
The Anycubic Vyper is also capable of automatically leveling its printing bed so that you won’t have to spend a lot of time configuring the printer every once in a while. There’s a 16-point bed leveling system that tests for differences between the heated bed and the hotend and you can initiate it by simply tapping a button.
Anycubic Vyper is actually an upgraded version of a previous model and it now has a new 32-bit mainboard that’s equipped with a high-performance main control chip built on the Cortex-M3 architecture.
As a result, this unit boasts greater computing speed values and a smoother overall experience. Furthermore, the mainboard, chip, and TMC2209 silent drivers make it possible for you to benefit from a silent printing experience, as well as more precise voltage control for increased accuracy and reduced noise levels.
On the other hand, if you’re the silent, stoic type who prefers to work a lot on your projects before reaping the rewards, you might be a tad disappointed at how easy it is to assemble the Anycubic Vyper. Don’t get us wrong, we don’t think that the fast assembly is a bad thing.
However, if you expect to work and toil over your work desk for hours before you can send the first print to your hand-assembled Anycubic Vyper, then this printer is definitely not what you’re looking for.
Anycubic Vyper is immediately convenient thanks to its generous 4.3-inch color touch screen that lets you operate it in a quick, intuitive manner. The printer also features a re-designed smooth interface (compared to its previous version), and easy “English to Chinese” switching.
Unlike other printers that you’d have to upgrade with this system, the Anycubic Vyper unit has a high-precision double screw system that runs synchronously. As a result, you’ll get a lot more precision, increased stability, and a smaller chance of encountering zeroing errors.
Additionally, the double photoelectric limit feature ensures that the machine is capable of compensating the difference between the hotend and the hot bed automatically, so as to increase the accuracy of Z-axis zeroing.
This machine also features a double-gear extrusion system, which is able to keep the occurrence of filament tangle issues at a minimum. Furthermore, the extruder upgrade also means that the Anycubic Vyper is compatible not only with generic filaments but also with more pretentious ones.
For instance, you can print with PLA and PETG the same as you would with some of the other printers we’ve discussed in our guide. However, this unit is also capable of working with ABS, nylon, flexible filaments, and even wood fill without significant effort.
The upgraded extruder system will make sure that any compatible filament will be extruded with great force to increase overall effectiveness, and that the path that the filament takes within the extruder is optimized to avoid any issues arising from path mismanagement.
The printing head of this machine now encompasses a dual two-way cooling fan system that can cool down your models quicker and more effectively than the printer’s predecessor. Also, the machine can reach a printing speed of 180 mm per second, which is quite impressive if you took its low price range into account.
On the other hand, the manufacturer recommends that you sit within an 80-100 mm per second printing speed range to avoid any complications that might arise with the printer as well as the printed object.
Aside from having automatic bed leveling, Anycubic Vyper also boasts removable spring steel magnetic platforms that can help you remove prints in an easy, convenient manner. You just have to remove the spring sheet that you’ve printed on and slightly bend it.
In turn, your print will pop right off of the spring sheet and the best part is that you won’t even have to use additional tools such as glue sticks, hair spray, or scrapers. That way, your prints, and the spring steel will have a longer life.
The printer comes with a much-needed filament runout sensor that can detect the presence of filament within the extruder and automatically pause the printing process in case there’s no filament.
Printers that lack this feature keep on printing despite that there’s no filament in the extruder, which means that you’ll have to start the entire printing process over unless you’re a 3D printer guru and know exactly which line of GCODE your printer ran out of filament.
Anycubic Vyper’s filament runout sensor will automatically bring the printing process to a halt and automatically resume it from the exact point where it stopped upon detecting that you’ve loaded a new strand of filament into the extruder.
Another awesome feature that absolutely no 3D printer should lack is the power panic. The principle of this feature is quite simple: in the event that the power goes out and you’re in the middle of an impossibly large print, the machine will simply pause the print automatically.
Once the power comes back on, the print can resume the printing process. You might need to confirm it on the printer’s touchscreen that you do want to resume the printing process from where it halted, but it’s a small price to pay for saving yourself a lot of time, patience, and even wasted filament.
That would be the end of our description, but if you’re still not sure whether or not you should buy an Anycubic Vyper as your next DIY 3D printer project, then you should definitely check the specifications list below, as it could help you make up your mind about it.
- Printer Technology: FDM
- Printer Dimensions: 508 x 457 x 516 mm
- Build Volume: 245 x 245 x 245 mm
- Print Accuracy: 0.1 mm
- X/Y Accuracy: 0.0125 mm
- Z Accuracy: 0.002 mm
- Nozzle Diameter: 0.4 mm (standard)
- Extruders: 1
- Print Speed: Up to 180 mm per second (recommended 80-100 mm per second)
- Supported Filament Materials: PLA, PETG, ABS, woodfill, TPU, flexible, nylon
- Supported Filament Diameter: 1.75 mm
- Maximum Hotend Temperature: 260 degrees Celsius
- Maximum Hotbed Temperature: 110 degrees Celsius
- Recommended Ambient Temperature: between 8 and 40 degrees Celsius
- Supported Software: Cura
- Supported File Formats: GCODE, STL, OBJ, AMF
- Connectivity: TF card, USB cable (recommended for expert makers only)
- Machine Input Power: 110/240V AC, 50/60Hz
- Machine Output Power: 24V/14.6A (350W)
Don’t forget to change the voltage accordingly during the assembly process, as guided by the assembly instructions. Failing to do so could not only damage your machine but also lead to voiding your warranty, which will make you uneligible for a refund.
To wrap it up, if you’re looking for a DIY 3D printer kit that won’t have you questioning your sanity during the assembly process and comes with a lot of awesome features such as automatic bed leveling, filament runout sensor, and automatic print resuming after a power outage, then Anycubic Vyper is definitely worth checking out.
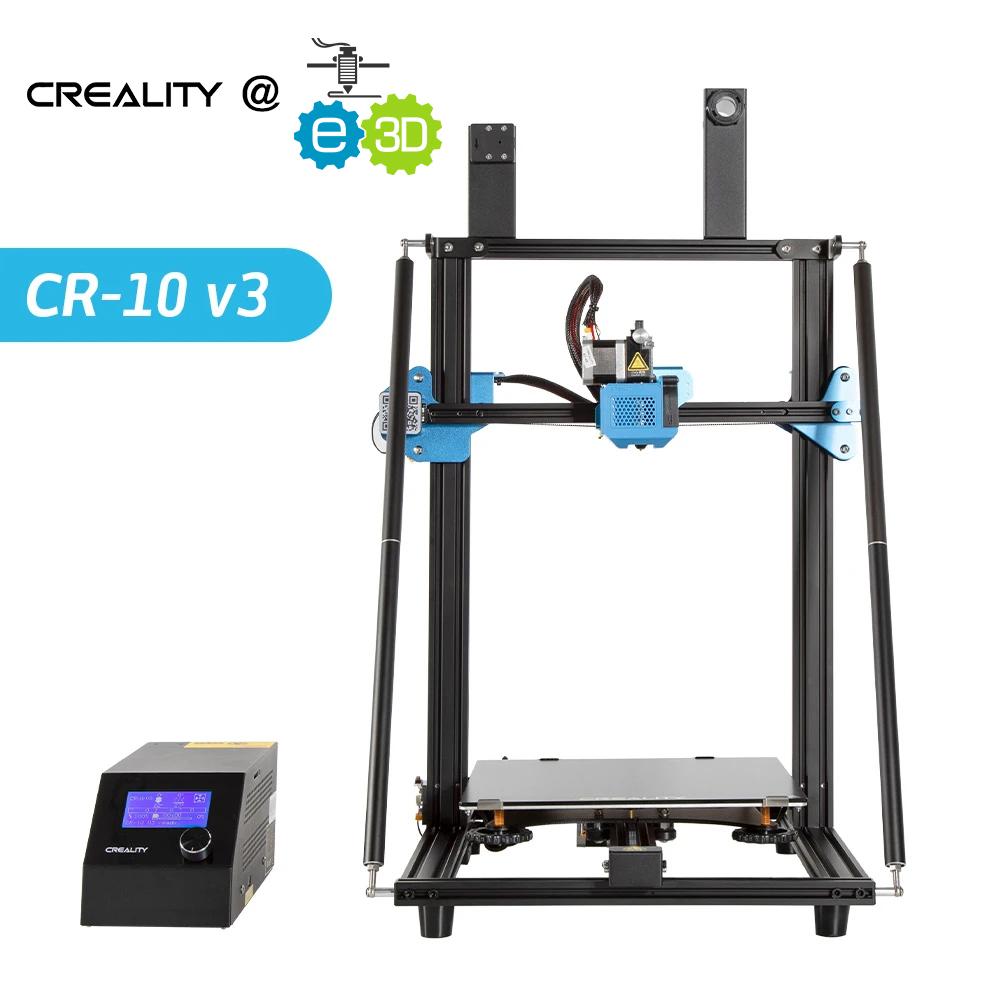
View price on Amazon7. Creality CR-10 / V2 / V3
As you may have grown used to, here’s yet another Creality printer included in our guide, and let me tell you something: there’s a perfectly good reason why Creality keeps making all these appearances in virtually every 3D printer ranking you’ve seen: they’re not only cheap but reliable as well.
As a matter of fact, there are entire communities worth of makers who swear by Creality’s reliability, upgradeability, and efficiency. All of those are of course correlated with the printer’s price, but you get the point; if you don’t want to spend big, but still want reliability, Creality is the way to go.
Now for the CR-10, which is the third Creality product in our guide; the general consensus is that it’s simply the best DIY 3D printer that you could find in that price range. Not only that but this DIY 3D printer kit can be built in just about 45 minutes or an hour (depending on your previous experience).
The Creality CR-10 is an open-source 3D printer, which means that the plans of the machine (firmware, design, mechanical, electrical) are available to everyone for various purposes such as allowing enthusiasts to improve the product or extensive modding done by expert 3D printer engineers.
Creality CR-10’s wide availability paves the way for some awesome community-driven projects. Much like other 3D printers in the Creality family, the CR-10 is highly upgradeable, which means that you can take it apart and put it together extremely easily, and not only that, but you can also choose from a plethora of upgrades to attach to it.
The fact that this printer is highly moddable is perhaps one of the main reasons why there is more than just one model of the CR-10 available on the market. There are, in fact, 3 different versions of the CR-10, and each of them brings more to the table than the previous model (obviously, otherwise they wouldn’t be called upgrades).
If you’re curious about all the different specifications and features that set the three models (CR-10, CR-10 V2, and CR-10 V3) apart, you should check the table we’ve attached below. This could also help you make up your mind about whether or not the CR-10 is the 3D printer you’ve been looking for.
| Creality CR-10 | Creality CR-10 V2 | Creality CR-10 V3 |
|---|---|---|
| Single-port hot end Cooling Fan | Dual-port hot end Cooling Fans | Dual-port hot end Cooling Fans |
| Bowden Extruder | Bowden Extruder (changeable Titan direct drive extruder) | Titan direct drive extruder |
| Manual bed leveling | Manual bed leveling (upgradable to automatic bed leveling) | Manual bed leveling (upgradable to automatic bed leveling) |
| Normal drive | TMC2208 motherboard | TMC2208 motherboard |
| No print resuming feature (in case of power outages) | Print resuming feature (in case of power outages) | Print resuming feature (in case of power outages) |
| No filament sensor | Filament sensor included | Filament sensor with optimized structure included |
| Includes 12V generic power supply | Includes 24V branded power supply | Includes 24V branded power supply |
| Single Z-axis | Dual Z-axis | Dual Z-axis |
| Generic UI | Branded and improved UI | Branded and improved UI |
Now that you’ve got to know what sets the three different Creality CR-10 models apart, we can go back to talking about why this unit might be just what you’ve been looking for, especially if you’re new to the DIY 3D printer kit scene.
What we did fail to mention was that the CR-10 is not exactly a DIY kit, seeing as it includes various parts that are semi-assembled. Therefore, you won’t reach the same levels of frustration as you would with some other machines in our guide, but you’ll still have fun and learn a lot about your new 3D printer while you’re assembling it.
The Creality CR-10 is fairly large, at least when you compare it with other printers in our guide (or on the market, for that matter). It has an impressive build volume of 300 x 300 x 400 mm (12 x 12 x 15.5 inches) that will enable you to print even the largest objects in your project portfolio without skipping a beat.
That way, you won’t have to improvise or find workarounds to compensate for your printer’s reduced build volume such as printing multiple parts and attach them together, or changing the orientation of the objects and use an ungodly amount of supports. You just print them as they are and that’s about it.
The Creality CR-10 3D printer comes with a Bowden extruder design that’s specially crafted to keep the weight on the X-axis at a minimum. Aside from keeping the 3D printer’s lifespan as long as it can be, the weight-reduction feature is also incredibly helpful for increasing performance, especially for tall printed objects.
This unit is built on an all-aluminum frame so as to provide the printer and all of its parts with increased stability and sturdiness. There’s a V-Slot wheel design (available on various other printers) that’s crafted out of thermo-plastic and ensures dimensional stability, even if you’ve been using the 3D printer for a long time.
Furthermore, the fact that this 3D printer doesn’t rely on metal-on-metal steel rods and instead uses the thermo-plastic V-Slot wheels reduces the level of noise that the machine generates by a great deal. Therefore, you’ll be able to create your favorite projects without being disturbed by annoying grinding noises or trepidations.
Unlike some of the other DIY 3D printer kits in our guide that feature magnetic, removable spring metal sheets, Creality CR-10 boasts a glass bed which should get rid of various issues such as non-adhesion, warping, or difficulty removing the printed model from the printing surface.
The glass bed is flat, and we all know that you can’t really bend glass, so either it breaks or it stays flat, as it was designed. Thus, with Creality CR-10’s glass bed you can say goodbye to uneven print surfaces or even warped beds.
However, and this is a big however, despite the long way this printer has come (at least if you compare it to some of Creality’s previous models), it still has those rotary knobs that you’ll need to learn how to use if you want to level your bed.
That’s right, if you hoped that you’ll get automatic bed leveling later down the road from Creality, the CR-10 is still one disappointment in that regard. The first model of the CR-10 doesn’t even come with an official auto leveling upgrade option, so if you were rooting for that feature, you should get the V2 or the V3 and then purchase an upgrade.
Or, if you are the crafty 3D printer engineer type, I guess you could think of a way to adapt an automatic bed leveling sensor to the original CR-10 as well. After all, one of the things that Creality printers are famous for is their upgradeability.
Now for the other two convenience features we’ve kept mentioning above, namely the power panic (resumes prints in case of power outages) and the filament runout sensor. The bad news is that the original CR-10 lacks them completely, so you may want to stick with one of the two later models if you’re not willing to compromise on them.
It’s worth mentioning that the Creality CR-10 V3 has the upper hand when it comes to the filament sensor, seeing as it has an optimized structure, making it able to detect when the filament runs out in a more efficient manner than the V2 or the original CR-10 (which lacks this feature entirely).
Having a filament runout sensor is crucial if you want to be able to step outside of your workspace while your printer is running and you’re not sure whether or not you have enough filament on your spool.
The CR-10, which lacks the filament sensor, would simply continue to print, even though nothing would come out of the extruder. The V2 or V3, on the other hand, would simply pause and notify you that there’s no filament left in the extruder, and won’t resume the print until you load another spool.
The power panic speaks for itself, as it’s one of those features that could save you from a lot of anger, frustration, as well as wasted time and filament. In case there’s a power outage and you’re in the middle of a 40-hour print, a printer that doesn’t have a power panic module would simply shut down.
Upon being powered back up, your print would be wiped into oblivion, so you’d have to start again, praying this time that the power won’t go out once more. Alternatively, you could go into the GCODE and resume your print from the precise line where it went out, but you’d have to be an expert user to accomplish that.
CR-10 lacks the power panic feature, but the later models (both the V2 and the V3) encompass it, and it works great on them. So, if you are using the CR-10 V2 or the CR-10 V3 and you’re in the middle of a long print (or not necessarily) when the power goes out, all you have to do is wait for the power to come back up and confirm on your 3D printer’s display that you want to resume the print.
If you’re still having a hard time figuring out what’s the perfect DIY 3D printer kit for you, but you’re somewhat interested in the Creality CR-10 one, let us help you make up your mind about it by showing you a list of its technical specifications:
- Technology: FDM
- Printer Dimensions: 600 x 590 x 610 mm
- Build Volume: 300 x 300 x 300 mm
- Printing Speed: normal 60 mm per second, maximum up to 100 mm per second
- Supported Materials: PLA, PETG, TPU, ABS, nylon, copperfill, carbon fiber, flexible
- Supported Filament Diameter: 1.75 mm
- Nozzle Diameter: 0.4 mm
- Hotend Temperature: up to 250 degrees Celsius
- Heat Bed Temperature: up to 75 degrees Celsius
- Supported Software: Cura, Repetier-Host, Simplify3D
- Supported File Formats: GCODE, STL, OBJ
- Power Input: 110V/240V
- Power Output: 12V/24V, 270W
Note that during the assembly you may have to switch to the correct power input level (voltage) according to your electrical setup. If you don’t do so before you connect your 3D printer to a power outlet, you may damage the machine and void your warranty, making you uneligible for a refund.
To wrap things up, if you want to purchase a DIY 3D printer kit and don’t know where to start, the Creality CR-10 can be a great asset for your activity. It goes without saying that the V2 and V3 models of the CR-10 series are better than the original, but if you want a bargain and don’t care much about features, you might as well just go with the original.
All three models are easily upgradeable, and all of them boast the exact same build volume and the price differences between them are not exactly huge. If you want to learn more about what sets them apart from one another feel free to check the comparison table we’ve included above.
View price on Amazon8. Prusa Mini+
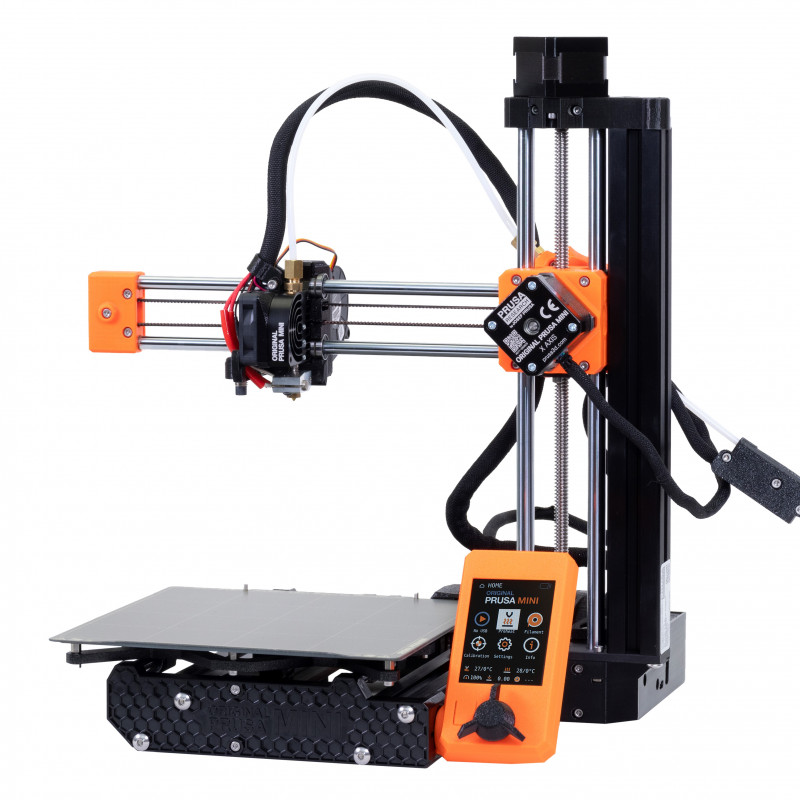
Prusa Mini+ doesn’t, or at least shouldn’t need any introduction, considering that they’re the creators of one of the most reliable 3D printers on the market, the Prusa i3 MK3S+ that we’ve also included in this guide.
The Prusa Mini+ is actually a smaller version of the wildly popular model that we’ve briefly mentioned above and it’s a machine that can provide you with lots of hours of fun. Among the things that Prusa printers are largely known for is their reliability.
Their components come pre-calibrated from the factory so that you won’t have to spend hours finding the perfect fit for them. Much like the Prusa i3 MK3S+, the Prusa Mini+ comes in two flavors: a DIY kit that you’ll have to put together or the already assembled 3D printer.
As you’d expect, the kit is a bit cheaper than the fully assembled unit, and it makes sense considering that you’ll have to put some elbow grease into it before you can reap the rewards of having a 3D printer. However, we’re guessing that you’re more interested in the DIY 3D printer kit, since, you know, this is the main topic of this guide.
However, here’s an interesting thing: the assembled version of the Prusa Mini+ is not fully assembled; it’s actually a three-piece assembly that you’ll have to put together, but let’s face it, it’s chapters away from being a truly DIY project. However, if you want to go for the 3-piece assembly, you’ll have to reach deeper into your pockets and find an extra 50 bucks.
Moving on, we’ve mentioned that the Prusa Mini+ is a smaller version of the i3 MK3S+ and this greatly reflects in the price of the unit. Currently, you can buy a Prusa Mini+ for half of what you’d pay if you were to buy the i3 MK3S+.
In turn, you get a smaller build surface of only 18 x 18 x 18 cm (7 x 7 x 7 inches), no sensor filament (you can still buy it separately for only $20), PTFE tube-based 3:1 gearing extruder, no power panic, and no support for carbon-filled filaments.
If you’re interested in finding out more about the main differences between the Prusa Mini+ and the Prusa i3 MK3S+, you should check out the table below.
| PRUSA MINI+ | PRUSA i3 MK3S+ | |
|---|---|---|
| Build volume | 18 x 18 x 18 cm (7 x 7 x 7 inches) | 25 x 21 x 20 cm (9.84 x 8.3 x 8 inches) |
| Layer Height | Between 0.05 and 0.25 mm while using a standard 0.4 mm nozzle | Between 0.05 and 0.35 mm |
| Maximum Travel Speed | More than 200 mm per second | More than 200 mm per second |
| Maximum Temperature | Up to 280 °C / 536 °F (hotend) Up to 100 °C / 212 °F (heatbed) | Up to 300 °C / 572 °F (hotend) 120 °C / 248 °F (heatbed) |
| Mainboard | Custom 32-bit Buddy electronics with STM32 and latest Trinamic 2209 silent stepper drivers | Einsy RAMBo 8-bit board with Trinamic 2130 drivers co-developed with Ultimachine |
| MMU2S Support | No | Yes |
| Extruder | Bowden 3:1 gearing extruder system | Direct drive |
| LCD Screen | 2.8-inch 65k color screen | Monochromatic LCD |
| Print Surface | Magnetic heatbed with removable PEI spring steel sheets | Magnetic heatbed with removable PEI spring steel sheets |
| Filament Diameter | 1.75mm | 1.75mm |
| Nozzle Diameter | 0.4mm (default) / supports other nozzle diameters | 0.4mm (default) / supports other nozzle diameters |
| Supported Materials | Any thermoplastic except Carbon filled | Any thermoplastic including Nylon and Polycarbonate |
| Filament Run-Out Sensor | Optional upgrade (bought separately) | Yes (IR) |
| Power Panic | Future software upgrade Single layer accuracy | Hardware-based Single G-code line accuracy |
| Ethernet Connectivity | Yes | Via Raspberry Pi |
| Wi-Fi Connectivity | Separate future upgrade (ESP Wi-Fi module) | Via Raspberry Pi |
| Advanced Sensors | 3 thermistors + SuperPINDA, fan RPM sensors | 3 thermistors + SuperPINDA, fan RPM sensors |
| Farm Mode | Yes (upcoming feature) | No |
| Calibration | Automatic, Mesh Bed Leveling | Automatic, Mesh Bed Leveling |
| Print File Transfer | USB drive / LAN | SD card |
| Firmware Update | USB drive / LAN | USB port |
| Power Supply | 160W, external adapter by Mean Well or Delta (depending on the region) | 240W, custom made by Delta with Power Panic HW |
Now that you’ve acknowledged the main differences between the two 3D FDM printers, we can focus more on what Prusa Mini+ has to offer. One of the most important features of the Mini+ is the SuperPINDA sensor.
This sensor is merely a temperature-independent probe that helps ensure that the first printed layer is always consistent. The fact that it’s temperature-independent means that it’s not affected by temperature drifts, making it extremely precise.
Its utility shines bright in a wide variety of scenarios, but one that’s more common than others is the one where you’re running several prints in quick succession but you set the Live Adjust Z value with a cold printer. Prusa Mini+’s SuperPINDA sensor will save you from that unpleasant situation.
Prusa Mini+ also features a series of upgrades compared to its predecessor, the Prusa Mini (sans the +). For instance, the previous model had a bunch of U-bolts that were there to secure the Y-axis bearings. Instead of them, the Prusa Mini+ uses a set of metal clips that are not only easier to mount, but also support the bearings in a better way.
Furthermore, this 3D printer also boasts sensorless homing, replaceable nozzles, automatic Mesh Bed Calibration, USB printing (no more SD cards), as well as a full-color (65k) 2.8-inch LCD screen. All of these features combined make you feel like the Prusa Mini+ is not a product of compromise living in the shadow of a greater unit, but a fully-fledged 3D printer that’s been designed in a smaller frame.
The 2.8-inch 65k color LCD screen helps you configure your 3D printer without breaking a sweat and also check out previews of your sliced models before you initiate the printing process. This is quite important considering that compatibility issues between a slicing software and a 3D printer could ruin your prints without any prior notice.
Let’s get things straight, the LCD screen won’t magically snap its fingers and eliminate all the issues that you might get from your slicer, but it will at least let you check out a preview of the model so that you know if there’s something wrong with your model before starting the printing process.
Prusa Mini+ also features Ethernet RJ45 connectivity, so that you can send files to the printer or download firmware updates. Right now it doesn’t come with wireless connectivity, but this will be possible in the near future through an optional ESP Wi-Fi module upgrade.
Safety-wise, the Prusa Mini+ offers unmatched measures and each of its components is thoroughly tested before being packed and sent your way. The unit has three thermistors and boasts a high-quality PSU (either Delta or Mean Well PSU, depending on your region) for increased reliability and safety.
This unit’s reduced size might be a bit off-putting at first, but after you realize that you could definitely stack several machines on a single shelf or even create a 3D printer farm, you’ll probably come to appreciate it. The size of the Prusa Mini+ is only 38 x 33 cm (15 x 13 inches), making it perfect for you if you don’t have much space to spare.
Much like its bigger version, Prusa Mini+ boasts a magnetic heatbed as well as removable spring steel sheets. This means that you can remove printed objects by simply removing the steel sheet and slightly bending it. Cleaning and re-vitalizing the steel sheets can be done without breaking a sweat as long as you have isopropyl alcohol.
Did we mention that the Prusa Mini+ is extremely intuitive? All you have to do to start a printing project is simply slicing the object and inserting the USB drive that’s holding the sliced file (GCODE).
The 3D printer will automatically display a menu with an object preview window where you can check if there’s anything wrong with your model. If everything’s alright, you just have to confirm your selection with a single tap of the control knob and wait for the printer to complete your project.
Prusa has performed several modifications on this unit to keep the price at a minimum and increase overall convenience. One of these improvements is moving the extruder motor on the Z-axis column and choosing a 3:1 drive gear ratio to decrease the overall weight of the unit.
The extruder feeds the 1.75 mm strand of filament through a PTFE tube to the hotend and ultimately through the 0.4 mm nozzle. It’s worth mentioning that the PTFE tube isn’t available on the i3 MK3S+, and it’s a part that needs proper maintenance every once in a while.
If somehow you’re not exactly convinced that the Prusa Mini+ is just what you need as a DIY 3D printer enthusiast, then you should definitely check out Prusa Mini+’s extensive list of specifications below:
- 18 x 18 x 18 cm (7 x 7 x 7 inches) build volume (X x Y x Z)
- 38 x 33 x 38 cm (15 x 13 x 15 inches) printer dimensions (X x Y x Z)
- 4.5 kg printer weight
- 2.8 inches 65k color screen that offers a GCODE preview window
- X and Y axes feature sensorless homing mode
- 256 microstepping Trinamic drivers
- 3 thermistors
- Fan RPM sensors
- 3:1 gearing Bowden extrusion system
- Temperature-independent SuperPINDA probe that’s immune to temperature drifts
- Ethernet RJ45 connectivity
- Future optional support for ESP Wi-Fi connectivity through module upgrade
- Low-noise Trinamic 2209 stepper drivers
- 32-bit “Buddy” mainboard
- Removable magnetic spring steel sheet for easier print removal
- Preheats PLA in 1 minute and ASA in 3 minutes
- Supports various materials, including PLA, ASA, PETG, ABS, Polycarbonate (PC), PVA/BVOH, Polypropylene (PP), Flex, nylon, nGen, and woodfill
To wrap it up, if you’re looking for a cheap DIY 3D printer kit that will also provide you with incredible reliability, top-notch components, and high-quality printed objects, then the Prusa Mini+ is definitely worth checking out.
View price on Amazon9. Prusa i3 MK3S+
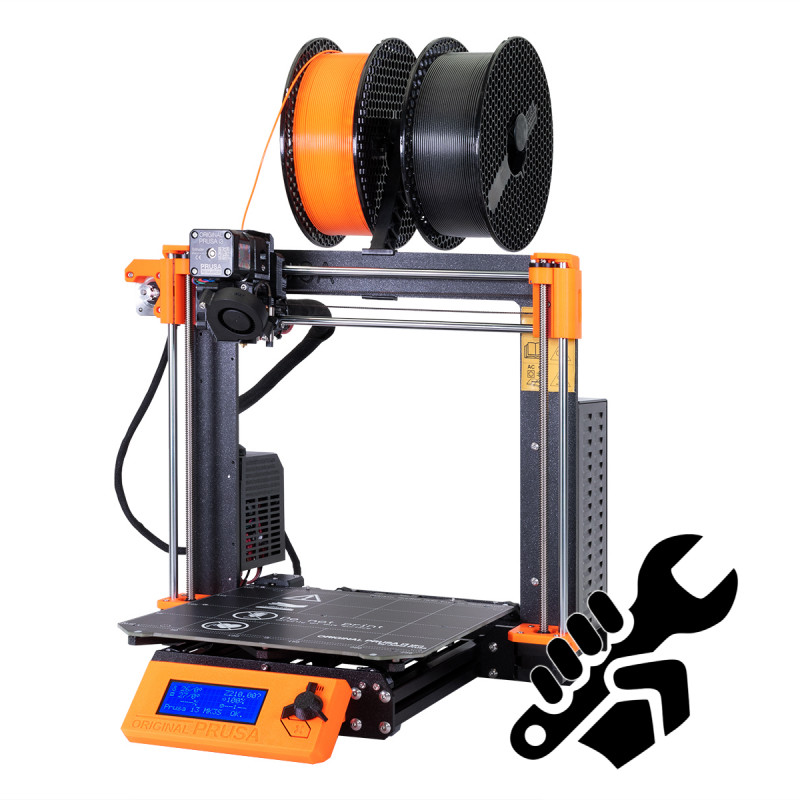
If you read the description of the other Prusa 3D printer in our guide above, then you probably know what you can expect from the i3 MK3S+, the model that inspired the Mini+. Nevertheless, Prusa managed to make quite a name for itself in the past few years and quickly established their position as the manufacturers of one of the most reliable 3D printer on the market.
The machine we’re talking about, of course, is the i3, but this unit didn’t have all the bells and whistles you can find on its latest model from the beginning. No, in fact it was a tedious and exciting project that got Prusa customers waiting patiently for news and announcements.
First of all, the Prusa i3 MK3S+ is truly a DIY 3D printer kit. That is, unless you want to go with the fully assembled unit, which is also alright with us, but then why are you reading a guide for DIY 3D printer kits to begin with?
Getting back to our sheep, we were saying that this is truly a DIY kit, and the main reason we’re saying that is the assembly instructions. Unlike some other printer manufacturers we’ve included in this guide, Prusa took its job seriously and created intuitive, descriptive, in-depth instructions for its tinkerer-type customers.
In fact, it may be worth mentioning that the assembly instructions manual is actually a book and it has no less than 130 pages (or so) comprising crystal-clear instructions, tips, tricks, and helpful recommendations at most of the steps.
That way, the chances that you’ll overtighten a screw, connect a cable where it doesn’t belong or misaling crucial components become slim to none. The instructions are carefully divided into categories, and then there are sub-categories, and not to mention the high-quality pictures that show you exactly where everything goes.
Oh, and Haribo bears; if you buy a Prusa i3 MK3S+ kit, you’ll get a bag of Haribo gummy bears and you’ll also be advised not to consume them all at once, but instead separate them into several groups and eat them according to the difficulty of the chapter you’re currently at. But enough about gummy bears, you’re here to learn about the i3 MK3S+.
The Prusa i3 MK3S+ is one of the most popular RepRap 3D printer kits and it sports a generous build volume of 250 x 210 x 210 mm. If build volume is not a thing that you’re willing to compromise on, then we’d suggest you to find a different 3D printer DIY kit in our guide, seeing as some models we’ve listed here have an almost-double build volume.
If reliability, sturdiness, and print quality are more up your alley, then stick with us and we’ll tell you everything that your Prusa i3 MK3S+ can help you achieve. The Prusa i3 MK3S+ is highly upgradeable, but not in a Creality kind of way.
When a new model comes out, you can just order an upgrade kit that will bring your 3D printer to its latest version instead of buying the entire package. The pieces you’ll receive will also come with a comprehensive list of assembly instructions that will cover both taking your old printer apart and installing the new pieces in a quick, intuitive manner.
The latest upgrade brought Prusa i3 MK3S a brand new SuperPINDA probe that is designed to help you with the annoying first layer calibration process that never seems to go right from the first try. The SuperPINDA sensor is temperature-independent, which basically means that it won’t be affected by changes in temperature such as drafts.
The SuperPINDA probe packs a high-quality sensor that can help you achieve a trully fully-automated mesh bed leveling process, so you won’t have to spend time manually adjusting levers, knobs, and cogs.
Before every print starts, the unit moves the printing head that holds the SuperPINDA probe and checks in several places if the bed is leveled. Furthermore, during this process the probe also creates a virtual heightmap of the print area so as to ensure that your first layer will be calibrated to perfection.
Furthermore, upgrades also include high-quality Misumi bearings, a brand new set of improved metal clips that will hold the Misumi bearings into place, a reworked X-axis belt-tensioning mechanism, reinforced X-end plastic components, and an upgraded filament path in the extruder to ensure compatibility with more pretentious types of filament such as flexible, ABS, nylon and carbon fiber.
Prusa i3 MK3S+ has Genuine Gates belts, an EINSY RAMBo motherboard, an IR filament sensor to detect whether there’s filament available inside the extruder, a power panic mode, as well as Bondtech drive gears. All of these features contribute to an absolutely amazing process with incredible accuracy and high-quality prints.
Some common issues with 3D printers include reduced print adhesion and not being able to remove printed objects from the printing surface without damaging either the surface you’re printing on or the printed object itself. Thanks to Prusa i3 MK3S+’s removable spring sheets, this issue can become history.
Not only you’ll be able to remove print sheets so that you can clean them and maintain them more easily, but you’ll also remove the printed objects without fear of breaking them by simply bending the print sheet slightly.
Prusa offers three types of print surface: smooth, satin, and textured. These surfaces can cover most, if not all of your 3D printing needs, regardless of what material you’re using. However, you can only select one of the sheets at the same price. If you want both of them included, you’ll have to cough up an extra $35.
Prusa i3 MK3S+’s Y-axis assembly is aluminum-extruded and features a milled Dural frame to provide you with increased stability, rigidity, and ease-of-assembly. The printer’s frame combined with the Bondtech-gear extruder and the E3D V6 hotend can ensure you’ll always have accurate, high-quality prints of up to 210 mm in height.
The machine’s power panic mode can save you from a lot of anger, frustration, and probably even wasted filament, seeing as it can efficiently detect power interruptions, saves the last known location of the printing head, and shuts down heating on the hotend and heatbed.
Once the power comes back on, the printer will ask you if you want to resume the last unfinished print. Upon confirmation, you’ll notice that the printer will go ahead and continue the print as if no power outage event ever occured.
Now speaking about sensors, we’ve already told you that the Prusa i3 MK3S+ has a filament runout sensor, and this tiny component can also help you avoid failing prints due to running out of filament mid-way through the process.
The filament sensor installed on the i3 MK3S+ relies on a trustworthy trigger system that can detect whenever you insert a strand of filament into the extruder, regardless of material and/or color. Furthermore, the system automatically feeds the filament through the extruder, so you won’t have to turn knobs or pull levers to achieve that. Everything is quick, easy and automated, just the way it should be.
Prusa i3 MK3S+ features Trinamic 2130 drivers and a fan that doesn’t generate a lot of noise. That way you can enjoy a silent printing operation and you won’t have to move far away from the printer each time it runs. Furthermore, this unit also features a stealth printing mode that you can use if you plan on leaving it running overnight.
Prusa i3 MK3S+’s stealth mode isn’t as fast as its normal mode, but it gets the job just right and is truly silent. Last, but not least, the Prusa i3 MK3S+ 3D printer comes with proprietary software that packs fully-tested, in-house made profiles for all of Prusa’s 3D printers.
Furthermore, the slicer software also includes a plethora of profiles for filaments, as well as advanced tools such as cutting, automated object distribution, advanced support generation, and ironing that you can easily use.
Prusa also released a multi-material upgrade that you can use with some of its 3D printers. More so, this upgrade has already reached its second iteration, now being called the Multi-Material Upgrade 2.0 or the MMU2.
Now here’s the kicker: unlike the Mini+, the i3 MK3S+ fully supports the MMU2, which means that you can use this unit to print with more than just one type of filament. In fact, you can use the MMU2 to print with up to 5 colors or filament types at the same time.
The MMU2 has a redesigned body that boasts a rotating pulley barrel as well as a single extruder motor. There’s also a selector head that has a filament-cutting blade that will automatically load and unload filaments as instructed.
Not only can the MMU2 work with generic materials such as PLA, PETG, or ABS, but it also supports soluble supports such as PVA or BVOH, which is truly a game-changer considering that you can easily detach prints from their supports by simply dunking them in water.
In case you’re still on the fence about buying a Prusa i3 MK3S+ DIY 3D printer kit, you might want to check the specifications table below; it could help you make a decision faster.
- Technology: FDM
- Printer Dimensions: 500 x 550 x 400 mm (19.6 x 21.6 x 15.7 inches)
- Build Volume: 250 x 210 x 210 mm (9.84 x 8.3 x 8.3 inches)
- Layer Height: between 0.05 and 0.35 mm
- Nozzle Diameter: 0.4 mm standard size (supports wide range of nozzle diameters)
- Maximum Travel Speed: 200 mm per second
- Maximum Hotend Temperature: 300 degrees Celsius (572 degrees Fahrenheit)
- Maximum Heatbed Temperature: 120 degrees Celsius (248 degrees Fahrenheit)
- Print Surface: removable magnetic steel sheets and heatbed with cold corner compensation
- Extruder: Direct Drive, E3D V6 hotend, Bondtech gears
- Controller: EINSY RAMBo 8-bit mainboard and Trinamic 2130 drivers, sensorless homing for XY-axis
- Display: monochromatic LCD screen with rotary knob for control
- Supported Materials: PLA, PETG, PC (Polycarbonate), PP (Polypropylene), ABS, nylon, carbon filled, nGen, CPE, PVA/BVOH, HIPS, PVB, Flex, ASA, woodfill, and others
- Supported Filament Diameter: 1.75 mm
- Mesh Bed Leveling: automated leveling with advanced SuperPINDA temperature-independent probe before each print
- FilamentSensor: built-in IR sensor that supports loading filament automatically, and pauses print when filament runs out
- Power Panic: hardware-based power panic with single GCODE line accuracy
- Print Sheet Profiles: printer supports print sheet profiles where it stores Live Z calibration data so you can switch quickly through different print sheets
- Calibration: SelfTest, Mesh Bed Leveling, automatic calibration
- Connectivity: SD card, Ethernet (via Raspberry Pi), Wi-Fi (via Raspberry Pi)
- PSU: Delta PSU with hardware-based power panic
- Advanced Features: steel sheet profiles, Octoprint compatibility, automatic filament loading, filament sensor, power panic
As you can see, there are more than enough specifications that can help you make a decision about whether or not the Prusa i3 MK3S+ can be a valuable asset to your 3D printing operation. Furthermore, there’s also the chance that more features could be added alongside future updates.
All things considered, if you’ve been searching for a stable, reliable, upgradeable, fast DIY 3D printer kit, then the Prusa i3 MK3S+ is definitely what you’ve been looking for. It’s one of the most popular and fan-favorite 3D printers on the market and for good reason, too.
If you’re not exactly convinced that the Prusa i3 MK3S+ is what you need or you feel like it’s just a bit too pricy for your tastes, you should check the Prusa Mini+, which is basically a cheaper, smaller, yet equally-competent version of the i3 MK3S+, only with a smaller build volume and no support for the MMU2.
10. Peopoly Moai
This is the most expensive unit in our guide, but it’s also unique in its way, seeing as it’s the one and only SLA 3D printer kit that we’ve included in here. As you may know, SLA printers (better known as resin 3D printers) are not exactly cheap, so it makes sense that we’ve left it for last, considering its price range.
Furthermore, another interesting thing about SLA printers is that they’re not usually kits, meaning that you receive them fully-assembled, take them out of the box, put them down on your desk, fill the resin tank, power them up and start printing amazingly detailed projects.
Peopoly Moai is not your usual SLA printer, considering that you need to assemble it before you start printing with it. It’s well worth mentioning that assembling the kit will take about 5 hours of your time, so it’s not the easiest kit to assemble, either.
The assembly time also involves that there are not a lot of pieces that are pre-assembled, so if you’re the tinkere type that gets enthusiastic while putting together DIY projects, then the Peopoly Moai 3D printer is really something to look forward to.
You can probably find a version of this 3D printer that is already assembled if you look close enough, but we doubt that you’d be interested in a fully-assembled version since you’re browsing products in a guide that mainly promotes DIY 3D printer kits.
This SLA 3D printer kit offers you a build volume of 130 x 130 x 180 mm, so if you’re into printers with large build volumes, we suggest you keep on looking (actually you should go back a few steps, since all other printers are listed above) and reconsider your choice.
On the other hand, if you’re well-versed in the ways of 3D printers, you may already know that SLA printers are not exactly popular for their huge build volumes, so it makes sense that they’re not as generous as FDM (filament) 3D printers when it comes to print volume.
This unit also has a 70-micron laser spot, which is also quite impressive considering the printer’s price range. Yes, it does cost a bit north of $1,000, but you’ll get great accuracy and an increased quality of the objects you’re trying to print. Increased print quality translates into fewer layer lines or lines that are not exactly visible to the naked eye, and this is something every maker yearns for.
Peopoly Moai also boasts an FEP resin vat that will ensure your prints will be highly durable. Durability is yet another thing that resin prints are not exactly popular for, so the fact that the FEP vat can boost this parameter is definitely a well-appreciated improvement you could get from your SLA printer.
One of the greatest setbacks that makers have to deal with is leveling the printing surface in an optimal manner. This essentially means that you need to make sure that the bed doesn’t have an offset so that your prints will come out looking flawlessly as opposed to suffering from warping or incorrect positioning.
The Peopoly Moai 3D printer encompasses an EZ-level plate so that you can benefit from leveling the surface in a quick, effortless manner, as well as extra volume (not a lot though) for your resins. Long story short, this combination of features is definitely something you’d want from your SLA printer.
On the Peopoly Moai you can also find a heater component that is sensor-controlled. This heater’s purpose is to keep the resin at an optimal printing temperature of between 20 and 30 degrees Celsius without you having to intervene in any way. The fact that the heater is controlled by a sensor means that the entire process is automated and requires no assistance on your side whatsoever.
This machine has an impressive resolution of only 5 microns layer height, which means that it can create objects with an incredible level of detail, seeing as even small details on various objects can be generated by Peopoly Moai without significant effort.
Some parts of the post-curing processes are already covered by the Peopoly Moai 3D printer, as the machine features an UV LED light source. That way, you won’t have to rely on an external UV LED light source to place your printed objects into in order to enhance their overall appearance and feel.
One thing that most SLA printers can’t handle is printing via GCODE, so it’s definitely a relief to learn that Peopoly Moai completely supports printing from GCODE. This is incredibly convenient especially if you’re familiar with FDM printing since you can use slicer software solutions such as Cura or Simplify3D to slice your objects before printing.
Another interesting thing is that usually resin printers (and not only) are vendor-locking their product to some specific brands of resin, usually ones that are self-produced by the manufacturer of the unit. However, Peopoly Moai is truly compatible with several other resins, meaning that you can keep printing costs at a minimum by going for cheaper resins, and also increase the applicability of the printer by trying specialty resins, as well.
We told you at the beginning of this description that the Peopoly Moai 3D printer is truly a DIY kit, and we’ve got yet another perk that you may get excited about, especially if you’re the tinkerer type. This machine provides you with fully customizable settings regarding the exposure of the laser.
That way you’ll be able to experiment with different settings, which is an amazing deal if you’re not exactly fine with using a bunch of pre-determine settings for your resin. On the other hand, if you don’t feel comfortable adjusting these parameters, the default profiles will work just fine, so you can also use those instead.
If you’re not exactly convinced that you need to stick to Peopoly Moai as your next DIY 3D printer project, then maybe this list of this machine’s technical specifications will help you make a decision faster:
- Technology: SLA
- Printer Dimensions: 250 x 250 x 630 mm
- Build Volume: 130 x 130 x 180 mm
- Laser Power: 150 mW
- Laser Wavelength: 405 nm
- Resin Compatibility: any resin that can be cured by 405 nm UV light
- X/Y Resolution: 70 micron
- Z Resolution: 15 micron
- Supported Formats: GCODE
- Processor: ST 32-bit ARM processor
- Input Power: 100-240V 50/60 Hz 2.0A
As you can see, there’s not a lot to work with in terms of technical specifications, but the build volume of this machine is quite generous, and you can get quite detailed prints with it. The price tag may be the only thing you might want to complain about, but the fact that resin printers are usually more expensive than their FDM counterparts is common knowledge.
The Peopoly Moai 3D printer is an absolute catch if you’re ready to spend just a bit north of $1,000 for an SLA 3D printer DIY kit. Unlike some other products on our list, the Peopoly Moai is truly a DIY kit, so you’ll need to actually assemble it before you can use it.
FAQ
Can you DIY a 3D printer?
If you mean whether or not you can buy a 3D printer kit that you can put together by yourself just as you would virtually any piece of furniture you buy from stores like IKEA, then yes, you can absolutely DIY a 3D printer. On the other hand, if you mean whether or not you can source parts for a 3D printer that you can put together on your own, the answer is also yes, but you’d have to be crafty, know exactly what components you need, and find a fitting firmware for your DIY 3D printing machine.
Is it illegal to own a 3D printer?
Absolutely not, 3D printers are not at all illegal to own. In fact, there are several educational programs that not only promote the idea of having a 3D printer in your house or school that you can work on, but also teach you how to build your own 3D printer, configure and calibrate it properly, and get high-quality prints each time. However, there’s a series of items that are not legal to print, such as firearms and copyrighted stuff that you plan on selling.
How much does a DIY 3D printer cost?
The answer to this question depends on a series of factors, including but not limited to the build volume of the printer, the technology deployed by the printer, print accuracy, assortment of supported materials, layer height, stability, sturdiness, upgradeability, and presence of advanced features such as power panic, filament runout sensor, and sheet profiles. A DIY 3D printer kit can cost anything between $189 and a few thousand bucks, depending on what your requirements are.
Are DIY 3D printers worth it?
If you’re into 3D printing and want to save a bunch of money on the actual unit, going with a DIY 3D printer kit is one of the best ways to tackle this situation. You’ll get an equally-capable 3D printer for a smaller sum of money, but you’ll actually have to assemble it by yourself. Some would argue that getting a DIY 3D printer kit is actually better for you as a maker, since you also learn a lot about the way these machines work and could be better prepared in the event that something goes wrong and you’d need to troubleshoot and fix an issue with the unit.
How much does a resin printer cost?
It depends on the capabilities of the actual 3D printing unit, but the price can vary from a few hundred dollars to a few thousands.
Can any 3D printer print resin?
No, currently there are two types of 3D printers: ones that use filament that’s wound around a spool, then extrude it layer by layer to create 3D printed objects, and ones that use liquid resin that’s solidified layer-by-layer using a laser. Only the latter are capable of printing with resin.
Which is better FDM or resin?
There is no easy answer to this question, as it highly depends on what your needs from your 3D printer are. So, if you want to create large objects and don’t care much about printing highly-detailed works of art, then obviously an FDM (filament) 3D printer is the best way to go about it. On the other hand, if you don’t plan to create large objects and would pretty much prefer working with incredibly fine detail with your 3D printer, then you should definitely go with a resin printer. Furthermore, it’s also worth mentioning that FDM printing is cheaper than resin printing, and we’re not talking only about the price of the machine; we’re also taking into account the money you’ll need to spend on spools of filament compared to the sum you’d have to pay for bottles of resin. Spoiler alert: spools of filament are always cheaper.
Best DIY 3D Printer Kits – CONCLUSION
To sum everything up, if you’ve wanted to buy a 3D printer, but you’d also like to partake in the assembly process of this machine, you should definitely go for a DIY 3D printer kit, such as the ones we’ve already included and discussed in our guide above.
Almost all the models we’ve included in our guide can be purchased for less than $1,000, except the SLA printer at the end. It’s also worth mentioning that the last item in our guide is also the only one that can print using resin, and it’s not exactly a secret that resin printers usually cost more than their filament counterparts.
In this guide, we’ve focused on various parameters such as price, build volume, ease-of-assembly, print quality, sturdiness, reliability, print resolution, and print speed to bring you only the best 3D printers that you can assembly on your own (for the most part).
Some of the products we’ve listed here are more difficult to put together than others, while some are even available as fully-assembled units, but whatever your technical experience is, we’ve got products to satisfy all of your potential requirements, whether you like tweaking and calibrating every single screw and nut, or you’d rather prefer having pre-assembled units that only need to be put together before you start working.