The Best 3-in-1 3D Printer for Serious Makers (2023 Edition)
If you’re not exactly well-versed in the ways of 3D printing but still have a relatively strong grasp of basic concepts in this field, prepare to have your mind blown when you’ll hear about 3-in-1 3D printers.
What are 3D printers?
To us, 3D printers are somewhat magical. They can turn spools or bottles of boring materials (resin or filament) into various creations, whether they’re toys, figurines, gadgets, works of art, lithophanes, components, or even replacement parts for other 3D printers.
But queue 3-in-1 3D printers, and you’re guaranteed to stare in awe when you find out that they’re not only good at 3D printing (the process we briefly described above), but also at laser engraving and cutting, and CNC cutting and milling. That’s right, these machines seem like they’ve been pulled from a maker’s wildest dream.
Not only can you use 3-in-1 3D printers to create objects from 3D models, but you can also customize these objects by engraving them, or turn a boring piece of mat board into a work of art by sculpting extraordinary details into it. And the best part about it is that you’ll be using the same unit; because with 3-in-1 printers, you only have to replace the printing head with the accessory of your choice, whether it’s the laser or the CNC component.
To eliminate every trace of confusion, we’re going to mention that these machines are also referred to (quite often) as multifunctional 3D printers, AIO (all-in-one) 3D printers, or multipurpose 3D printers. For the sake of keeping things as clear as possible for you, we’re just going to call them 3-in-1 printers, as we believe it’s a more accurate term.
3-in-1 3D Printers – The short story
| 3D Printer Model | Printer Type | Build Volume (mm) | Price* |
|---|---|---|---|
| Snapmaker 2.0 | 3-in-1 3D printer | Varies by model | $1,199-$1,799 |
| Snapmaker Original | 3-in-1 3D printer | 125 x 125 x 125 | $799 |
| ZMorph Fab | 4-in-1 3D printer | 250 x 235 x 165 | $4,000 |
| Creality CP-01 | 3-in-1 3D printer | 200 x 200 x 200 | $819 |
| Ecubmaker TOYDIY | 4-in-1 3D printer | 180 x 180 x 180 | $549 |
| 5axismaker | CNC mill 3D printer | Varies by model | £5,500 / £6,800 |
| Diabase H-Series | 3D printer-CNC hybrid | Depends on number of axes | $9,750+ |
Note that the price of the products in our guide can vary due to location, laws, and regulations, as well as various promotional offers that the manufacturers and distributors of the machines may currently run.
We’ve built this list to serve you as a guide if you’re on the fence about buying a 3-in-1 printer, but you’re not exactly sure about their efficiency, or you don’t know what to expect from such a contraption. Unlike with some of our other guides, we didn’t split the printers into several price-based categories, and the reason is quite simple: the top only has 7 entries.
It’s worth mentioning that we focused on several features and parameters of all the machines that we’ve included in our guide, just to be as thorough as possible and provide you with a comprehensive comparison so that by the end of it you can make an educated choice and even decide whether or not you actually need a 3-in-1 3D printer.
What Is The Best 3-in-1 3D Printer?
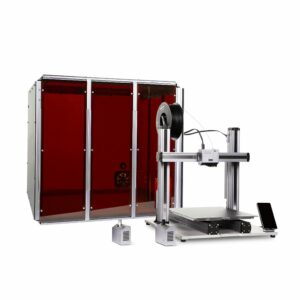
1. Snapmaker 3-in-1 3D Printer (2.0 Model)
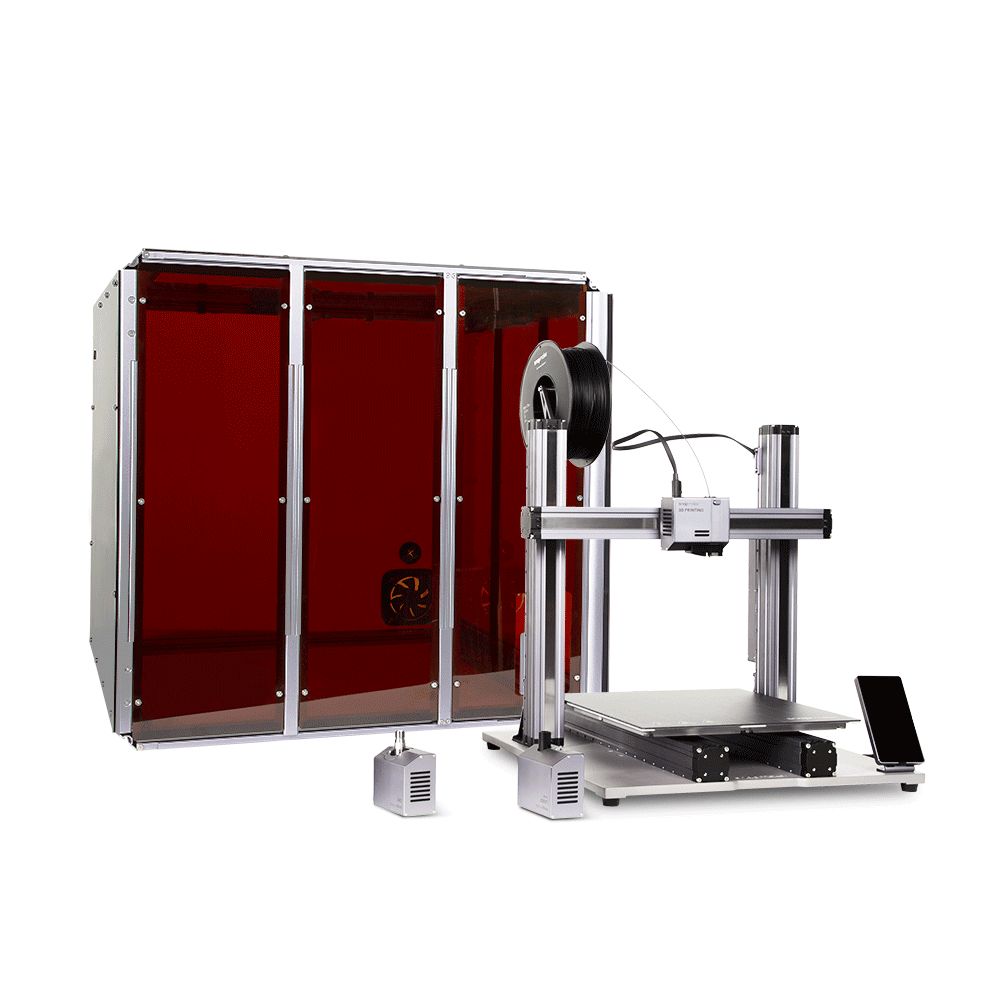
The Snapmaker 2.0 is one of the greatest 3-in-1 3D printers on the market. The reason why so many makers are really enthusiastic about it is that it’s an upgrade to the popular original Snapmaker, and, of course, the fact that you can buy this 3-in-1 3D printer at the price of an above-average 3D printer is also a major game-changer.
Snapmaker 3-in-1 3D Printer Review
But let’s focus on the actual capabilities of the Snapmaker 2.0. First of all, it’s quite important to understand that the Snapmaker 2.0 doesn’t have a standard size. Instead, it comes in three different flavors, as you can see below:
- A150 – 160 x 160 x 145 mm
- A250 – 230 x 250 x 235 mm
- A350 – 320 x 350 x 350 mm
Therefore, if having a greater build volume is paramount to you and your crafting projects, you may want to stick with one of the larger models. Note that if you’re going to pick a larger model, you’ll also have to pay more for it, so this would be a great time to reconsider if one of the smaller models won’t be enough for your projects.
Furthermore, and this is something that’s not entirely clear for many Snapmaker customers, you won’t receive an enclosure by default with your 3-in-1 3D printer. Although most of the pictures on the official website depict the Snapmaker 2.0 within a sleek enclosure, you will have to buy it separately in order to get it or purchase a printer + enclosure bundle.
Even an enclosure for the smallest model (the A150) will set you back €399,00, so you should really ponder whether or not you should go with one of the largest models of the Snapmaker 2.0. Sure, it’d be more fun to work on larger projects and everything, but you’ll also have to pay a lot more for this experience, and unless you’re going to turn a profit from this, it might not be profitable in the long run.
If you decide to go with one of the bundles (you definitely should, since having an enclosure is paramount when you perform laser cutting or engraving), you will get not only the full Snapmaker 2.0 experience but also an increased level of safety and overall convenience for working on your projects.
Snapmaker 2.0 Enclosure
Having an enclosure is not only necessary for your laser cutting or engraving projects, but it’s also of utmost importance for printing with pretentious or temperature-sensible materials such as nylon and ABS. Furthermore, 3D printing with nylon and ABS will result in toxic fumes being released, and an enclosure is a perfect way to keep them, well, you know, enclosed.
One of the greatest features of the Snapmaker 2.0 is that it comes with an air evacuation shaft, where you can just attach a hose and suck the impure air from the enclosure by any means you see fit, whether it’s using a specially designed fan or with an adapted vacuum cleaner.
If you’re absolutely serious about the quality of the air in the room you’re using the Snapmaker 2.0 in, you should know that Snapmaker also sells an air purifier. This air purifier is not included in the bundle, but you might find it recommended somewhere under the bundle’s presentation. It costs roughly €449,00, and it can be attached to the Snapmaker 2.0 enclosure to purify the air that’s inside the enclosure and make sure it won’t pollute the air in your actual room.
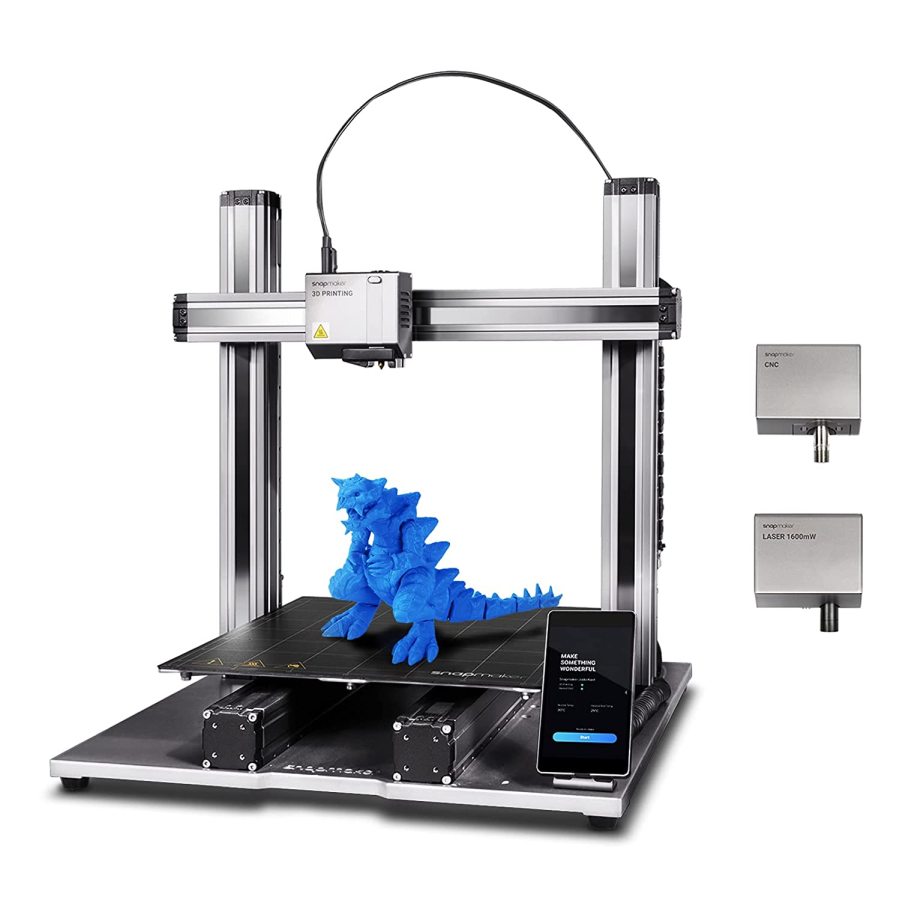
The Snapmaker 2.0 provides you with an unmatched level of intuitiveness, thanks to the touchscreen that’s attached to the enclosure. There’s only one connection from all the systems to the control panel, so whether you’re trying to perform laser engraving, 3D print, or carve into your favorite materials using the CNC head, you’ll be able to access it all from the 5-inch touchscreen.
Snapmaker 2.0 3D Printing
Compared to the original Snapmaker, this unit can handle 3D printing tasks better, considering that the entire system has been upgraded to provide you with better results. There’s a new and improved cooling system, better extrusion components, as well as a quick-release hotend mechanism that will definitely turn 3D printing into a pleasant experience.
Furthermore, you can choose from a wide variety of materials that you can load into the 3D printing head, including PLA, ABS, and even flexible filament. The Snapmaker 2.0 3D printing module lets you choose any layer thickness between 0.05 mm and 0.3 mm so that you can rely on it for a broad range of projects.
This 3-in-1 printer is also equipped with an accurate proximity sensor that it uses to calibrate the heated bed automatically, without any assistance on your side. If you’re the tinkerer type or just want to control each parameter individually, the Snapmaker 2.0 also lets you switch to manual calibration mode and work your magic on the heated bed surface.
Some of the most important features of the Snapmaker 2.0 are the filament run-out sensor and the power panic sensor. The former detects whenever your printing head has run out of filament and pauses the printing process so that you can load a new spool and resume it, while the latter can automatically resume a print that has failed due to power outages.
Note that the quick-release hotend system we mentioned above is actually there to help you remove the printing head and replace it with one of the other tools that are compatible with the Snapmaker 2.0, such as the laser engraver or the CNC milling head, but all of these features are tightly-wound to ensure that you’ll have flawless results every time.
Laser Engraving & Cutting
Now for the laser engraving and cutting part: as we’re sure you’re already aware, the Snapmaker 2.0 can perform laser engraving and cutting. Thanks to its powerful 1600 mW laser module, this 3-in-1 3D printer allows you to engrave and cut a lot of materials, including leather, wood, and plastic.
The Snapmaker 2.0 encompasses a built-in camera that’s paired with a couple of awesome features called the Auto Focus and Camera Capture. This combo ensures that you’ll save a lot of time as you won’t need to focus the laser manually, but it also means that you’ll get optimal engraving results without breaking a sweat.
The Auto Focus feature shows different results of engraving that’s performed at various laser heights so that you won’t have to test multiple times to detect the optimal focal point. This, in turn, enables the printer to automatically select the optimal laser height without any additional assistance on your side.
Camera Capture essentially means that the built-in camera module will automatically snap a picture of the material you’re using as a canvas and uploads it to the printer’s proprietary software solution, the Snapmaker Luban. After getting the canvas loaded in the program, you can import an image to it and work from there.
It’s possible to import an image and edit it directly on the imported canvas and then engrave the final image that’s displayed in the program by simply pressing a button. The results you see in the Snapmaker Luban software tool will be the same results you’ll get from the actual 3-in-1 3D printer.
The fact that a laser can harm you shouldn’t be a secret to you, especially if you’re considering purchasing a machine that can burn designs into various objects using a laser. That’s precisely one of the reasons why you’ll definitely need an enclosure for the Snapmaker 2.0, seeing as the panels and doors of the enclosure are created from brown acrylic, which can protect you from the harmful effects of the laser.
If you go for the bundle, you’ll also get a pair of OD6 laser safety goggles, which can further improve your level of protection. Last, but not least, as we’ve already mentioned, the Snapmaker 2.0 enclosure has a controllable fan that can extract fumes that are generated during laser engraving or 3D printing and evacuate them outside of the enclosure.
Snapmaker 2.0 CNC Carving
Finally, the CNC carving module is the final component of the Snapmaker 2.0. Compared to the original Snapmaker, the CNC module on the Snapmaker 2.0 has been improved and now has better concentricity, uses an ER11 collet, and can yield more consistent and accurate results.
It’s possible that you can swap the default collet on the Snapmaker 2.0 to different sizes, according to your needs. It’s worth noting that the CNC module is compatible with a broad range of bits, from 0.5 to 6.35 mm in diameter. This, in turn, enables you to unleash your creativity on a wide variety of materials.
Furthermore, you can also adjust the speed of the spindle between 6,000 and 12,000 RPM (Rotations Per Minute), which further increases the compatibility of the Snapmaker 2.0 with various projects and materials without significant effort.
The Snapmaker 2.0 also has an MDF CNC carving platform that encompasses a wasteboard and clamp set, so that you can easily secure the components you want to perform the CNC carving on without worrying that it will come off or shift while you’re processing it.
Last, but not least, here’s yet another reason why you will definitely need an enclosure for your Snapmaker 2.0: CNC carving generates a lot of noise, and having an enclosure can keep this noise level down by up to 10 dBA (under controlled conditions).
Snapmaker 2.0 Features
Other nifty features of the Snapmaker 2.0 include:
- Machine and enclosure are built from aero-grade aluminum alloy
- Snapmaker 2.0 uses the CAN (Controlled Area Network) bus system, which has high adaptability and versatility
- The modular design and standardized ports enable you to switch to different functionalities
- Comes with an Android-based 5-inch touchscreen that’s built on a quad-core processor
- Supports OTA (over-the-air) updates
- Proprietary slicing software Snapmaker Luban with 3-in-1 functionality
- Includes Wi-Fi functionality
- Snapmaker 2.0 pauses automatically upon detecting that one or both enclosure doors are opened during CNC carving or laser engraving
- Includes controllable LED strips that let you check on your projects at any given time
All things considered, if you are looking for an amazing piece of machinery that can perform 3D printing, laser engraving and cutting, and CNC carving, then you can’t go wrong with Snapmaker 2.0. It features everything you need to get started and offers you a highly intuitive experience, whether you want to 3D print, engrave, carve, or cut.
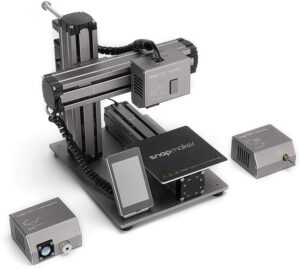
View price on Amazon2. Snapmaker Original
We feel like we should’ve started with this one, but there’s a perfectly good reason why we’ve decided to leave Snapmaker Original in the second place: the Snapmaker 2.0 is an upgrade of the Original version, and thus it’s simply better. Surely enough, the Snapmaker Original is not to be ignored either, but its successor truly deserves the 2.0 in its title.
The Snapmaker Original is actually a great machine for starters, so if you have no idea what to expect from a 3D printer that can also perform laser cutting and engraving, and also CNC carving, then this unit is the perfect place to start this journey.
This machine sparked the curiosity of many when it raised a tremendous amount of $2.2M on Kickstarter. By no means was the Snapmaker Original the first 3D printer that could also perform CNC carving, engrave and cut with a laser, but it was the first one that was truly accessible to the general public.
The Snapmaker Original is still one of the best choices when it comes to entry-level 3D printing, but on top of that, you also get the ability to create marvelous projects by engraving on various surfaces using laser, cutting using laser, and even carving using the CNC head.
It’s true what they say, that focusing on several fields at the same time (such as the Snapmaker Original does) translates into average results for each field separately, but this doesn’t mean at all that the Snapmaker Original is an average machine. In fact, it still yields remarkable results, considering its low price range.
Snapmaker Original Review
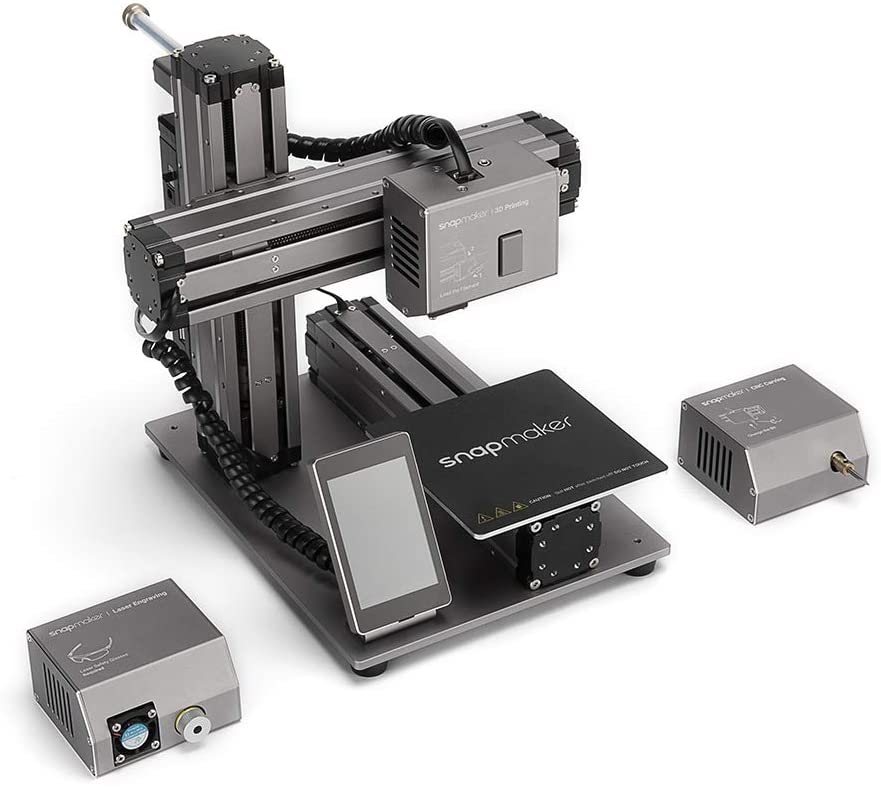
But let’s start at the beginning. First of all, the Snapmaker Original isn’t available in different sizes (i.e., different build volumes). The only model of Snapmaker Original you could buy is capped at 125 x 125 x 125 mm, which is quite small for a 3D printer, but enough if you’re just starting your journey as a maker.
Furthermore, the fact that it only has that one size available means that there won’t be any price variation, and you won’t have to feel like you’re compromising on size in favor of price. This is quite important, seeing as the Snapmaker 2.0 comes in three sizes, and the price differences between them are quite something.
Finally, it’s worth mentioning that the Snapmaker Original doesn’t come with an enclosure. However, if you want one (we strongly recommend it), you only have to pay about €100 more for the enclosure, as opposed to the upgraded version, where you have to pay four times as much for the smallest enclosure.
The purpose of this tool is rather education-oriented than for hobbyist makers, considering that each order of the Snapmaker Original includes a practical educator’s guidebook that covers several teaching plans. That way, teachers can easily integrate not only 3D printing, but also CNC carving, and laser engraving in their classroom in a seamless manner.
As opposed to its successor, the Snapmaker Original doesn’t take up a lot of space and weighs a lot less, so that you can easily set it up on your writing desk without significant effort. Want to move it around or bring it with you to a trade fair or convention? You can easily do that, too.

Many novice makers are worried about their limited set of skills that would impede them from using their 3-in-1 3D printers at their full capacity, but Snapmaker Original features a lot of video tutorials, user manuals, and quick start guides that will not only help you get started but also hone your maker skills.
Intuitive Design
These helpful resources combined with the intuitive interface design of the Snapmaker Original and streamlined workflow that it facilitates will make sure that you won’t miss a thing when it comes to interacting with this 3-in-1 printer, as well as understanding and unleashing its full potential.
Whether you’re a novice or an expert maker, the Snapmaker Original should offer you an intuitive, streamlined experience so that you won’t waste a lot of time wondering where certain features can be found or how to use them effectively.
Like the Snapmaker 2.0, the enclosure for the Original Snapmaker can and does protect you from a lot of stuff, such as fumes when printing with certain materials (ABS or nylon), fumes that are released during laser engraving operations, as well as noise whenever you’re using the CNC carving head.
When working with some materials, CNC carving can also be hazardous, considering that small parts of carved objects (materials) could fly your way, and an enclosure can help you get rid of that. It’s worth mentioning that an enclosure can reduce the volume of the noise generated by CNC carving by up to 10 dBA.
However, you should be aware that this noise level reduction was observed in laboratory conditions, so this value could vary based on various factors, such as the size of your room, the material you’re carving, the speed of the spindle, as well as the distance between you and the Snapmaker Original.
Snapmaker Original comes with a free 3-in-1 software solution called the Snapmaker Luban, which enables you to create carving, laser engraving, or 3D printing projects without significant effort, all from the same place.
Snapmaker Luban is easy to customize and calibrate so that it fits the requirements of your current project, and if you don’t want to waste a lot of time configuring various parameters, you can just use it as it is with its default settings, as they’re also pre-defined for impressive results.
The Snapmaker Luban is capable of generating GCODE files that you can send to the Snapmaker Original in order to start a 3D printing project, is easy to calibrate, comes with an intuitive, streamlined design, includes a layer slicer for path inspection, and provides you with full support for vector engraving and carving.
Modular Design
We’ve already established that the Snapmaker Original has a modular design. However, this doesn’t only mean that this unit can be upgraded without significant effort; it also means that you can create custom pieces to fit your own needs, such as bit holders for your CNC bits, filament spool holders, or filament guides.
If you’re both creative and a tinkerer, you’ll most likely have a lot of fun with the Snapmaker Original, considering the number of upgrades you can improve it with to make it more personal, not to mention the fact that you could design most of these upgrades by yourself.
However, there are some upgrades that you can simply buy and apply to your Snapmaker Original if you want to make it more powerful, or you want to focus more on one of its capabilities. For instance, you can upgrade its 200 mW laser to a 1600 mW one, which means that you’ll have a laser engraving and cutting machine that’s 8 times as powerful.
Snapmaker Original can work with a plethora of materials, including PLA, PETG, and ABS for 3D printing, wood, bamboo, plastic, leather, fabric, non-transparent acrylic, and paper for laser engraving, and PCB, wood, acrylic, jade, and carbon fiber sheet for CNC carving.
We’ve talked about the Snapmaker Original’s multiple uses, but we didn’t mention how easy it is to replace modules. Well, thanks to its modular design, Snapmaker Original made it extremely easy to replace the current module with a different one.
How To Replace Snapmaker Original Modules
All you have to do is unscrew the four hex screws (you’ll obviously need a suitable hex tool for the job), detach the cable, fasten the module you want to attach with the same hex tools you’ve unscrewed earlier, and then attach the dedicated RJ45 module cable.
Even if you have no previous experience as a tinkerer, you’ll find replacing modules not only incredibly easy to perform but also kind of rewarding, as it definitely seems like a big deal to make a machine do something entirely different just by replacing the head it works with, whether it’s printing laser engraving or CNC carving we’re talking about.
Depending on what module you’re switching to, you’ll also want to replace the work surface accordingly. For instance, if you’re switching from 3D printing to laser carving, you’ll also have to replace the heated bed with the engraving platform, which can be easily done by removing four screws at the bottom of the heated bed, placing the carving surface, and securing it using the same screws.
When it comes to calibration (for instance, calibrating the laser engraving unit), things could be a bit more difficult, since the Snapmaker Original doesn’t have the same awesome auto-calibration features that its successor (the Snapmaker 2.0) comes with.
As a result, you’ll have to go through manual calibration each time you replace the work module. For instance, if you’re switching to the laser module, you need to focus the laser to a point. This process uses a focusing ring to make things easier for you and the machine’s Z-axis height.
To wrap it up, if you’ve decided that you need a 3-in-1 3D printer in your life, but you’re not exactly ready to spend a lot of money on it, then the Snapmaker Original is an excellent choice. It’s an incredibly intuitive machine, and while it doesn’t pack as many awesome features as its successor (the Snapmaker 2.0), it’s still able to yield some pretty impressive results.
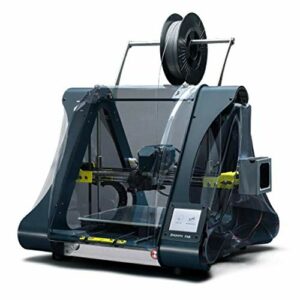
View price on Amazon3. ZMorph Fab
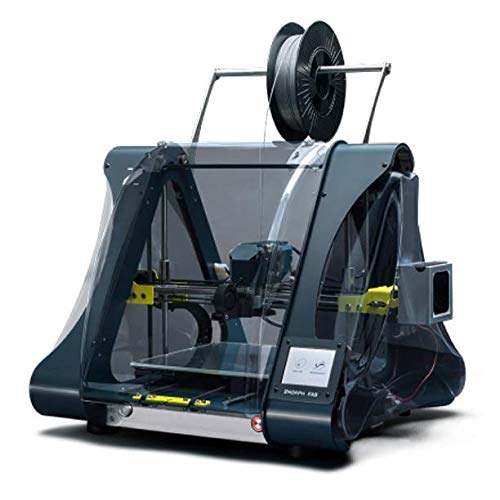
We’re quite aware that we’ve created a list comprising the best ‘3-in-1 3D printers’, which is why the ZMorph Fab could cause a little bit of confusion among our readers. The reason why any of you would be confused by this product would be its very utility: the ZMorph Fab is actually a 4-in-1 3D printer.
If you read mostly everything in this guide to this point, you should be familiar with the operations that a 3-in-1 printer can achieve. Namely: 3D printing, CNC milling, as well as laser cutting, and engraving.
The ZMorph Fab can cover all of that, but in addition, also features a thick paste extruder. This incredibly awesome addition means that you can use edible materials such as chocolate, icing, and even dough if you’re creative enough. The thick paste extruder may seem a bit too much, but if you’re a creative spirit and want to turn a profit from your hobby, that’s the way you’d want to go.
ZMorph Fab Review
First thing’s first, the fact that the ZMorph Fab is a multifunctional 3D printer means that you will have to change its working head (the tool currently in use) in order to switch through the machine’s different functionalities. Furthermore, you’d probably go for a machine that allows you to change the tools you’re working it without too much effort.
The ZMorph Fab allows you to replace the tool you’re currently using without breaking a sweat. If you’ll follow the instructions enclosed in the user guide to replace the 3D printer tools it shouldn’t take you longer than a minute to perform this operation.
Some makers believe that multipurpose 3D printers such as the ZMorph Fab are spread too thin. In other words, this means that generally speaking, 3D printers that are not only focused on printing objects from 3D models but also cut with laser or mill with CNC will lose some of the performance of each operation they’re capable of.
However, ZMorph Fab has them stand corrected since this amazing piece of machinery is capable of creating with certain materials that are not even available to single-purpose 3D printers (i.e., 3D printers that can’t do anything else aside from 3D printing).
This impressive compatibility with a lot of materials doesn’t only apply to 3D printing, though. In fact, there’s an outstanding list of materials that the ZMorph Fab is compatible with, be it the 3D printer, CNC milling, or laser cutting head you’re trying to work with. You can find the complete list below:
3D Printing Materials
- PLA
- ABS
- PET-G (PETG)
- Nylon
- HIPS
- ASA
- PMMA
- TPPE
- PC (Polycarbonate)
- PC/ABS
- PP (Polypropylene)
- PVA
Laser Cutting And Engraving
- Leather
- Felt
- Laser Foil
- Cardboard
- Foamiran
- Wood Fiber Boards
- Plywood
- Wood
- EPP
- EVA Foam
- Neoprene
CNC Milling
- ABS
- Nylon
- HDPE
- PTFE
- PC (Polycarbonate)
- PP (Polypropylene)
- POM
- PMMA
- PVC
- HIPS
- LDPE
- PET
- Carbon
- CCL FR4
- Dibond
- TCF
- Wood
- Plywood
- Wood
- Wood Fiber Boards
- Aluminum
- Brass
- Cardboard
- Copper
- Machining Wax
- Modeling Boards
- Styrodur
As you can see, it’s quite an impressive variety of materials that the ZMorph Fab can process, whether it’s through its 3D printing head, its laser cutter, and engraver, or CNC machining head. For obvious reasons we didn’t include the chocolate and other edible materials, you can print with the thick paste extruder. That’s entirely up to you.
An awesome feature that ZMorph Fab boasts is the fact that you won’t have to spend a lot of time and invest your energy into assembling machine parts into a fully functional machine. In fact, the ZMorph Fab comes fully functional as-is, meaning that you just buy the 3D printer, unbox it, place it on your desk and start using it.
Automatic Calibration
Additionally, you won’t even have to perform any calibration or configuration, whether it’s after you just unboxed the printer and thought about starting a new project, or after changing the working tool. The ZMorph Fab detects the tool you’ve attached automatically and re-calibrates the entire machine to perfection so that you can just start making without worrying about configuration steps, calibration, and other trivial things.
The ZMorph Fab works with almost every plastic filament (almost every plastic material) that’s currently available on the market. It’s not uncommon for multipurpose 3D printers to have limited support for materials they can print with, but ZMorph Fab just keeps delivering. But that’s not everything that this device has to offer.
The autocalibration feature we’ve talked about above isn’t just there to help you save some time while switching the different tools of this 3D printer. Instead, it can enhance the way the machine adapts itself to various projects or printing with different materials so that you can focus more on your projects instead of researching calibration tips online or testing various settings.
Therefore, you can yield truly remarkable results even as a complete novice who has never touched or seen even a single-purpose 3D printer before, let alone a multipurpose one such as the ZMorph Fab.
Furthermore, the fact that the ZMorph Fab has multi-material support virtually means that you will be able to print your favorite projects with water-soluble supports so that you could remove your objects from the projects by simply dunking them into water.
Sturdy Hardware & Software Components
ZMorph Fab is built out of heavy-duty aluminum plates that ensure an incredible level of rigidity to the machine and protect its moving parts and electrical components from various harmful elements such as dust or loose debris from CNC milling.
Aside from providing the machine with an incredible level of protection, the sturdy build of the ZMorph Fab also means that you’ll have better stability when printing, whether you’re printing with one or two materials at the same time. Furthermore, the ZMorph Fab has been designed to withstand CNC operations, which are known for their high level of vibrations that could destabilize the machine and, in turn, alter the results of your projects.
In terms of build, the ZMorph Fab is unmatched thanks to its incredible reinforced Cartesian XZ-head motion system that is also doubled up with dual glass-fiber-reinforced belts. This technology helps the machine (and, of course, you) reach a whole new level of performance and create objects with even more stability and accuracy.
Obviously, ZMorph Fab doesn’t do it all by itself and relies heavily on an equally sturdy software component. The software utility that’s paired with the ZMorph Fab is also an AIO (all-in-one) tool, considering that you can use it for 3D printing, laser cutting, CNC machining, and engraving.
Prints Edible Materials
Yes, we’ve also mentioned that you could use the thick paste extruder to create 3D prints out of edible materials such as chocolate, icing, or cookie dough, but you won’t need a separate software program for that; just use the 3D printing feature as you would with any other type of plastic filament.
An important aspect of the ZMorph Fab is that this machine, much like any other multipurpose 3D printer, can emanate a series of harmful elements while functioning, especially during its operation. Whether it’s 3D printing, engraving, or cutting we’re talking about, multipurpose 3D printers can create particles and fumes you shouldn’t get in contact with.
On the plus side, the ZMorph Fab features a combination of HEPA and carbon filters that can easily remove both particles and fumes that are generated through 3D printing, laser engraving, or laser cutting. Additionally, the machine will also notify you when it’s time to change the filter, so you’ll always stay in the know as far as air health is concerned.
ZMorph Fab features a professional-grade worktable that boasts a simple, yet very effective solution to help you mount materials to it (you know, so they don’t slip while you’re trying to mill them). As a result, you’ll be able to work with objects of various shapes and sizes, and ones that are built out of a broad range of materials.
The software component of ZMorph has been updated so that now it encompasses several awesome features, including but not limited to path visualization, the ability to replace the tool within the same GCODE (for instance, you can print an object then engrave it within the same GCODE), and CAM-standard workflow for CNC procedures with STEP operations.
Reduced Noise Levels
Here’s another awesome feature that you’re not likely to find with other similar products: reduced noise levels. Usually, the more moving parts a 3D printer has, the more noise it will generate, and that’s not just a myth, that’s a fact. The ZMorph Fab generates such a low level of noise during its runtime that you’ll easily be able to work next to it.
The design of this 3D printer, along with the high quality of the electronics being used and the drivers that were carefully programmed, all contribute to providing you with an almost silent multipurpose 3D printer. It goes without saying that electronics and drivers make the very soul of this machine, and you can rest assured that only the best materials were used for these parts.
Furthermore, judging by the quality and sturdiness of the materials being used, you’ll be able to enjoy an industry-grade machine at the price range of a high-end desktop all-in-one 3D printer. As a result, you’ll be able to enjoy a tremendous level of repeatability and reliability, regardless of what your projects are.
We’ve already mentioned the software component of the ZMorph Fab and some of the impressive things it’s capable of. What we didn’t mention, however, is the software’s materials presets that you can either customize or create new ones from scratch. Instead of wandering around the Internet looking for the best settings for your print, just take a look at Voxelizer’s list of presets because you may find something that fits your project’s needs perfectly.
Last, but not least, we’d like to bring into discussion the fact that the ZMorph Fab has a seamless interface. We’ve already established that it needs no calibration as it can handle that by itself, no configuration is needed and that it works right out of the box. All of these combined with the streamlined user interface of the ZMorph Fab contribute to quicker and easier interaction with the machine, even if you’re a complete beginner.
However, that’s not to say that the machine is specifically designed for novices. The fact that it provides you with a plethora of industry-grade features, as well as the fact that you can configure a broad range of complex options, means that it’s also an excellent fit for professional makers.
ZMorph Fab Features
Check out the full list of specifications of the ZMorph Fab below:
- 3D Printing
- Technology
- FFF (Fused Filament Fabrication)
- Tools
- Single extruder 1.75
- Dual extruder
- Layer resolution
- 0.05 mm – 0.4 mm
- Printing Temperature
- Maximum 250 degrees Celsius (Hotend)
- Maximum 115 degrees Celsius (heated bed)
- Work Surface
- 235 x 250 x 165 mm
- Accuracy
- 0.2 mm (minus plus)
- Leveling Method
- Automatic
- Manual
- Material Diameter
- 1.75 mm
- 3.00 mm
- Nozzle Diameter
- 0.3 mm
- 0.4 mm
- 0.5 mm
- 0.6 mm
- Printed Supports
- Either mechanically or chemically removed
- Printed with the same material as the object
- Connectivity
- Ethernet
- USB
- SD Card
- Speed
- Work Speed – 40 mm per second
- Travel Speed – 120 mm per second
- Supported Materials
- PLA, ABS, PET, Nylon, PVA, HIPS, ASA, TPE, PP, PC, PMMA, PC/ABS
- Works with third-party materials as well
- Technology
- CNC Milling
- Tool
- CNC Spindle
- ER-11 Collet Tool Holding
- Power
- 300 W maximum spindle power
- Noise level
- Up to 70 dB
- Leveling Method
- Manual
- Work Surface
- 235 x 250 x 85 mm
- Speed
- Work speed – 0.1 ~ 20 mm per second
- Travel speed – 120 mm per second
- Supported Materials
- ABS, Nylon, HDPE, PTFE, PC, PP, POM, PMMA, PVC, HIPS, LDPE, PET, Carbon, CCL FR4, Dibond, TCF, Wood, Wood-like, Aluminum, Brass, Copper, Cardboard, Wax, Modeling board, Styrodur
- Tool
- Laser Engraving And Cutting
- Tool
- Laser
- Laser Specifications
- Spot size for 50 mm – 0.1 x 0.1 mm
- Spot size for 80 mm – 0.1 x 0.18 mm
- Wavelength – 450 nm
- Laser Class – 4
- Power – 2.8 W
- Noise – 40 dB
- Leveling Method
- Manual
- Work Surface
- 235 x 250 x 85 mm
- Speed
- Work speed – 15 mm per second
- Travel speed – 120 mm per second
- Supported Materials
- Wood, wood-like, leather, paper, cardboard, felt, foil, laminate, EPP, EVA Foam, CCL FR4
- Software
- Supported File Types
- .stl, .obj, .step, .dxf, .png, .bmp
- Supported File Types
- Filtration Parameters
- Filter Type
- HEPA / Carbon
- Filter Specifications
- Power – 1.54 W
- Filter dimensions – 80 x 80 x 25 mm
- Filter system dimensions – 85 x 85 x 50 mm
- Filtration Control
- Temperature
- Filter Type
- Tool
We’re quite confident that if your description still had you on the fence about whether or not you should be investing in a ZMorph Fab, seeing the full list of specifications surely tipped the scales one way or another.
The bottom line is that the ZMorph Fab is a truly remarkable machine, considering that it can easily cover all the features that any other 3-in-1 3D printer can, but it also has the thick paste extruder component that enables you to create culinary works of art by printing with chocolate, cookie dough, icing, and many other edible materials that can be extruded.
View price on Amazon4. Creality CP-01
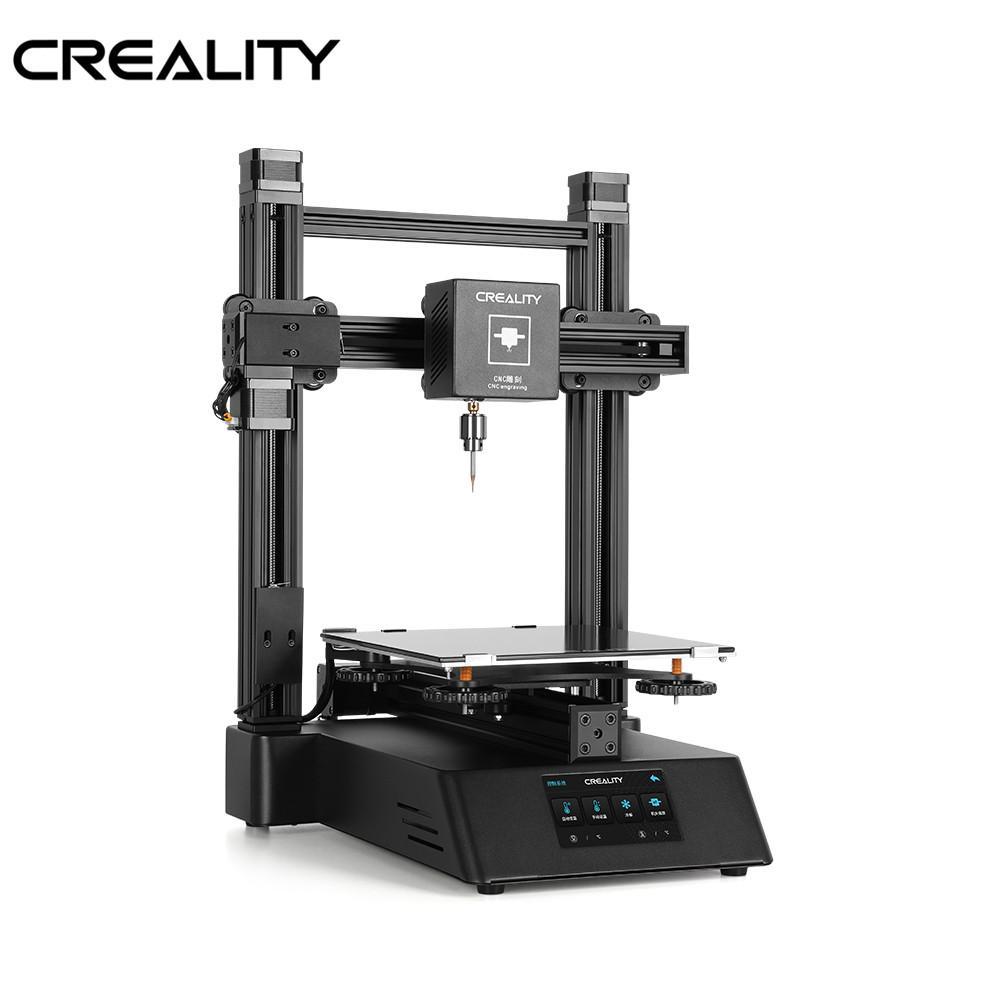
Perhaps one of the most fitting ways to start describing the Creality CP-01 modular 3D printer is to tell you about its incredibly low price. Most of the time, you can find this impressive multipurpose 3D printer revolving around the $800 price range, but if you’re lucky enough, you could even grab it for a couple of hundred bucks cheaper.
That’s sort of the Creality trademark, seeing as most of their products can be purchased at incredibly low prices. However, this doesn’t mean at all that this machine is worth being overlooked just because it’s cheaper. If we learned one thing from Creality is that you can have a solid 3D printer without paying a fortune for it, and the same goes for the Creality CP-01 when it comes to 3-in-1 3D printers.
This machine is truly a 3-in-1 3D printer, seeing as it can perform 3D printing, CNC cutting, and laser engraving. These operations can provide you with a full crafting experience, whether it’s CNC machining, laser engraving, or simply 3D printing you’re trying to achieve.
Creality CP-01 Review
If you want the short version of what Creality CP-01 can help you achieve, here it is: it can provide you with accurate 3D printing with nearly invisible layer lines, smooth CNC model cutting with nearly flat surfaces, and a laser engraving tool with minimal positioning error so that you can enjoy accurately engraved models.
The list of supported materials isn’t nearly as complex as that of some more expensive multipurpose 3D printers (such as the ZMorph Fab), but it still gives you plenty of elbow room. Here’s what Creality CP-01 allows you to work with (as extracted from the official product page):
- 3D printing: PLA, ABS, PVA, TPU, PETG
- CNC machining: paper, wood, plastic, leather, PCB, and others
- Laser engraving: PCB, paper, wood, leather, plastic, and others
Probably this machine supports many other materials, but those aren’t specifically mentioned by the producer, so you might need to experiment for a while if you want to discover some of Creality CP-01’s hidden capabilities. Either that or you can visit online communities built around this product and find some more info there.
Creality CP-01 is, first of all, a modular machine, meaning that you can replace some of its components in order to switch the machine’s operation mode. In our case, you have a 3D printer head, a laser engraver unit, and a CNC cutting module to work with.
Intuitive Modular Design
Thanks to Creality CP-01’s intuitive design, you don’t need a lot of experience to replace the machine’s working heads. All you have to do is to remove the screws that hold the current module in place, position the new working head accordingly, then fasten the tool you want to work with using the same three screws.
If you already know where the screws are and what module you’re going to install next, the entire operation should take you more than 30-45 seconds. Now here’s another awesome thing about the Creality CP-01: it uses standard modules in its assembly, and we’re not talking about just the main operation heads (i.e., 3D printer, CNC machine, laser engraver), but other components as well.
For instance, you could easily add an automatic leveling sensor that will help you save a lot of time manually adjusting the printing surface (bed) by performing this operation automatically. By default, the Creality CP-01 comes with an easy-leveling nut that you can easily rotate to adjust the leveling of the working surface. Another fine example would be adding an extender to the Creality CP-01 so that you will get a larger print volume.
As we’ve previously mentioned above, Creality CP-01’s material compatibility isn’t limited to the items we’ve listed above, as those are merely the ones we’ve extracted from the manufacturer’s website. As far as 3D printing goes, you could probably load any material that is compatible with up to 100 degrees Celsius on the heat bed and up to 260 degrees Celsius on the hot end.
Accurate Laser Engraving
The laser engraving unit of the Creality CP-01 is remarkably precise, as it is capable of engraving with minor deviation. Accuracy is one of the biggest issues that laser engravers have to face, but fortunately, Creality CP-01 doesn’t fall in this category.
Although this machine comes with a default laser engraver head, that doesn’t mean you should stick with it until the end of time. In fact, this 3-in-1 3D printer is compatible with laser heads of varying power, so you can choose a module that suits your needs better and install it in place of the default laser engraver of the CP-01.
In case you didn’t know, the different powers of the laser engraving unit mean that you’ll have a wider variety of materials you could work with. Having more powerful laser engravers means that you could work with more difficult materials that require a higher temperature to be processed.
As far as CNC cutting goes, you shouldn’t expect the Creality CP-01 to work wonders. It’s still a decent piece of machinery, but it won’t be able to carve its way into more pretentious materials such as some of the more expensive units in our guide can (just take a look at ZMorph Fab’s supported material list).
That being said, it’s worth mentioning that the Creality CP-01 can create incredibly detailed models with smooth finishes, whether you’re working with plastic, wood, paper, or PCB. As we’ve mentioned above, it may be capable of processing even more materials, but we didn’t find any information about this on the product page, nor were we able to test our theories on our Creality CP-01.
Different Build Sizes
Now here’s another thing that many 3D printer manufacturers (and makers) have to deal with: maximum build volume. The fact that you have to compromise on build volume if you want to buy a cheaper 3D printer (especially if it’s a multipurpose unit such as the Creality CP-01) is absolutely heartbreaking.
However, Creality CP-01 takes a swing at it and shows us that this is not a given; this 3-in-1 3D printer has one of the most generous build volumes for its price range, whether we’re talking about 3D printing, CNC machining, or laser engraving. To be more specific, these build volumes are:
- 3D printing – 200 x 200 x 200 mm
- CNC machining – 200 x 200 mm
- Laser engraving – 100 x 190 mm
These build surfaces give you plenty of space to create your projects. Although they’re not exactly huge, these surfaces can accommodate the volume requirements of many makers and their projects.
Sturdy Build
The Creality CP-01 is built on an industrial-grade aluminum frame that will not only ensure that the 3-in-1 unit itself is a sturdy piece of machinery, but it will also increase the stability of the machine, which will subsequently translate into more accurate prints, CNC machined models and laser engravings. In other words, more sturdiness means more stability means more precision.
Furthermore, the Creality CP-01 has a full-belt drive that ensures you’ll be able to create high-quality models thanks to the better stability that comes with this upgrade. Full-belt drives are remarkably more stable than threaded rod guide rails and can yield better results.
This 3-in-1 3D printer boasts a high-quality V-slot profile and pulley structure that will ensure even more stability and smoothness, along with a low level of noise, longer lifespan of the unit and its components, and higher wear-and-tear resistance of the machine’s components.
Power Panic Included
If you’re worried about power outages ruining your print, you’ll definitely be glad to know that the Creality CP-01 comes with a PSU protection feature that can resume a print that fails because of a power outage. When the power comes back on, just tap the Yes button when the printer’s screen asks you if you want to resume the print.
After doing so, Creality CP-01 will resume the print EXACTLY from the spot where it stopped working during the power outage. This means that you won’t have to worry about long prints (20+ hours) being completely ruined because of a power outage, or you accidentally pulling out the power cord.
But power outages aren’t the only thing that could ruin your print. Power fluctuations can even burn your 3D printer’s motherboard, and Creality CP-01’s high-quality power supply can prevent such things from happening. This machine’s PSU has built-in wide voltage switches that automatically adapt the power to a stable level between 100 and 240V to ensure that your unit won’t become a useless paperweight until you repair it.
Creality CP-01 Features
If you’re still undecided whether or not you should stick with the Creality CP-01 as your default 3-in-1 3D printer, check out an extensive list of specifications of this machine below:
- 3D Printing
- Technology
- Fused Deposition Modeling (FDM)
- Build Volume
- 200 x 200 x 200 mm
- Print Precision
- ~ 0.1 mm
- Printing Speed
- Between 10 and 80 mm per second
- Temperature
- Heated Bed – Up to 100 degrees Celsius
- Hot End – Up to 260 degrees Celsius
- Layer Thickness
- Between 0.1 and 0.4 mm
- Nozzle Diameter
- Standard size of 0.4 mm, can be replaced with 0.6, 0.8 mm, 1 mm, and 1.2 mm
- Supported Filament
- PLA, PETG, ABS, PVA (1.75 mm)
- Slicing Software
- Cura, Simplify3D
- Accepted Formats
- STL, OBJ, AMF
- Technology
- CNC Machining
- Cutting Size
- 200 x 200 mm
- Supported Materials
- Wood, paper, plastic, PCB
- Supported Formats
- BMP, SVG, PNG, DXF, NG
- Spindle Speed
- Up to 4,800 RPM
- Cutter Size
- HRC55 tungsten steel milling cutter 4F 4*1
- Drill Chuck Clamping Range
- Between 0 and 4 mm
- Cutting Size
- Laser Engraving
- Engraving Size
- 100 x 190 mm
- Supported Materials
- Paper, wood, leather, plastic
- Supported Formats
- BMP, SVG, DXF, PG, NG
- Laser Power
- Less than 0.5W
- Engraving Size
As you can see, while the Creality CP-01 is not exactly a beast of a machine, it still has an impressive collection of features for its low price range. In other words, it won’t yield results as great as some of the more expensive units in our guide, but it will definitely impress you.
All things considered, if you’re on a budget and feel like getting a 3-in-1 3D printer instead of a single-purpose 3D printer (i.e., a 3D printer that can’t do anything besides printing objects from 3D models), then the Creality CP-01 is worth checking out. It’s sturdy, reliable, and intuitive enough that even novices can operate it without significant effort.
View price on Amazon5. 5axismaker
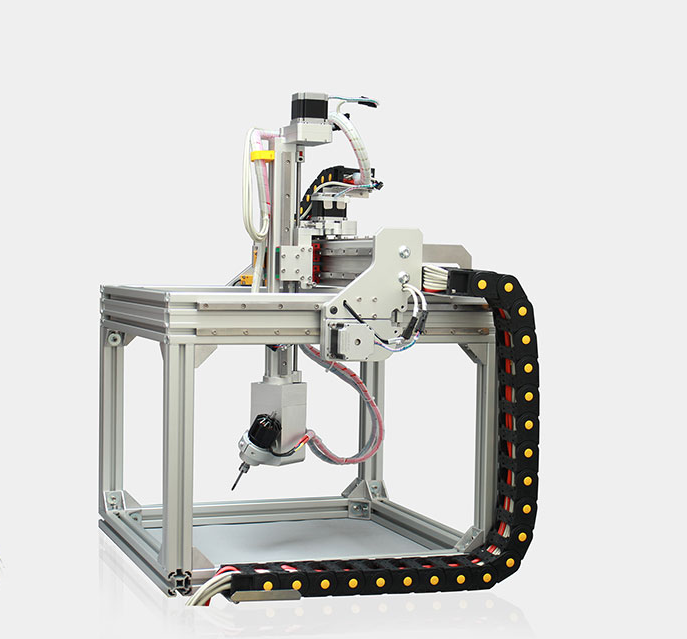
5axismaker is towards the expensive side of multipurpose 3D printers, considering that you can buy it for roughly £5,500 – £6,800, depending on the printer size you opt for. Obviously, the bigger the build surface, the more money you’ll have to pay for the unit.
5axismaker Review
Now that we got the financial aspect out of the way, we can focus on some of the more interesting aspects of the 5axismaker. While the topic’s still fresh, you should know that the 5axismaker comes in two flavors: the 5xm400, which has a build volume of 400 x 400 x 400 mm, and the 5xm600, which comprises a 600 x 600 x 600 mm build volume.
We can all agree that the 5axismaker is nothing short of incredibly generous when it comes to building surface, seeing as it boasts the absolute largest build volume in our guide so far. Seriously, if you’re looking for large build volumes, then 5axismaker is definitely worth checking out, as you won’t find anything similar in this price range.
First and foremost, it’s worth mentioning that, unlike other multipurpose 3D printers in our guide, the 5axismaker lacks an important feature: the laser engraving and cutting tool. In other words, the 5axismaker is only a 3D printer with CNC machining capabilities, or a CNC cutting machine with 3D printing abilities, depending on how you prefer to look at it.
However, this unit is not just another ordinary CNC milling machine or 3D printer. What truly sets the 5axismaker apart is the fact that it can work around 5 axes, as opposed to conventional 3D printers that can only work around 3 axes (X, Y, and Z).
Aside from the extruder head and the milling head, 5axismaker also allows you to attach a touch probe to it. However, if you want to receive and use the touch probe, you’ll have to contact the 5axismaker manufacturers directly. It’s worth noting that there are also other tools you could attach to the unit, but you’ll have to order them separately.
Upgrade, Repair, Maintain Easily
By default, the machine only comes with two main components, the extruder, and the milling head. Although it’s a complex piece of machinery, the 5axismaker is actually awesome when it comes to maintenance, since it encompasses modules that are incredibly easy to replace.
This basically means that whether you’re trying to repair the machine, maintain it or replace its active working head, you’ll be able to do so without significant effort, regardless of your potential lack of previous experience with similar tools.
5axismaker can provide you with a safe, reliable, and repeatable experience, whether you’re using it for its 3D printing or CNC milling capabilities. Each of the 5 axes of the unit relies on built-in induction sensors to ensure that you’ll have flawless results every time.
The tool heads use BC sensor homing, which means that the calibration and positioning processes are entirely automated so that you won’t have to waste precious time setting the machine up every time you’re starting to work on a new project. Automatic calibration and positioning work for both 3D printing and CNC milling projects.
Note that the working heads aren’t the only modules that you can replace on the 5axismaker. In fact, the machine has a convenient modular design that lets you replace most of the unit’s components without breaking a sweat. You just remove the module you no longer need and replace it with a different one in no time.
Furthermore, you can also find a nifty suspension mechanism that’s been attached to the stepper motors. This mechanism helps the unit prevent backlash and damage to the entire unit during a collision by putting a bit of distance between the parts that could get in each other’s way.
High-Quality Build
One thing that’s frequently overlooked in favor of shiny features is the quality of the materials being used to put the machine together. 5axismaker made no compromise and ensured that all of the components that are used to assemble the 5-axis CNC 3D printer are of top-notch quality.
Even the controller and power supply have been thoroughly tested to make sure that they work flawlessly in any country. The cables that the 5axismaker uses are shielded, branded ones that are widely used in robotics to transmit signals as accurately as possible.
The spindle/milling head combo boasts a brushless motor of 500-1000 W, a spindle speed of between 10,000 and 15,000 RPM (Rotations Per Minute), an ER11 collet, and can work with a broad variety of materials, ranging from foam, modeling and tooling board, to machinable wax, carbon fiber, engineering plastics, Corian, and even hardwood.
However, seeing as the machine can also create 3D prints of objects, let’s take a look at its 3D printing capabilities. The extruding head of the 5axismaker can handle a filament size of 1.75 mm and has a 0.6 mm nozzle. If needed, you can purchase additional nozzles of different sizes, ranging from 0.4 mm to 1.2 mm.
The 5axismaker doesn’t come with a heated bed, but it does come with an acrylic sheet you could use for PLA printing. It’s worth mentioning that the official product page only listed PLA and ABS in the list of supporting materials you could print with the 5axismaker.
5axismaker Features
If 5axismaker piqued your interest, but you’re still on the fence about purchasing this unit to use it as your main CNC milling machine with 3D printing capabilities, you can check the comprehensive list of specifications below, as it could help you make a decision faster.
- Dimensions
- 5xm400 – 790 x 580 x 800 mm /31 x 22 x 31 inches
- 5xm600 – 990 x 780 x 1000 mm /38.9 x 30.7 x 39.3 inches
- Weight
- 5xm400 – 72kg (in the box)
- 5xm600 – 93kg (in the box)
- Working Volume
- 5xm400 – 400 x 400 x 400 mm /15.7 x 15.7 x 15.7 inches
- 5xm600 – 600 x 600 x 600 mm /23.62 x 23.62 x 23.62 inches
- Resolution
- Mechanical
- XYZ axis: 0.036mm/ 36 microns /0.0014 inches
- BC-axis: 2 arcmin/ 0.034 degrees
- Electronic
- XYZ axis: 4.5microns
- BC-axis: 0.25 arcmin /0.0041degrees
- Mechanical
- Repeatability
- XYZ axis: 0.05mm /0.00196 inches
- BC-axis: 1arcmin
- Travel speed
- Max for XY– 15000mm per minute (X,Y) /590 inches per minute
- Max for Z -3000-6000mm per minute (Z) /120-240 inches per minute
- Max for BC – 20rpm(C) 20rpm(B)
- Power
- 1200W, 240-100V, 50/60hz, 13A (includes an IEC power cable for different countries)
- Connectivity
- USB
As you can see, while the 5axismaker does pack a great array of capabilities, it’s not even nearly as flashy as some of the other multipurpose 3D printers on our list in terms of awesome features (such as automatic air filtration, built-in enclosures). However, the 5axismaker is a great addition for any maker who needs the perfect CNC/3D printer combo.
The bottom line is that if you’re looking for a sturdy multifunctional 3D printer that lets you switch its modules without significant effort and provides you with an incredible level of reliability, sturdiness, and project quality (not to mention the huge build volumes), you should definitely check out 5axismaker.
6. Diabase H-Series
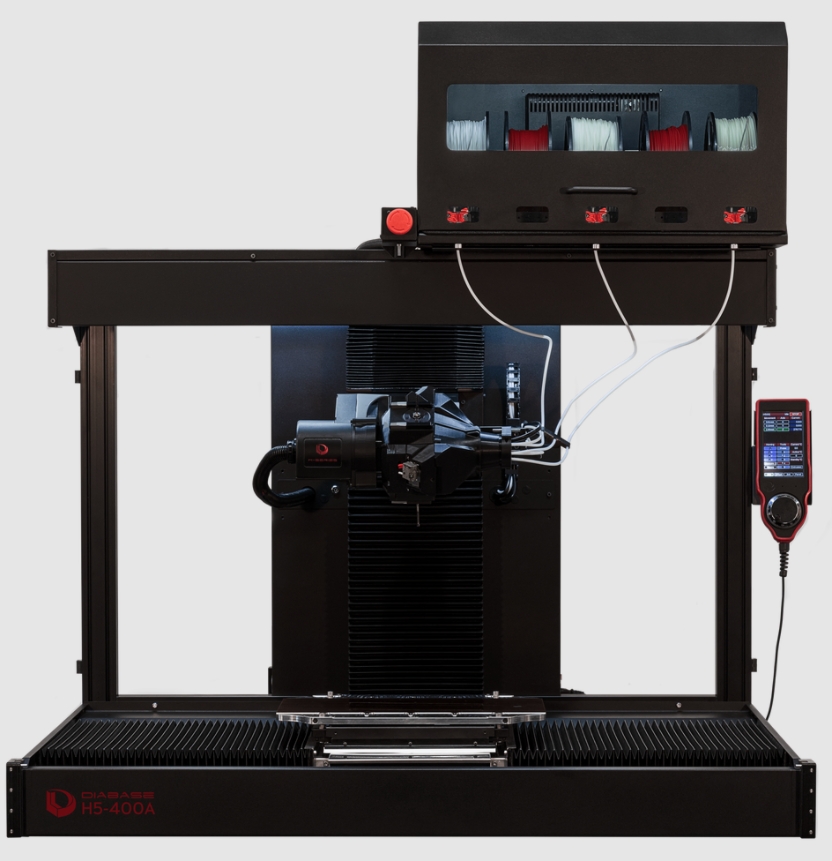
Diabase H-Series is yet another model of CNC mill 3D printer that you could purchase. However, this machine is preferred by small business owners, and its price range is obviously one of the most important reasons why. The price of one Diabase H-Series machine starts at about $9,750 and increases depending on the number of axes you want.
At the time being, Diabase offers three different options for customers who want to buy the H-Series model, and those are as follows:
- H5-400A Hybrid – capable of milling 3D printed parts, but doesn’t come with a tool plate, nor 4- or 5-axis upgrade
- H5-400A CNC Lite – comes with the 4- and 5-axis upgrade
- H5-400B CNC Full – includes all the features above, plus 4-material printing capabilities, a 14-tool changer, as well as a high-power spindle
Therefore, you get to choose what model from the Diabase H-Series you will stick with based on your needs and, of course, the budget you’re willing to allocate to buying a CNC 3D printer.
Diabase H-Series Review
One of the most impressive things you could do with a CNC 3D printer is using the unit’s 3D printing capabilities to create virtually any piece you want, then bring it to the desired shape using the powerful CNC milling component.
The fact that certain models in the H-Series come with 5-axis support is definitely impressive, considering that most 3D printers can print their models using only the X, Y, and Z axes. The extra two axes that the printers in the Diabase H-Series boast are an awesome addition, as they open an entirely new world of possibilities to CNC machine operators and 3D printers alike.
Furthermore, the 5-axis model also means that you could now be able to print impossible parts with strong adhesion without using extra support materials. In fact, the 5-axis system means that you could even print intricate models while using even less support material than with conventional 3-axis 3D printer systems.
The most expensive model of the Diabase H-Series is designed to support multi-material printing, which means that you can use not only different colors but also materials for your models. Furthermore, you can even produce high-quality 3D printed objects with interlaced materials without breaking a sweat, changing filament spools, or manually guiding the material through different extruders.
Certain models in the Diabase H-Series family of products even come with self-cleaning and priming nozzles so that you won’t need to worry about failing prints due to various technical issues such as over extruding, blobs, or the filament getting stuck in the extruder system.
Multi-Material Printing
Although we didn’t manage to get our hands on a complete list of materials that the machines in the Diabase H-Series support, at least we know that these units support milling materials as soft as ABS, but also harder ones such as aluminum, brass, and acetal.
As far as their 3D printing capabilities go, the Diabase H-Series machines support any 1.75 mm filament type, as long as they fall in line with the specifications of the machine. Diabase H-Series CNC 3D printers can handle nozzle sizes of between 0.15 and 1.2 mm in diameter, can reach a maximum bed temperature of 100 degrees Celsius and a maximum hot end temperature of 300 degrees Celsius.
The minimum filament durometer is 60 Shore A, which opens a new world of possibilities for creative 3D printing enthusiasts. Diabase H-Series CNC 3D printers have a Kapton build plate with quick-release magnetic latches so that you can not only remove the build plate easily but whatever is on top of it, as well.
Some examples of Shore A soft plastic objects include wiper blades, tire threads, shoe heels, and skateboard wheels. However, the Diabase H-Series 3D printers also support Shore D hard plastics, including cartwheels, toy blocks, PVC pipes, and even hard hats. This makes the printers in the H-Series line of products truly deserve to be in the industrial-grade category of CNC 3D printers.
Replaceable Build Platforms
We’ve mentioned earlier that the Diabase H-Series machines come with build platforms that are easily replaced. However, these build plates are varied, and they’re not at all as you’d expect, especially if you think that they’re your ordinary single-purpose 3D printer build plates. To be more specific, Diabase H-Series build plates include:
- 3-axis system
- Standard print bed
- Dovetail bed (lets you attach stock directly to the bed with M4 threaded holes)
- Flat vise (lets you adjust it to full width so that you can use it in various orientations)
- 4-axis system
- Rotary axis with ER32 collet (possible to upgrade it with a tailstock if you want to mill a longer stock)
- Opposed rotary axes (can hold rectangular pieces of stock or perform rotary processing using mandrels)
- Window frame fixture (enables you to clamp down long pieces of flat stock)
- 5-axis system
- Rotary + rotary + print bed (this system is available in small and large sizes to accommodate various requirements)
- Rotary + rotary + ER32 collet (enables the machine to hold round stock so it can mill it)
- Rotary + rotary + vise (enables you to hold square pieces of stock so you can mill them easier)
The Diabase H-Series machines feature a handheld pendant control, as opposed to other devices that rely on a touchscreen LCD allow users to interface with the units. Many swear by the touchscreen control mode, and it makes perfect sense considering that the same screen that’s used to provide you with information can be used to control the unit.
However, while working on the touchscreen, you could accidentally make the machine crash by initiating a wrong procedure or canceling the entire project. Depending on the size of the touchscreen and the spacing between various buttons and options, you could even press the wrong button on the screen, which could lead to ruining your project.
Handheld Pendant Control
With Diabase H-Series printers, you can opt for pendant control, which could bring you a series of benefits compared to using a touchscreen. For instance, pendant control offers you full tactile feedback from its scroll wheel while you’re using it, and you can actually feel whenever a command has been sent to the machine.
The pendant is also immediately responsive and doesn’t turn off (it has an always-on screen) so that you can adjust the movement of the machine swiftly and without significant effort. Furthermore, the pendant control eliminates the need for a computer (or other third-party control devices), as it provides you with everything you need to interface with the device effortlessly.
The fact that the pendant is connected through a 1.5 m cable to the controller makes it even more convenient, seeing as you can simply grab it and move it slightly away from the printer if you need to.
As we’ve previously mentioned, you can opt for a touch probe that you can mount on the machine, but you’ll have to contact Diabase directly. The omnidirectional touch probe allows you to benefit from automatic bed compensation, center finding, machine calibration, and edge detection.
That way, you won’t have to spend a lot of time finding the perfect settings for your projects, seeing as the Diabase H-Series machine will perform all these lengthy and cumbersome operations for you, granted you have the appropriate tool for the job (i.e., the touch probe).
Certain devices in the Diabase H-Series family of products come with a 5-station automatic tool changer that lets you load up to 5 tools that will be changed automatically while you’re working on your projects. For instance, if you’re printing a piece of stock that you want to mill, you won’t have to spend a lot of time changing tools, as the Diabase H-Series machine will take care of that for you.
Furthermore, the Diabase H-Series CNC 3D printer comes with a bed-mounted probe that can determine tool offsets semi-automatically. It has a hole pattern so that it can be mounted on multiple surfaces on any standard printing bed, vise bodies, and dovetail beds. Additionally, you can also use this utility to set tool XY offsets.
Diabase H-Series Features
Well, we can all agree that the Diabase H-Series machines have a generous selection of nifty tools you could use to create impressive projects. However, if you’re still on the fence about whether or not you should purchase such a machine, then here’s an extensive list of Diabase H-Series CNC 3D printers features to help you make up your mind:
- General Specifications
- Dimensions
- 1300 x 900 x 1200 mm (51 x 36 x 48 inches)
- Build Volume
- 3 Axis (XYZ): 416 x 186 x 375 mm (16 x 7 x 15 inches)
- 4 Axis (XZA): 416 x 275 mm (16 x 11 inches x infinite drive in A)
- 5 Axis (DHA): 150 x 275 mm (6 x 11 inches cylinder +- 100 A, infinite drive in C)
- Resolution
- 0.005 mm
- Mechanical Repeatability
- 0.01 mm
- Axis Alignment
- 1.8 arcmin
- Maximum Travel Speed
- 200 mm per second X, 200 mm per second Y, 50 mm per second Z
- Weight
- Up to 120 kg (265 lbs)
- Power Requirements
- 1200 W, 120-240 V, 50/60 Hz, 10 A
- Machine Control
- Handheld Pendant
- Connectivity
- Ethernet (via web browser)
- SBC (Raspberry Pi optional)
- Software
- Simplify3D
- Cura
- Fusion360
- HSMWorks
- Dimensions
- CNC Mill Specifications
- Spindle Speed
- Up to 12,000 RPM (Rotations Per Minute)
- Spindle Power
- 30W
- Chip Removal
- Compressed Air
- Maximum Cutter Length
- Up to 40 mm (up to 1.57 inches)
- Cutter Shank Diameter
- 3.18 mm (0.125 inches)
- Spindle Speed
- 3D Printer Specifications
- Filament Diameter
- 1.75 mm
- Minimum Filament Durometer
- 60 Shore A
- Maximum Extruder Temperature
- 300 degrees Celsius
- Maximum Bed Temperature
- 100 degrees Celsius
- Filament Type
- Any
- Nozzle Sizes
- Between 0.15 and 1.2 mm diameter
- Build Plate
- Kapton surface with quick-release magnetic latches
- Minimum Filament Cabinet Humidity
- 2%RH (at 25 degrees Celsius)
- Filament Diameter
To wrap it up, if you’ve been looking for an industrial-grade CNC 3D printer that will provide you with reasonable sturdiness, reliability, and a lot of nifty features, you should definitely consider checking the machines in the Diabase H-Series line of products out.
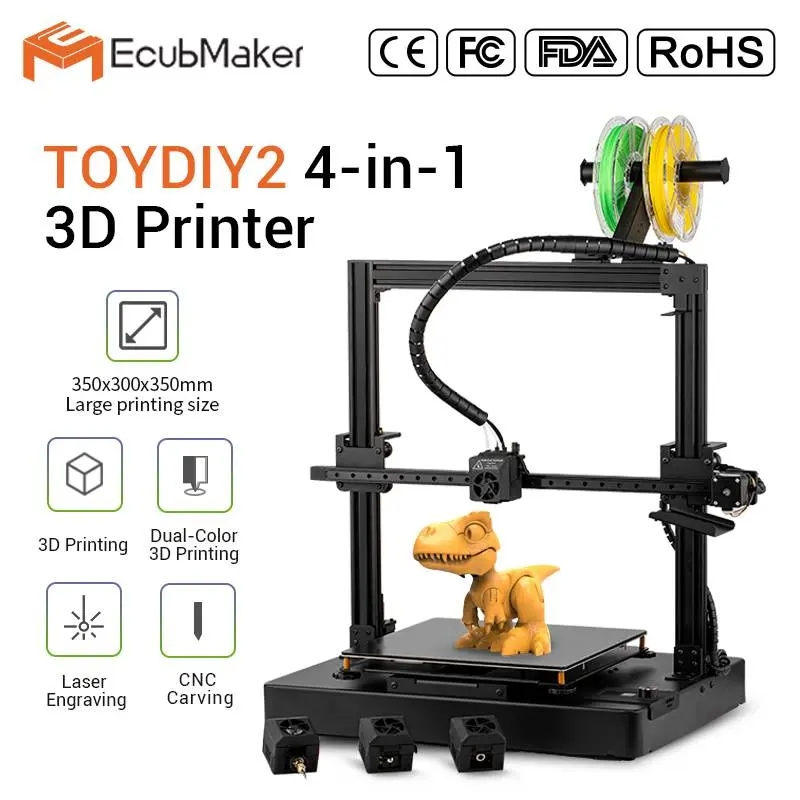
7. Ecubmaker TOYDIY2
Ecubmaker TOYDIY2 is yet another multipurpose 3D printer that you can use for 3D printing, CNC milling, and laser engraving projects by simply removing the head that it’s currently equipped on the machine and replacing it with another one that’s fit for the job.
Now there’s something that needs to be said about the Ecubmaker TOYDIY2 right before we start; although this machine advertises itself as being a 4-in-1 3D printer, one of its 4 functions is actually derived from 3D printing, and as a result, it falls in the exact same category.
To be more specific, Ecubmaker TOYDIY2 can help you perform CNC machining, laser engraving, FDM 3D printing, and FDM dual 3D printing. We can all agree that even if it involves processing filament through two different extruders, the dual FDM 3D printing is still 3D printing and shouldn’t be regarded as a separate function.
Ecubmaker TOYDIY2 Review
The Ecubmaker TOYDIY2 is actually an improved version of its predecessor, the TOYDIY original. As a result, the new and upgraded machine received a lot of awesome features, including an even larger printing size of 350 x 300 x 350 mm.
That way, you’ll know for sure that your projects will get all the room they need to grow, so you don’t have to resort to various workarounds, such as printing several parts and attaching or gluing them together.
As you’d expect from a multi-functional 3D printing machine, the Ecubmaker TOYDIY2 comes with 4 interchangeable modules that can be easily replaced one with another in no time. That way, you can easily switch through single or double-color 3D printing, CNC milling, and laser engraving without breaking a sweat.
The printer encompasses an awesome four-layer heated magnetic platform that is very convenient to print on, thanks to the fact that you can remove printed objects from it without having to use additional tools such as scrapers, cold spray, or other stuff.
You just have to remove the heated magnetic plate from the printer (you might want to leave it to cool off after finishing the print first), slightly bend it, and your print should pop right off the print surface. Afterward, you just put it back in place, and it should snap to the printing plate thanks to its magnetic insertions.
Automatic Bed Leveling
One of the most annoying things that a maker has to deal with is no other than leveling the bed. A printing bed that’s even slightly off will produce unwanted results such as warps or objects that don’t stick to a specific portion of the printing surface while getting smushed in a completely different region.
If you never had the chance to work with a 3D printer before, you’ll have to take our word on this: leveling the bed can be a painful experience with a lot of trial and error, seeing as you can’t level the bed without printing something on it and check every time if you got it right.
Well, thanks to Ecubmaker TOYDIY2’s automatic bed leveling feature, you won’t have to worry about setting the bed to its correct height in all the places. The printer uses a built-in sensor to ensure that the printing bed will always be leveled to the correct height no matter what.
It’s a known fact that an important part of a 3D printer is its software component, and we’re not talking about just the firmware. The software that you use to process the objects and projects you’re sending to be processed by the printer is equally important as everything else in the making process.
Ecubmaker TOYDIY2 comes with a 4-in-1 software solution that allows you to handle all four of the printer’s capabilities from the same tool, so you won’t have to look for specific utilities for CNC carving, laser engraving, single filament 3D printing, and dual filament FDM 3D printing.
For its single FDM 3D printing head the Ecubmaker TOYDIY2 has a 0.4 mm nozzle, can reach a maximum hot end printing temperature of 220 degrees Celsius, is capable of printing with PLA (not much variety), has a printing size of 350 x 300 x 350 mm and uses EcubWare as its slicing software.
You could probably use other tools for slicing models, but if a printer manufacturer offers you proprietary software, you should go with it. Proprietary software solutions usually yield the best results.
Dual Color 3D Printing
The dual-color 3D printing uses the exact same systems as the single-color FDM 3D printing system, the same nozzle sizes, and the same building volume. However, in terms of material variety, it’s still limited, which leads us to believe that the single 3D printing system is useless if you own the dual system.
Note that we didn’t say multi-material printing, since the Ecubmaker TOYDIY2 can only print using PLA, or so the official page of the product claims. This means that you won’t be able to create objects from PETG while using PLA supports, for instance. You can just print using different colored spools of PLA filament.
The laser engraving unit of the Ecubmaker TOYDIY2 boasts a laser power of 1500 mW and a wavelength of 405 nm. The working surface is still the same as for the 3D printing operations, so you’ll have 350 x 300 x 350 mm at your disposal to create intricate works of art using laser engraving.
As opposed to 3D printing, laser engraving supports a lot more materials. Well, not literally a lot more, since they’re only 3 supported materials, as opposed to the one (PLA) that you can process with the 3D printing unit, but still.
To be more specific, the laser engraving unit can work just fine on wood, leather, and plastic. Thus, if you need to engrave other materials using a laser, you may want to keep searching for a machine that allows you to do that.
Last, but not least, the CNC carving component is equipped with a high-speed 385 DC motor, has an input voltage of 24V, and can reach an RPM (Rotations Per Minute) value of over 10,000 (around 14,500 RPM). It’s worth mentioning that it works on the same build size (350 x 300 x 350 mm) as the 3D printer and laser engraver.
Using the CNC carving module, you’ll be able to process materials such as PMMA, plastic, PCB, and wood without breaking a sweat. If you want to experiment on other materials, do it at your own risk since the manufacturer doesn’t mention any other supported materials on the official page of the product.
Ecubmaker TOYDIY2 Features
If you still can’t decide whether or not you should buy an Ecubmaker TOYDIY2 and stick with it, check out a more complete list of specifications right below:
- Technology
- FDM 3D Printing
- Laser engraving
- CNC machining
- Bed Leveling
- Automatic
- Toolhead Type
- FDM Single 3D Printing Extruder (0.4 mm nozzle, up to 220 degrees Celsius)
- FDM Dual 3D Printing Extruder (0.4 nozzles, up to 220 degrees Celsius)
- Laser Engraver (1500 mW power, 405 nm wavelength)
- CNC Milling Head (40 W DC motor, 14,500 RPM spindle speed)
- Supported Materials
- PLA filament (3D printer)
- Wood, leather, plastic (laser engraver)
- Wood, plastic, PCB, acrylic (CNC milling)
- Build Volume
- 350 x 300 x 350 mm
- 3D Printing Accuracy
- +- 0.2 mm
- Positioning Accuracy
- Z-axis 2.5 um, XY-axis 11 um
- Layer Thickness
- Between 0.05 and 0.4 mm
- Printing Speed
- Under 40 mm per second
- Printing Platform
- Four-layer magnetic bed
- Automatic bed leveling
- The heated bed can reach up to 100 degrees Celsius
- Connectivity
- SD card
- Input
- 128 x 64 LCD screen (no touchscreen)
- Supported Formats
- STL and OBJ files as input
- GCODE as output
As you can see, Ecubmaker TOYDIY2 is not exactly top-of-the-line when it comes to features, but it’s still a more-than-decent multifunctional printer that can provide you with all the tools you need to make your hobby projects come to life.
The fact that it can only print with PLA could put you in a tough spot, especially if you’ve planned to print various projects using different materials. Furthermore, note that even though it comes with a dual extruder FDM 3D printer system, both extruders only support PLA, so the most you could do with it is print with multiple colors at the same time.
The bottom line is that if you’re looking for a cheap multipurpose 3D printer that has CNC milling and laser engraving capabilities, the Ecubmaker TOYDIY2 may be right up your alley.
Should I Be Getting a 3-in-1 3D Printer?
To wrap it up, when it comes to multifunctional 3D printers, there are several choices of machinery you could go with, which could make it a bit confusing for occasional or hobbyist makers. Our guide comprises cheap options, as well as more expensive ones you should only consider if you’re in the 3D printing/CNC milling/laser engraving & cutting business.
As you may have noticed, machines that are more expensive usually come with plenty of awesome features and are also more generous in terms of build volume. However, a large build volume isn’t necessarily an indicator of quality, seeing as certain machines may offer you huge build surfaces but lack several crucial features.
Our advice is that you should first make sure to assess your needs from your potential multifunctional 3D printer (e.g., whether you need a large build volume, a powerful laser, or a high-performance CNC head), take a good look at your budget, and then make your decision. Whatever you decide to go with from our guide, if it fits your needs, we guarantee that you won’t be disappointed.
3-in-1 3D Printer FAQs
Who makes Snapmaker2?
The team behind the original Snapmaker is the same ensemble that brought us the better, upgraded version of this 3-in-1 3D printer, the Snapmaker 2.0.
How much does a 3-in-1 3D printer cost?
It depends on the features and specifications it comes with. Therefore, you can find a decent 3-in-1 3D printer at less than $1,000, but you won’t be able to carry the same project difficulty as with a multifunctional 3D printer that costs $10,000.
What is a Snapmaker?
The Snapmaker is an all-metal 3D printer that’s capable of performing additional operations aside from creating 3D printed objects, such as CNC milling, and laser engraving. The original Snapmaker is an affordable unit, but the improved version of it called the Snapmaker 2.0 is not only more expensive, but it also comes in three different versions, each with a different build volume.
Can a 3D printer engrave?
To put it shortly, single-purpose 3D printers can’t engrave. If the 3D printer you bought doesn’t specifically mention that it’s capable of engraving through various means (laser, CNC) by replacing its working head or using a different method, then it’s not possible to engrave with it.
Is a Snapmaker worth it?
If you’re new to the world of 3-in-1 3D printing and want to discover the wonders of having a machine that can not only create 3D printed objects out of boring spools of filament but can also perform CNC machining and laser engraving, then yes, a Snapmaker is definitely worth it. If you’re looking for an affordable unit and don’t care much about flashy features, the Snapmaker Original is what you should be checking out. However, if you’re all about large build volumes, enclosures, and improved features, you should look into the Snapmaker 2.0.
Where is Snapmaker 2.0 manufactured?
Both the Snapmaker Original and the Snapmaker 2.0 are designed and manufactured by Snapmaker, a Shenzen-based company.
Can 3D printers laser cut?
No, 3D printers can’t perform laser cuts or engraving by default. You’d either have to be extremely crafty and resourceful to convert an ordinary 3D printer into a laser engraver, or you could go with one of the tens of models already available on the market that can 3D print, cut, and/or engrave with laser, and some of them even perform CNC milling.
Is laser cutting cheaper than 3D printing?
Not only are laser cutters more expensive than 3D printers (speaking from a per-unit standpoint), but they also use more power to work. Therefore, the answer to this question is no, laser cutting is not cheaper than 3D printing.
Can 3D printers cut wood?
No, 3D printers can’t cut wood; what you’re looking for is either a CNC machine that can perform cuts or carvings on wood, or a laser cutting machine that can cut through the wood using laser technology. There are several machines (such as some of the ones we’ve included in our guide) that can perform all three operations (3D printing, CNC machining, and laser cutting/engraving) by simply changing their working head.